The player above holds the whole tour of Git Gud, a desktop Git client with a lane-colored commit graph. It has 13 episodes, one per area of the app, and it plays them in order. You can also open the playlist on YouTube.
This page is the written version. Each section below is one episode, with what it says and the details.
The recordings use the real app against a demo repository called tidepool. The narration is a synthetic voice, and the titles and diagrams were made in Neon Video Studio.
The episodes
- Meet Git Gud
- Reading the commit graph
- Staging and committing
- Branches, tags, stashes and worktrees
- Working with remotes
- Rewriting history
- Conflicts and auto-fix
- Recovery and power tools
- Gerrit mode
- Settings and updates
- Peer connections
- The headless daemon and the relay
- The companion app
1. Meet Git Gud
This is Git Gud. It's a desktop Git client built around one idea: you should be able to see your history.
Every branch gets its own colored lane, and everything you do runs as a plain git command you can read.
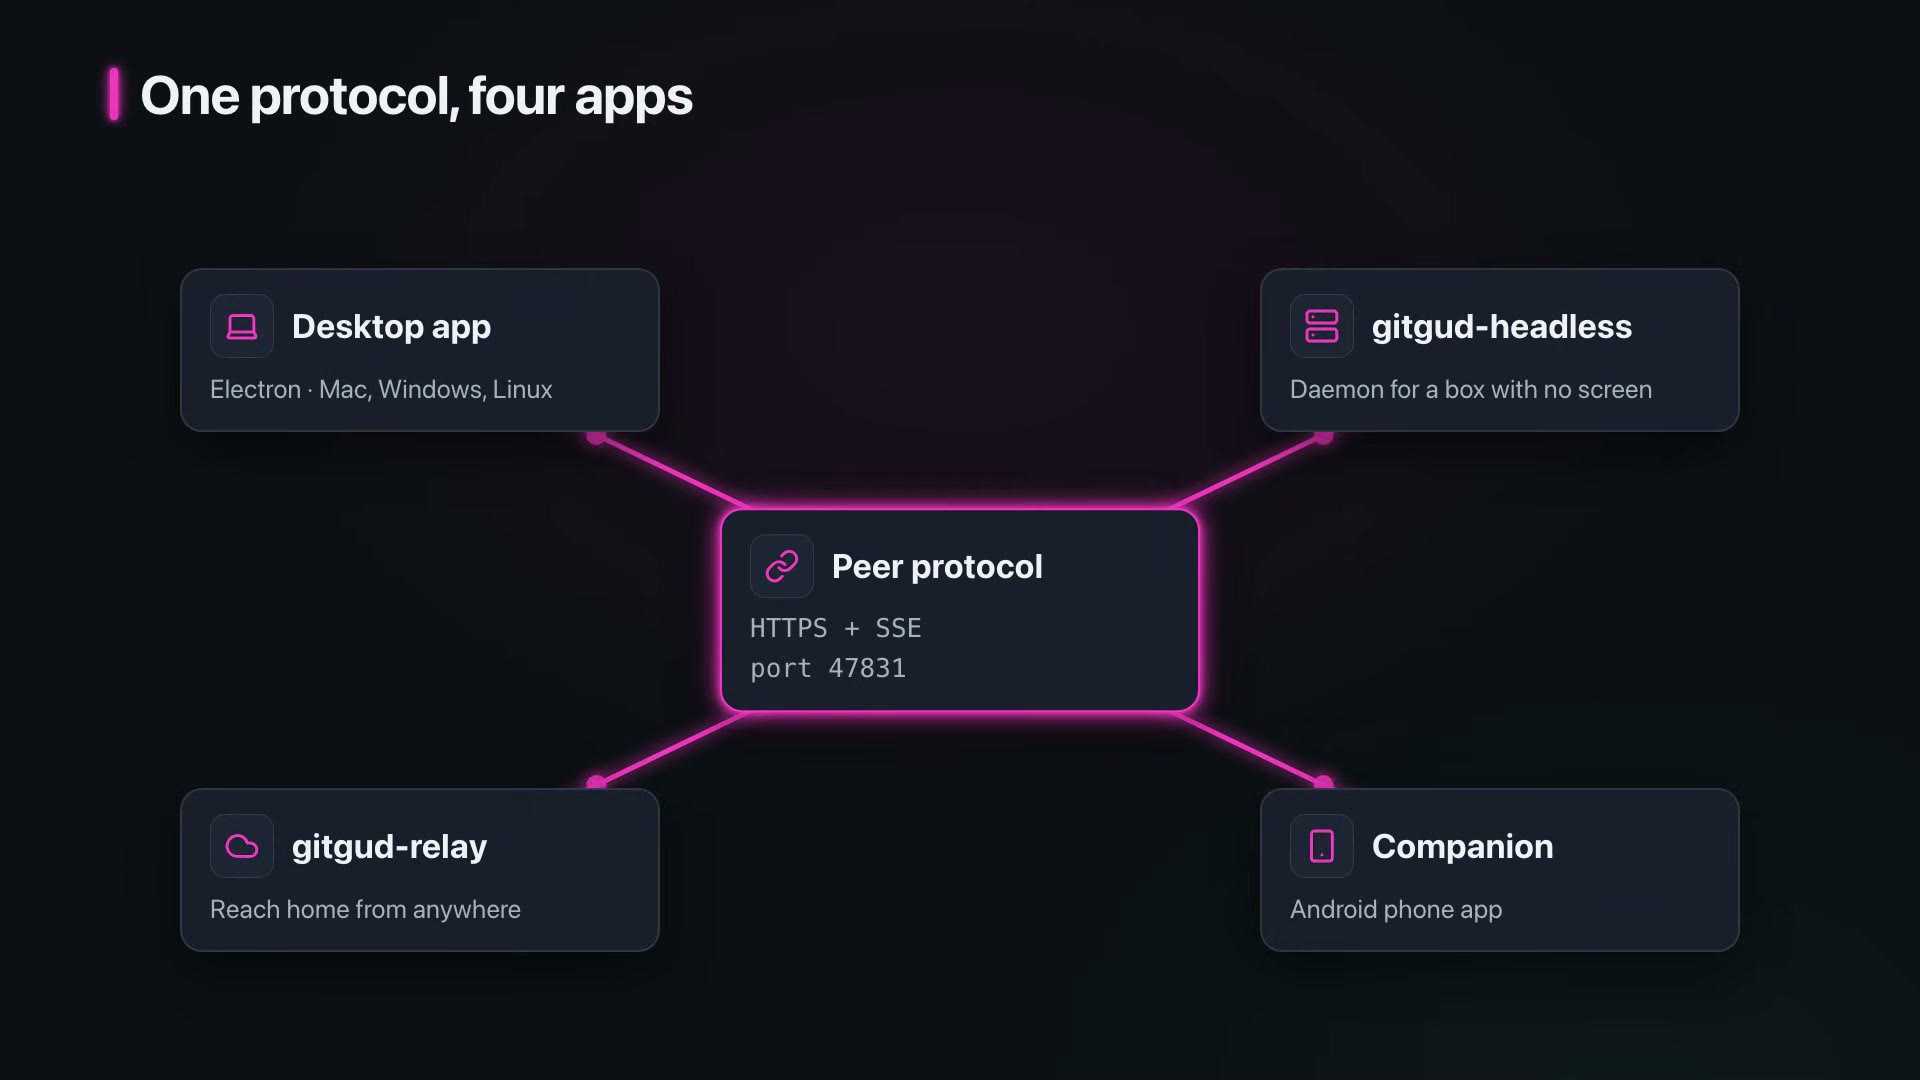
Git Gud is a family of four apps. The desktop app is the one you'll use most.
A headless daemon serves repositories from a server with no screen. A relay lets your devices reach each other from anywhere.
And a companion app puts your repositories on your phone.
Opening a repository
When you start Git Gud, you land on the start page. Open Repository picks any folder with a git repository in it.
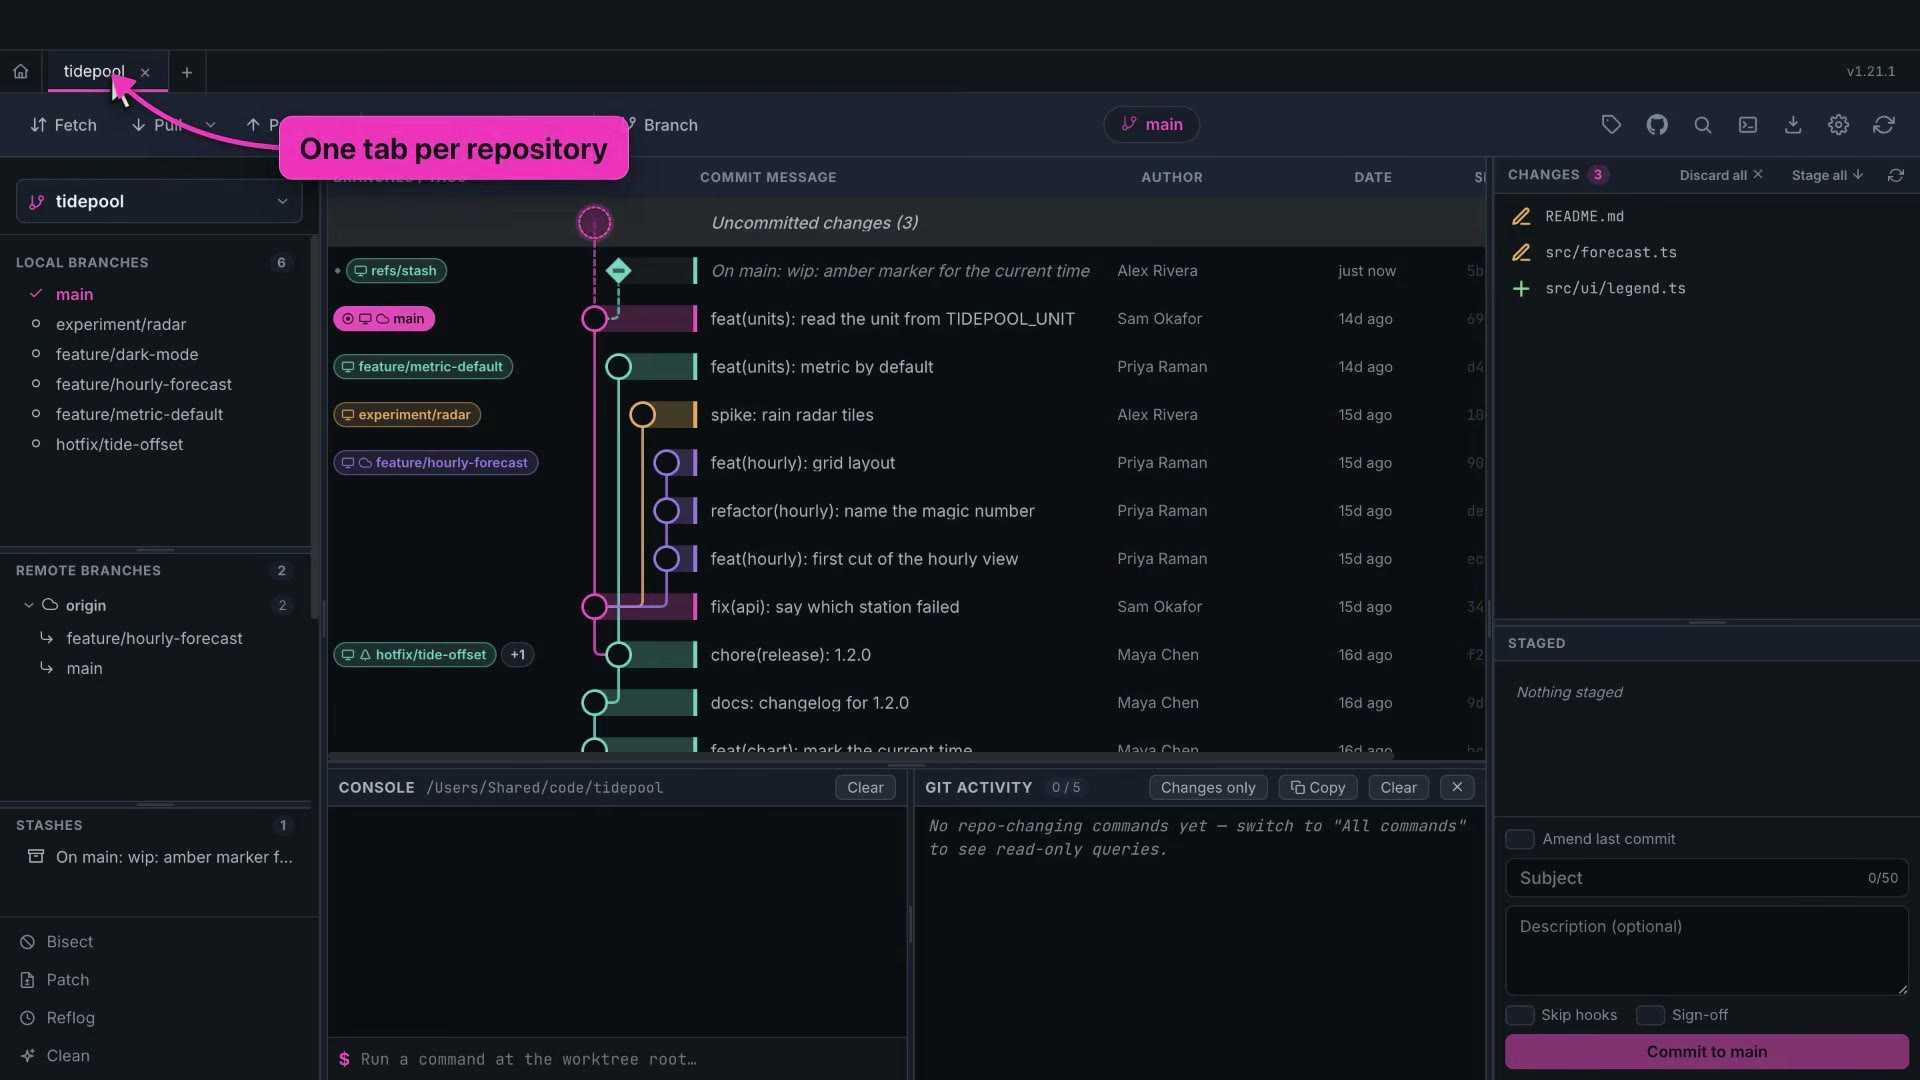
Each repository opens in its own tab. The home button takes you back to the start page, where your recent repositories wait.
Close the app and your tabs come back next time, exactly as you left them.
A tour of the window
Here's the main window. In the middle is the commit graph: one row per commit, newest at the top.
On the left, the sidebar lists your branches, remote branches, stashes, worktrees and tags.
Under them sit the power tools: bisect, patch, reflog and clean. We'll get to each one.
On the right is the detail panel. With nothing selected, it shows your uncommitted changes and the commit box.
Select a commit and the same panel shows that commit instead: its message, author, and the files it changed.
Across the top, the toolbar has fetch, pull and push, stash and pop, and a new branch button. The pill in the middle is the branch you're on.
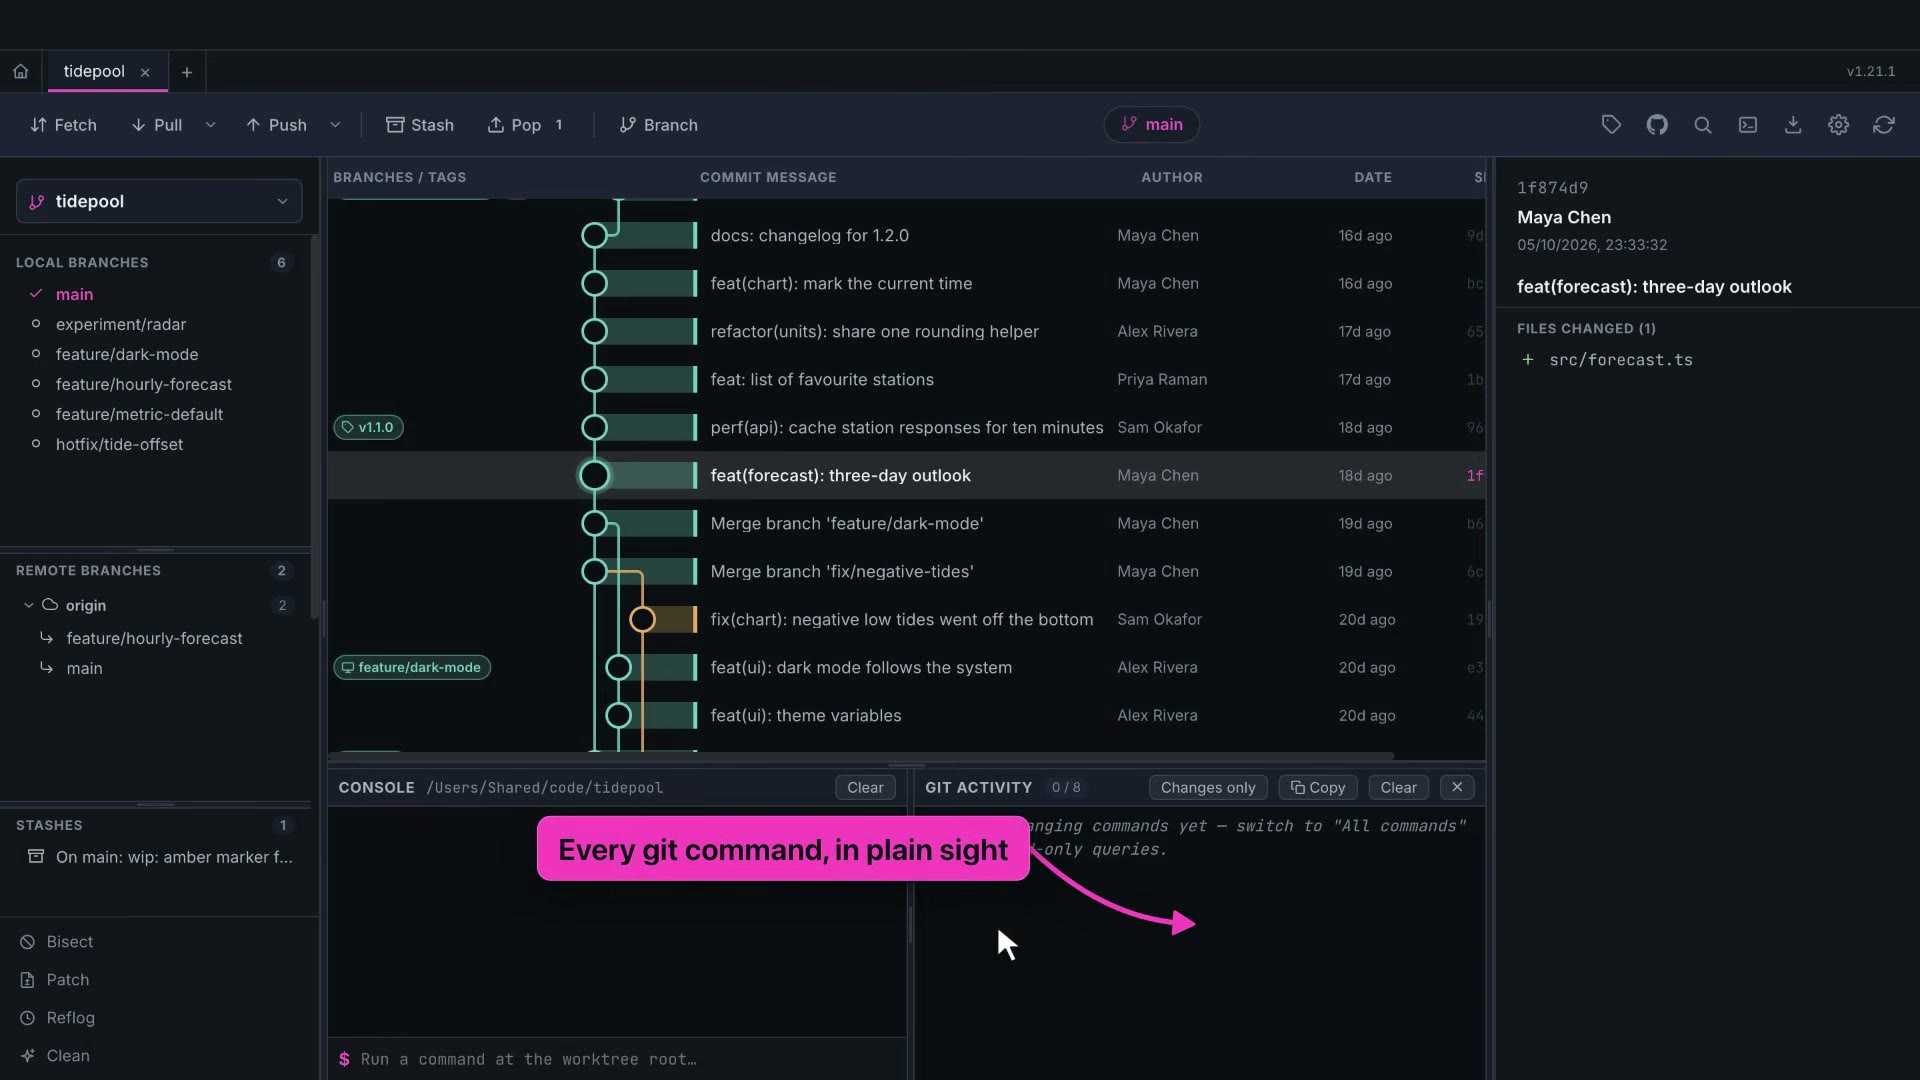
At the bottom is the console dock. One half is a shell. The other half is the git activity log, which shows every command the app runs for you.
The demo repository is tidepool, a small tide chart app with a few weeks of history from four people. Let's look at its graph.
2. Reading the commit graph
This is tidepool's history. Every branch draws in its own color, so you can follow one line of work from top to bottom.
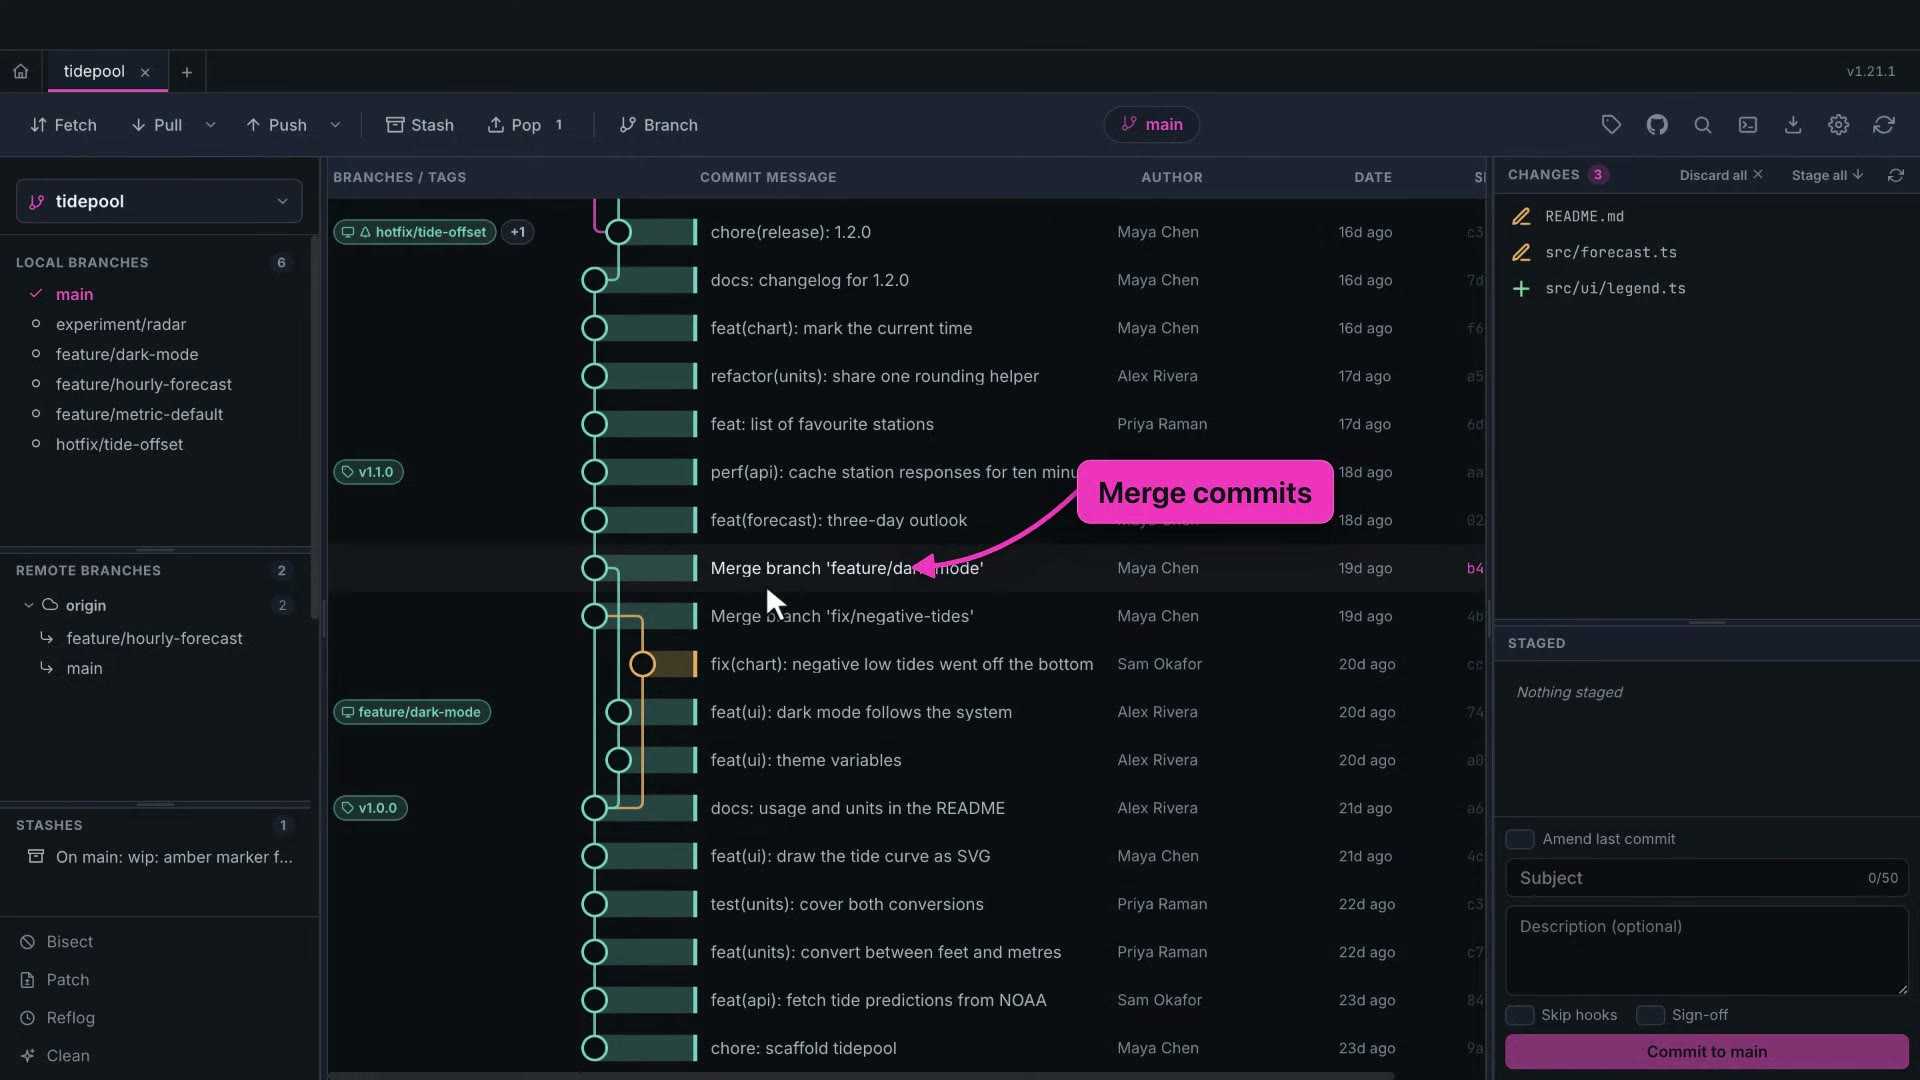
Pink is main. The purple lane is feature/hourly-forecast. It branched off main, and it hasn't been merged back yet.
Further down, two lanes rejoin main. Those are merges: dark mode and a chart fix, both finished and merged.
At the very top, the dashed node is your uncommitted work. It shows how many files have changed, and it sits right above the commit you have checked out.
The diamond is a stash, drawn where it was made. A stash is changes you put aside for later.
Ref pills
The left column holds ref pills. A filled pill marks the branch you're on. The icons tell you where a branch lives: on this computer, on the remote, or both.
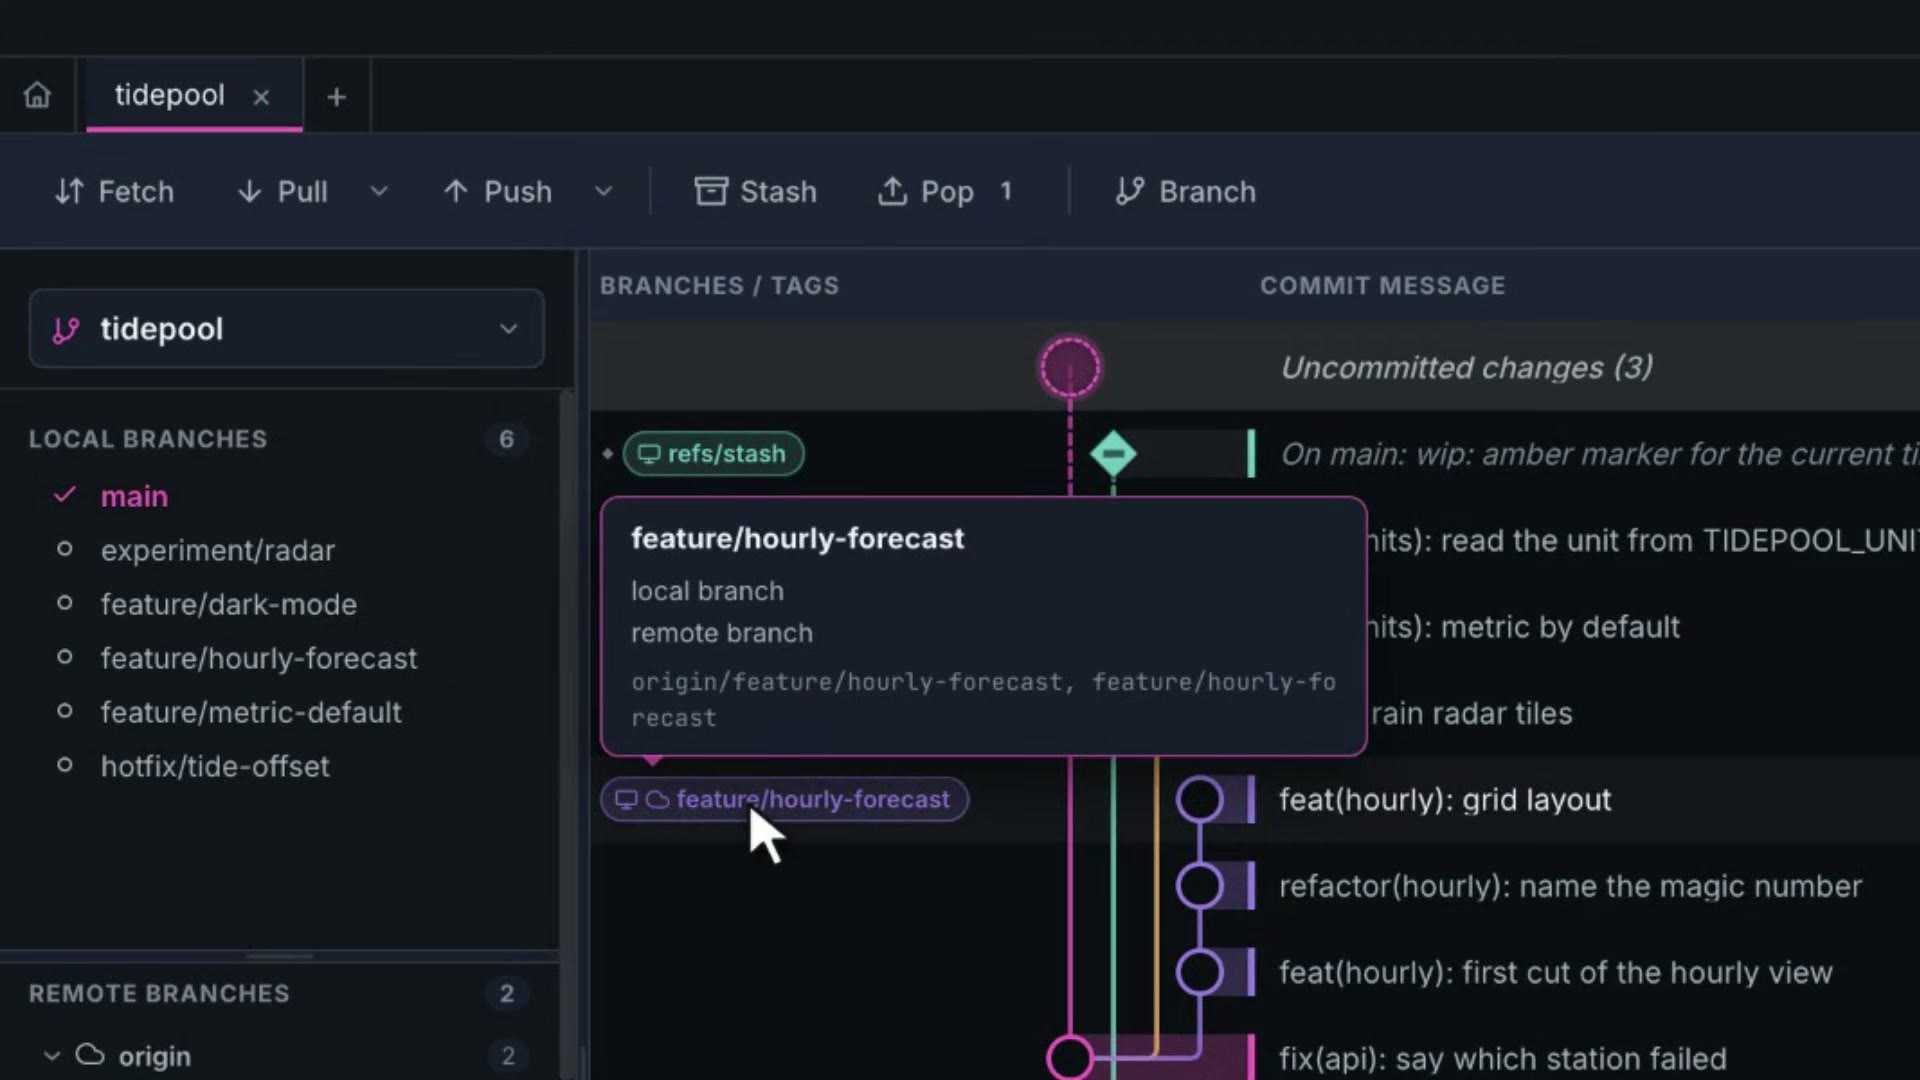
Tags get their own pills too. When a commit has more refs than fit, they fold into a plus chip. Hover it to see them all.
The tag button in the toolbar chooses which labels the graph shows: local branches, remote branches and tags. Switch some off when the left column gets busy, and back on just as fast.
Selecting commits
Click a commit to select it. The detail panel shows the full message, the author and date, and every file the commit touched.
Click a file and its diff opens in the middle of the window, where the graph was. Escape brings the graph back.
The arrow keys move the selection up and down the history, so you can read commit after commit without the mouse.
Shift-click selects a range. Command-click adds or removes single commits.
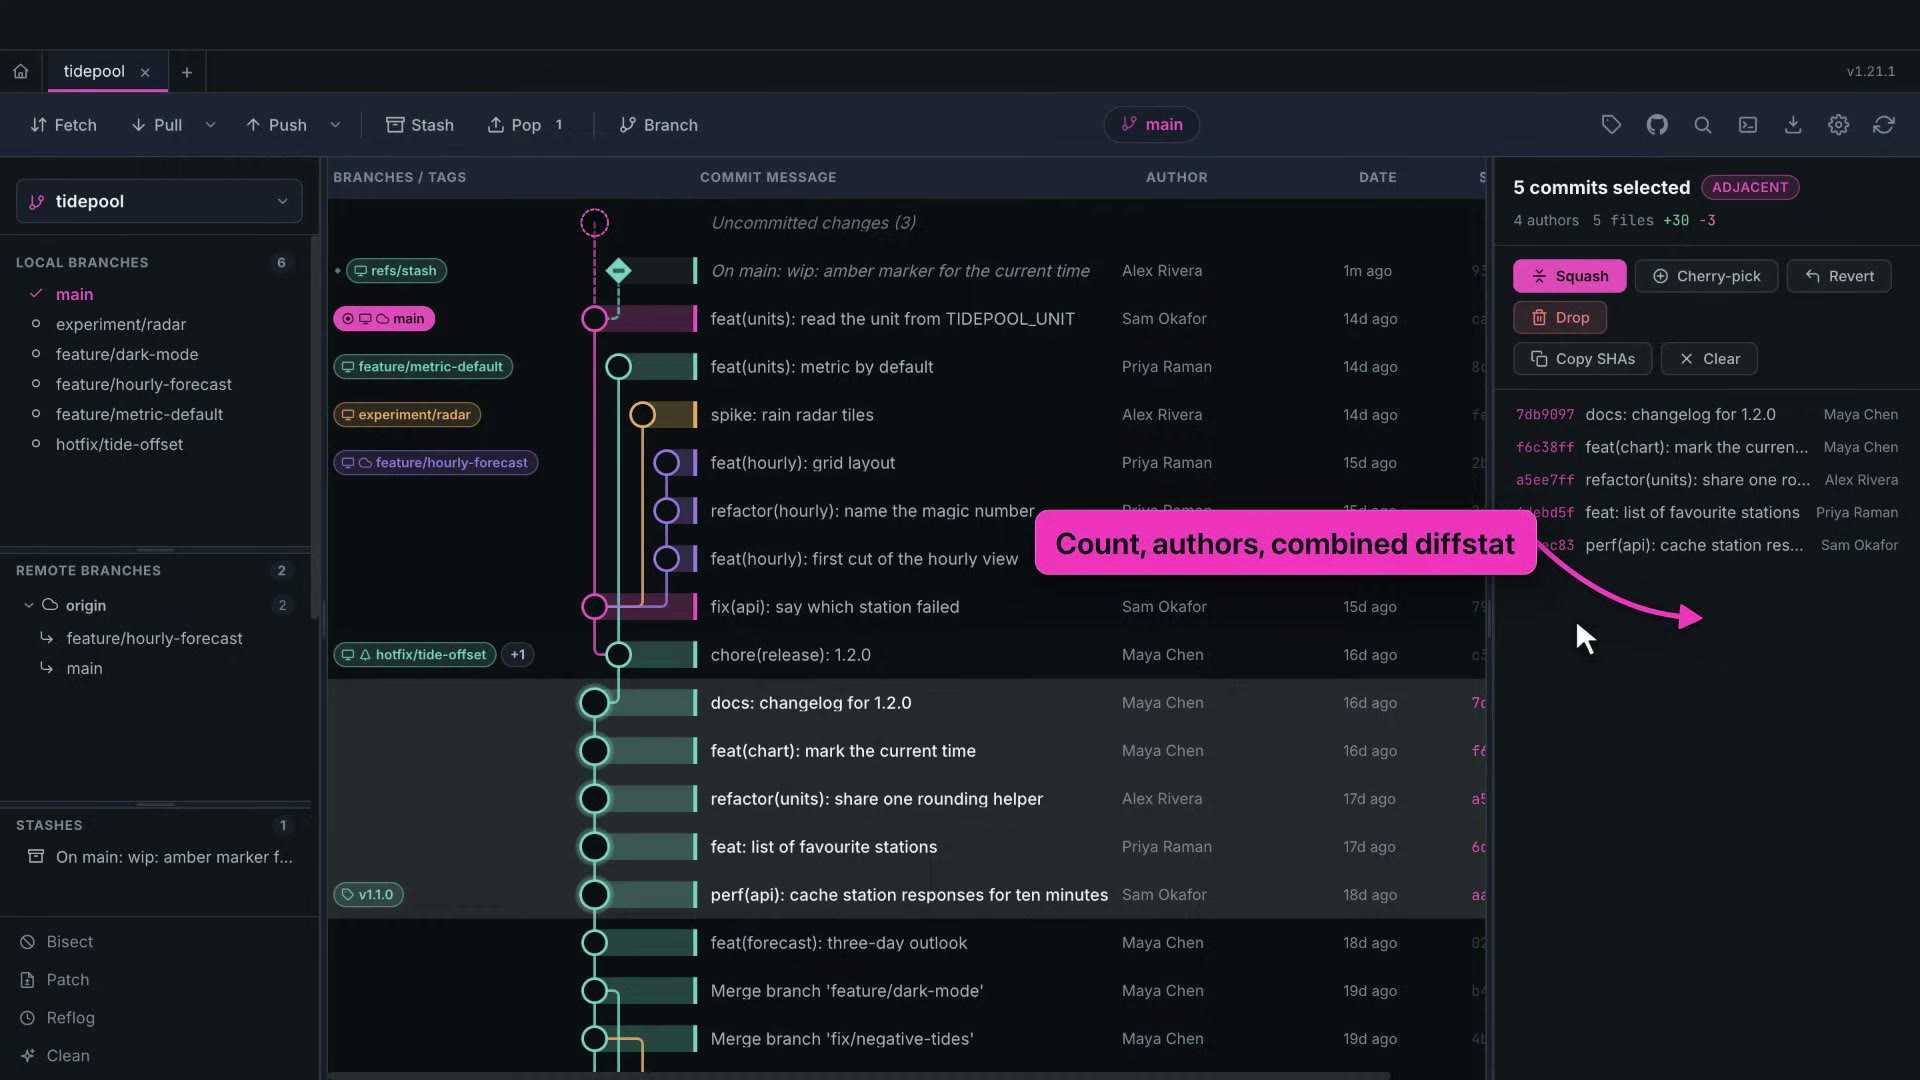
With several commits selected, the panel summarizes them: how many, who wrote them, and a combined count of changed lines. We'll use that for squashing in Rewriting history.
Searching history
⌘F opens search. In message mode it matches commit messages, authors and SHAs as you type.
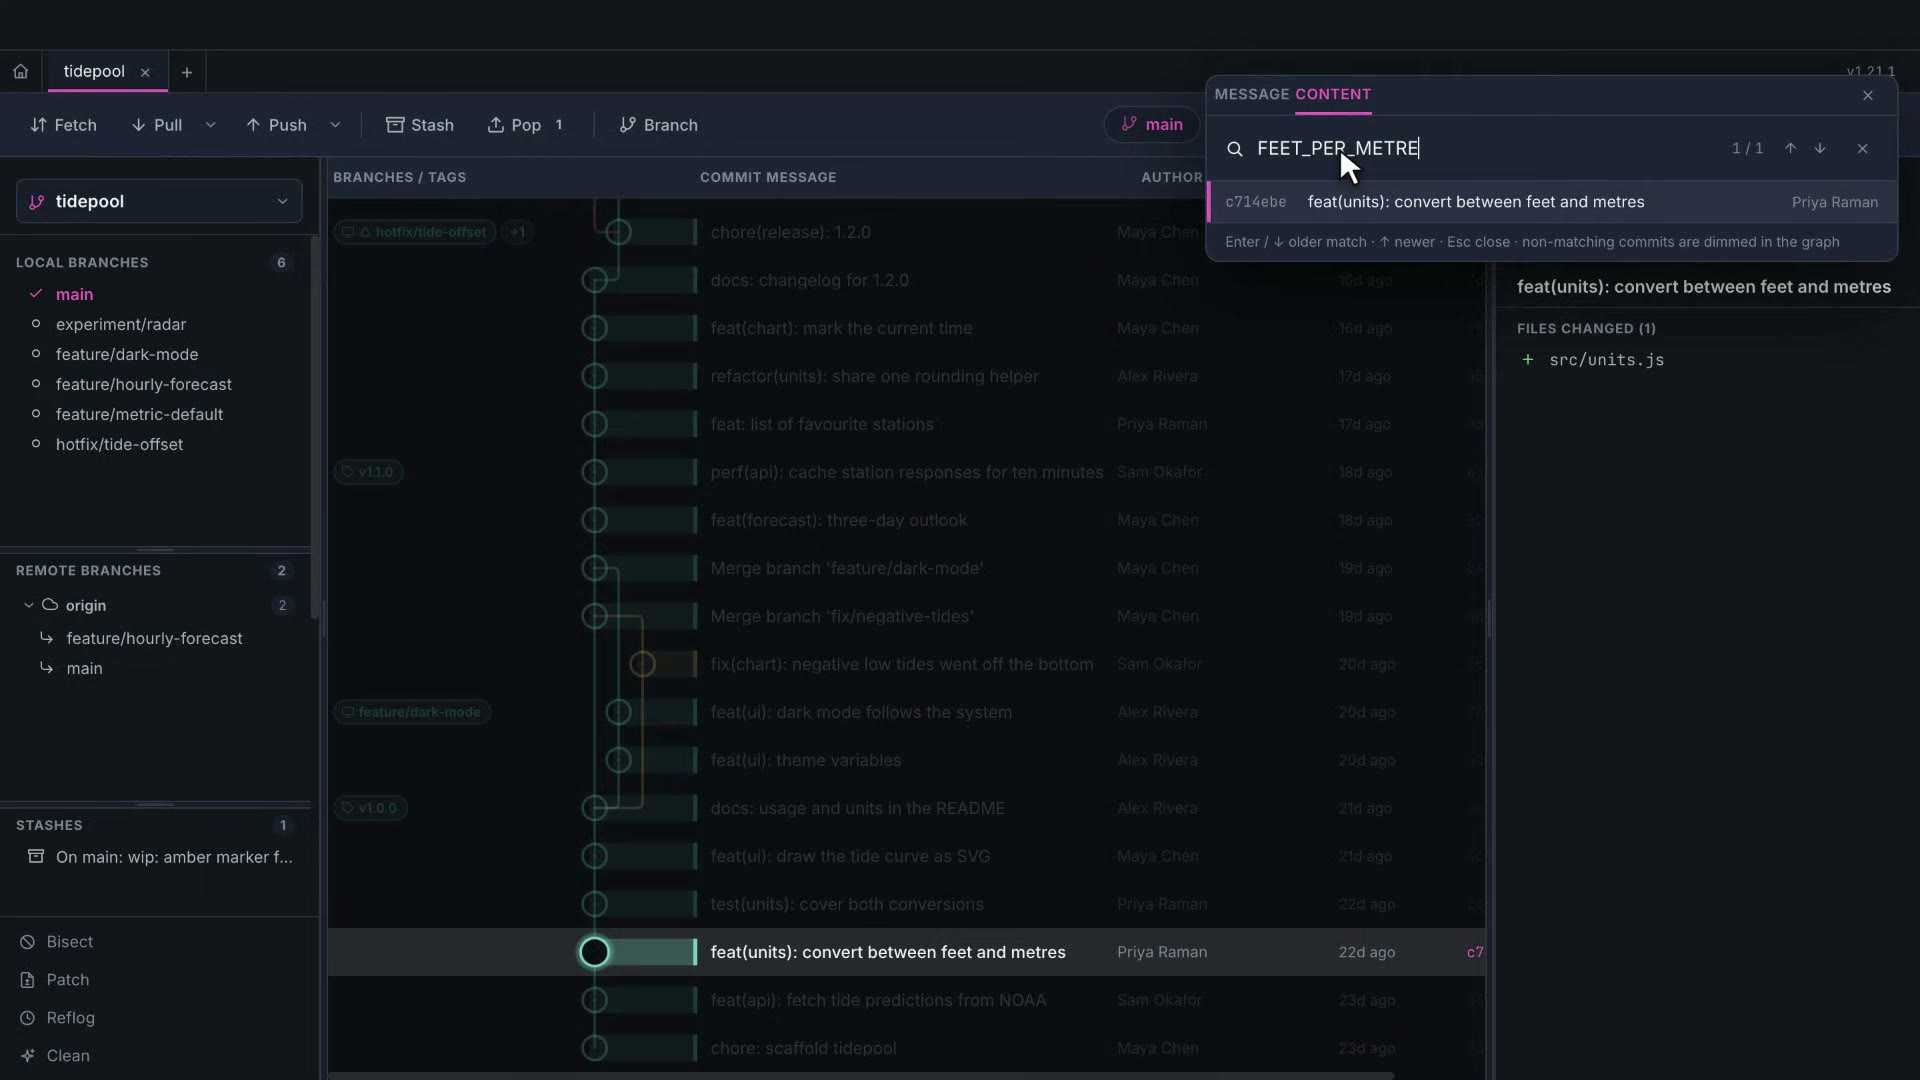
The counter shows which match you're on. Enter steps to older matches, and the graph jumps to each one.
Content mode searches inside the changes themselves. It finds every commit whose diff added or removed your text.
So if you want to know when a constant first appeared, or which commit deleted a function, type its name here.
That's the graph. Next, we'll make some commits of our own.
3. Staging and committing
Git keeps your changes in three places. Your working tree is the files on disk. The staging area holds what goes into the next commit. And a commit saves it into history.
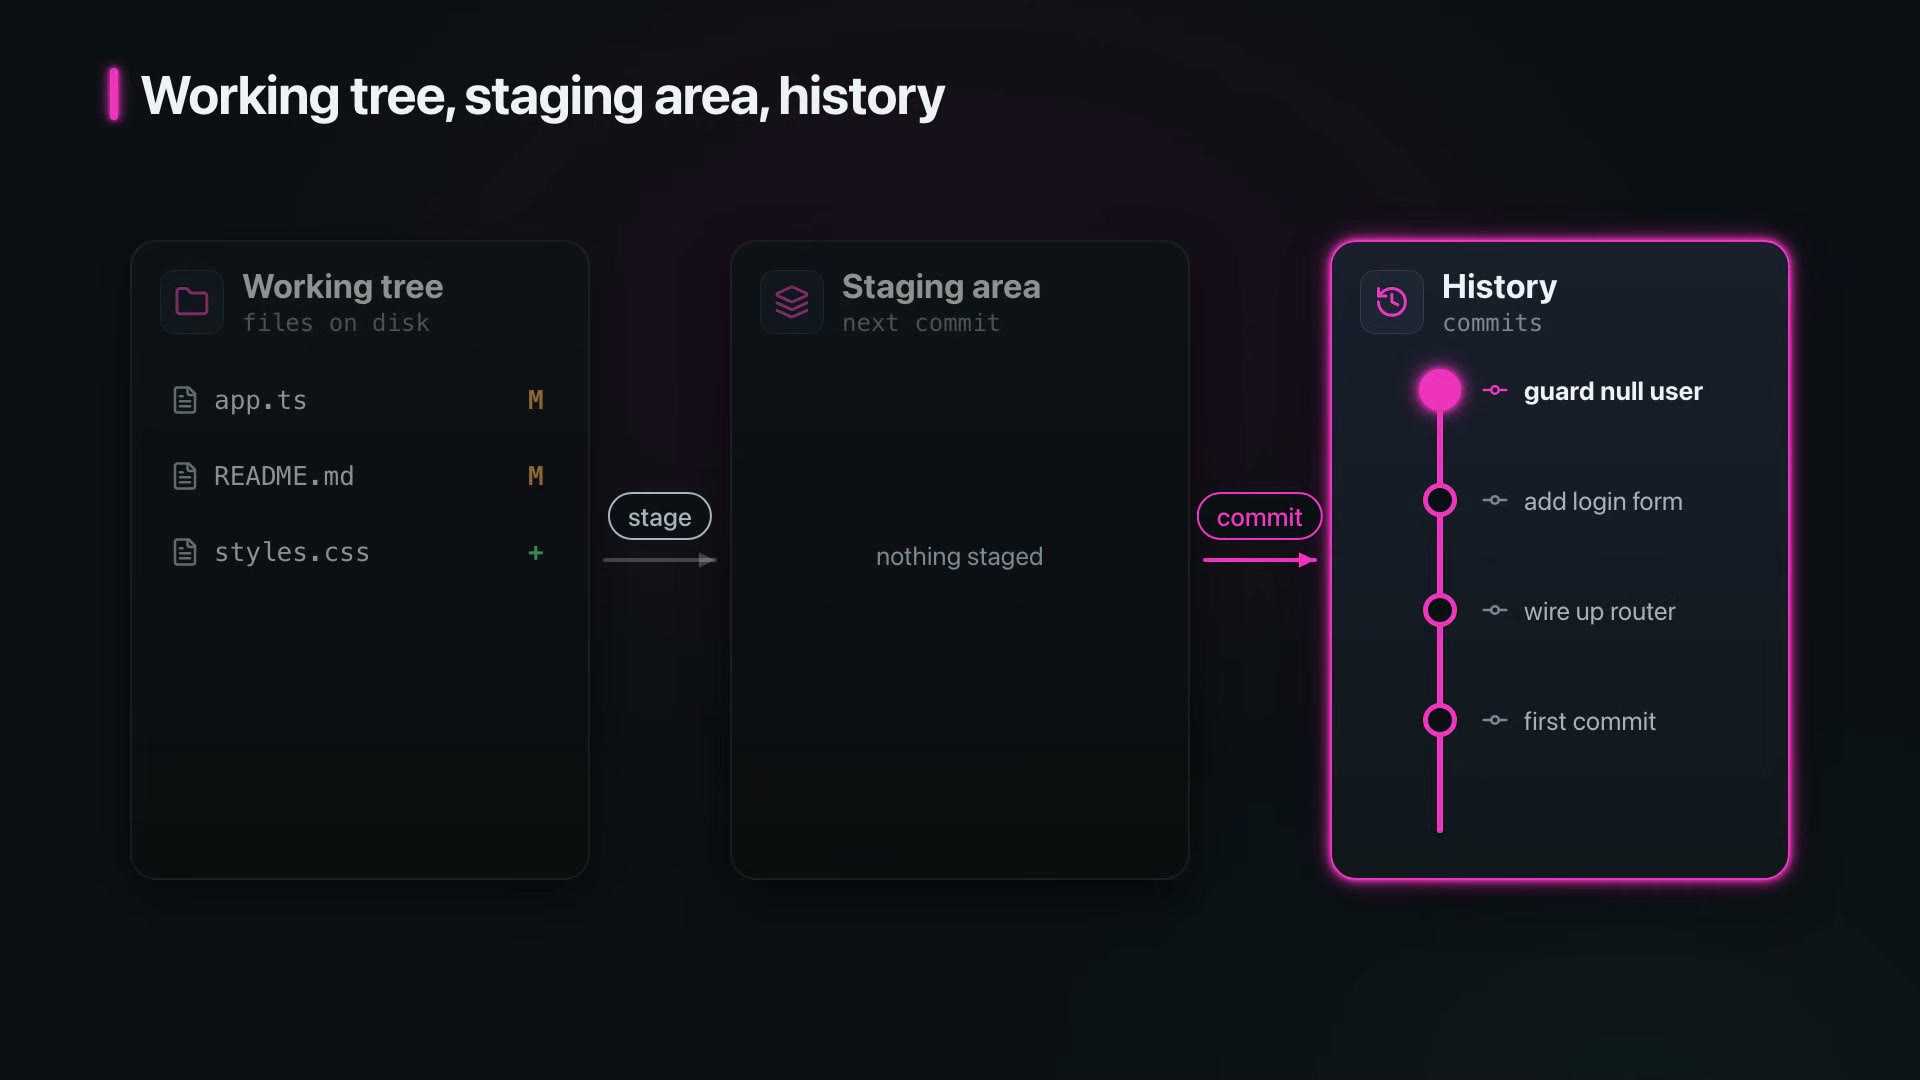
Git Gud lets you move changes into the staging area in pieces as small as one line, so each commit says one thing.
The changes list
With no commit selected, the right panel lists your changes. Modified files have a pencil. New files have a plus.
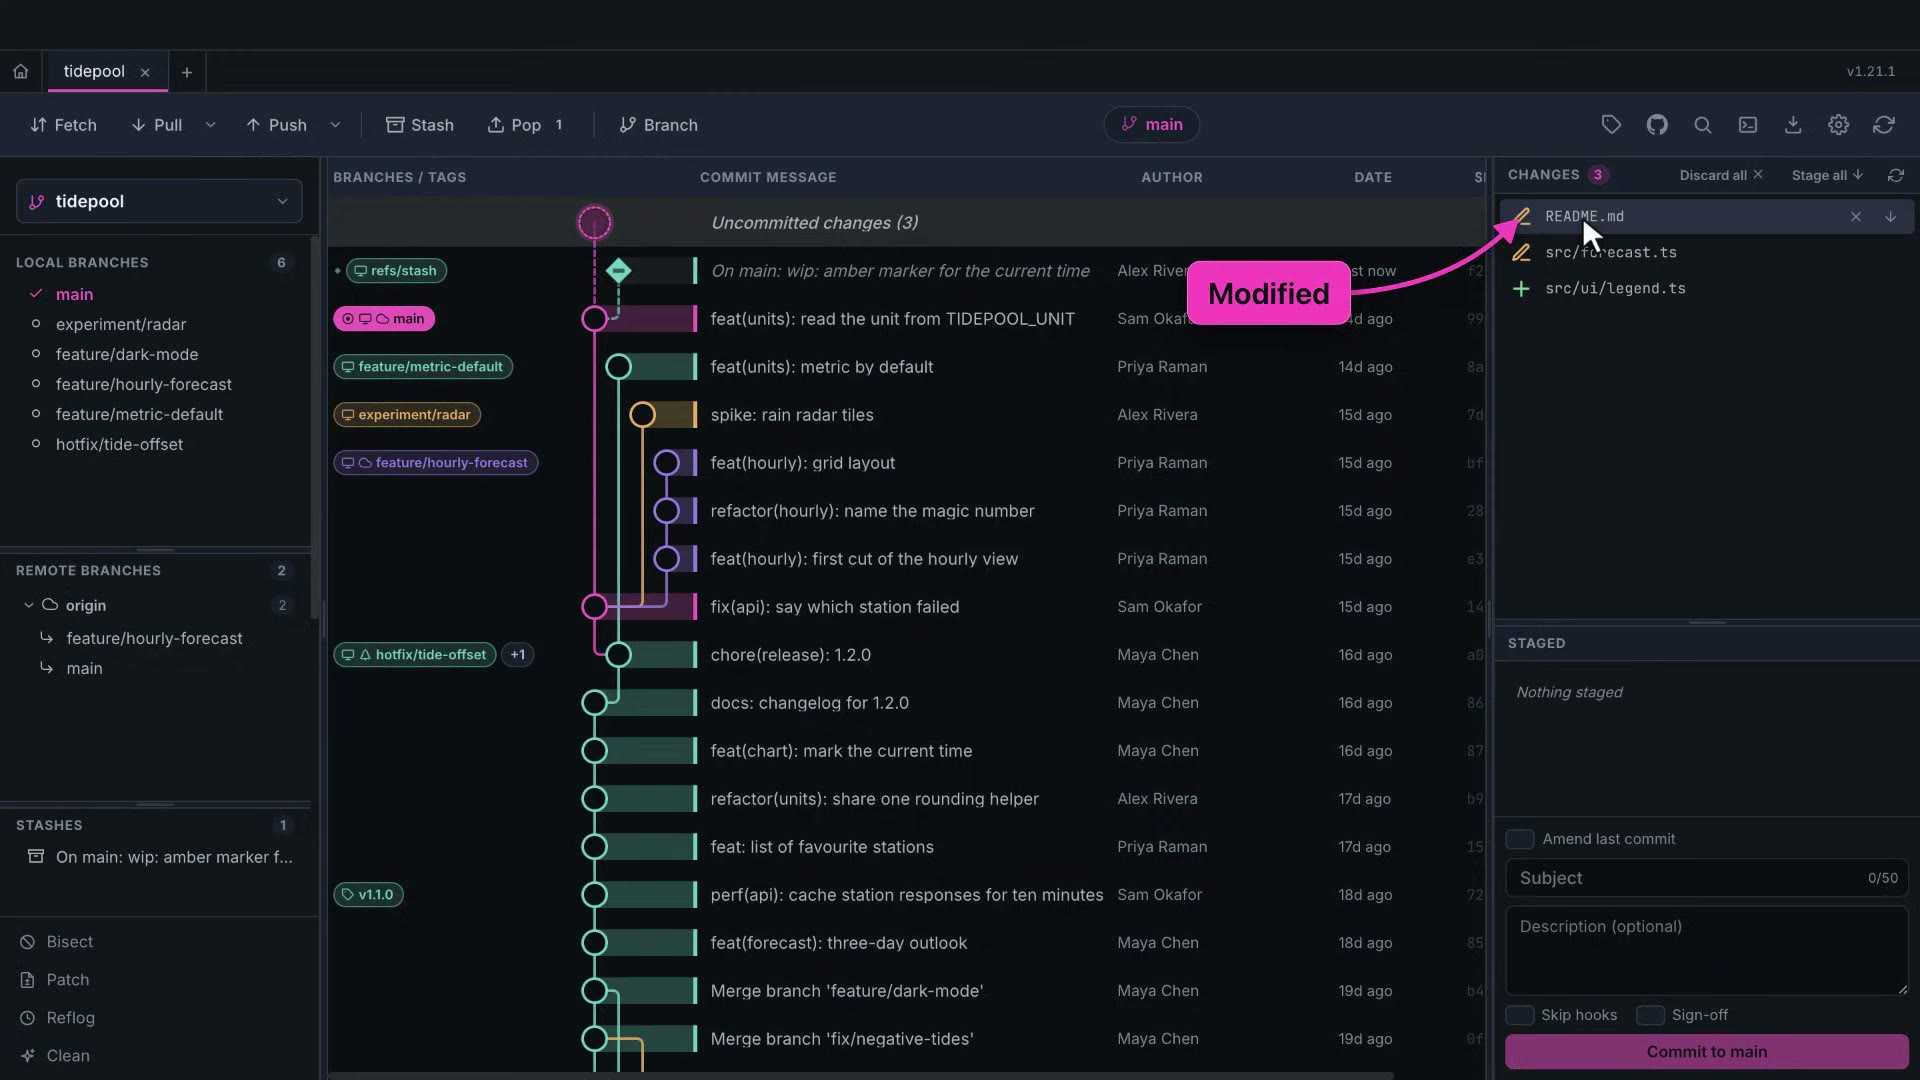
Each row has buttons to stage the file or to discard it. Stage all takes everything at once.
The arrow keys walk through the list and open each file's diff as you go. To stage a whole file, click its arrow.
The diff viewer
Here's the diff for src/forecast.ts. Removed lines are red, added lines are green, and the change is split into hunks.
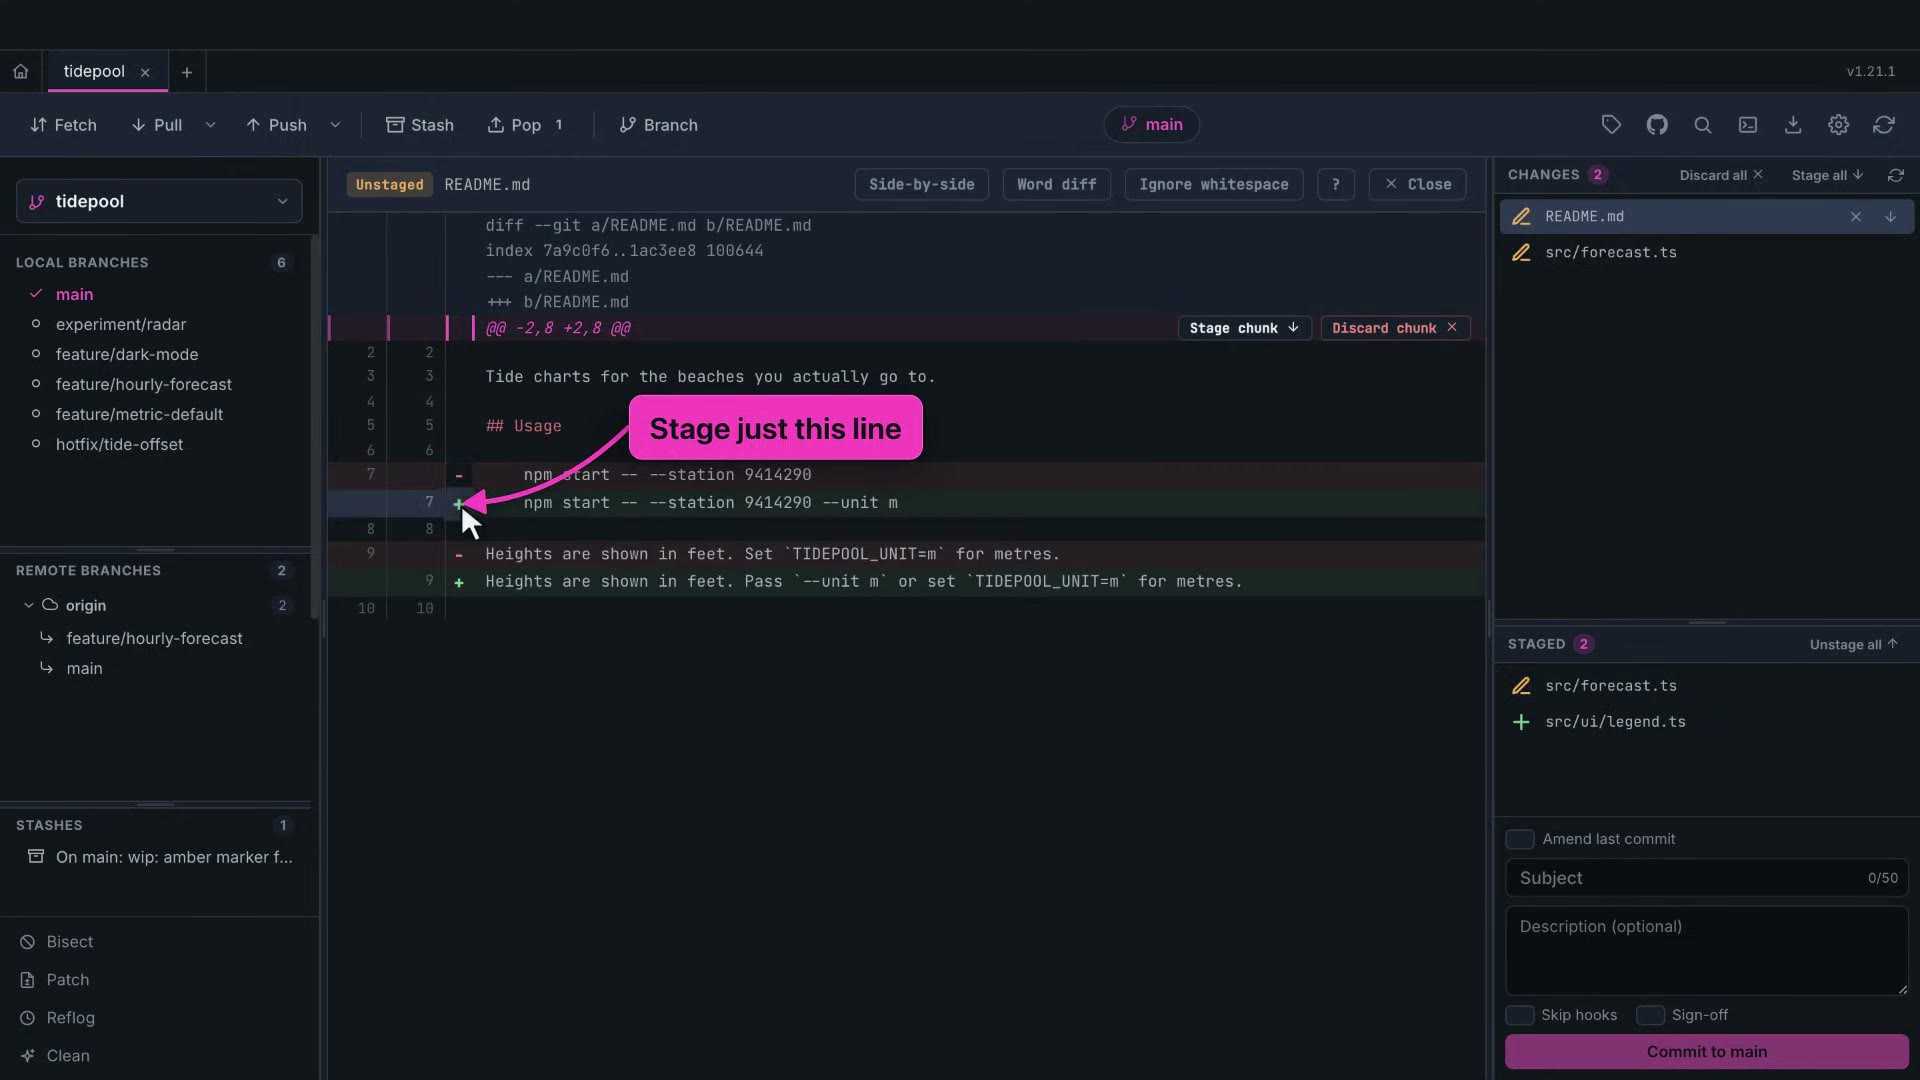
Word diff highlights exactly which words changed inside each line. It's much easier to read when a line was only edited a little.
Side by side puts the old file on the left and the new one on the right.
This file has two separate changes. The unit conversion belongs in the commit. The debug log at the bottom does not.
So stage just the first hunk. Press S, or use the hunk's stage button. The file now shows up in both lists: part staged, part not.
You can go smaller still. In the README, click the plus or minus next to a single line, and only that line is staged.
And the debug log? Discard chunk throws a hunk away. It asks you to click twice, because there's no undo for that.
Press the question mark to see every key: J and K move between hunks, S stages, D discards.
Committing
Now write the commit. The subject line has a counter, because short subjects read best in the graph.
The description is optional. Below it are three options. Amend last commit folds the staged changes into the commit you just made.
Skip hooks commits without running your pre-commit hooks. Sign-off adds a Signed-off-by line.
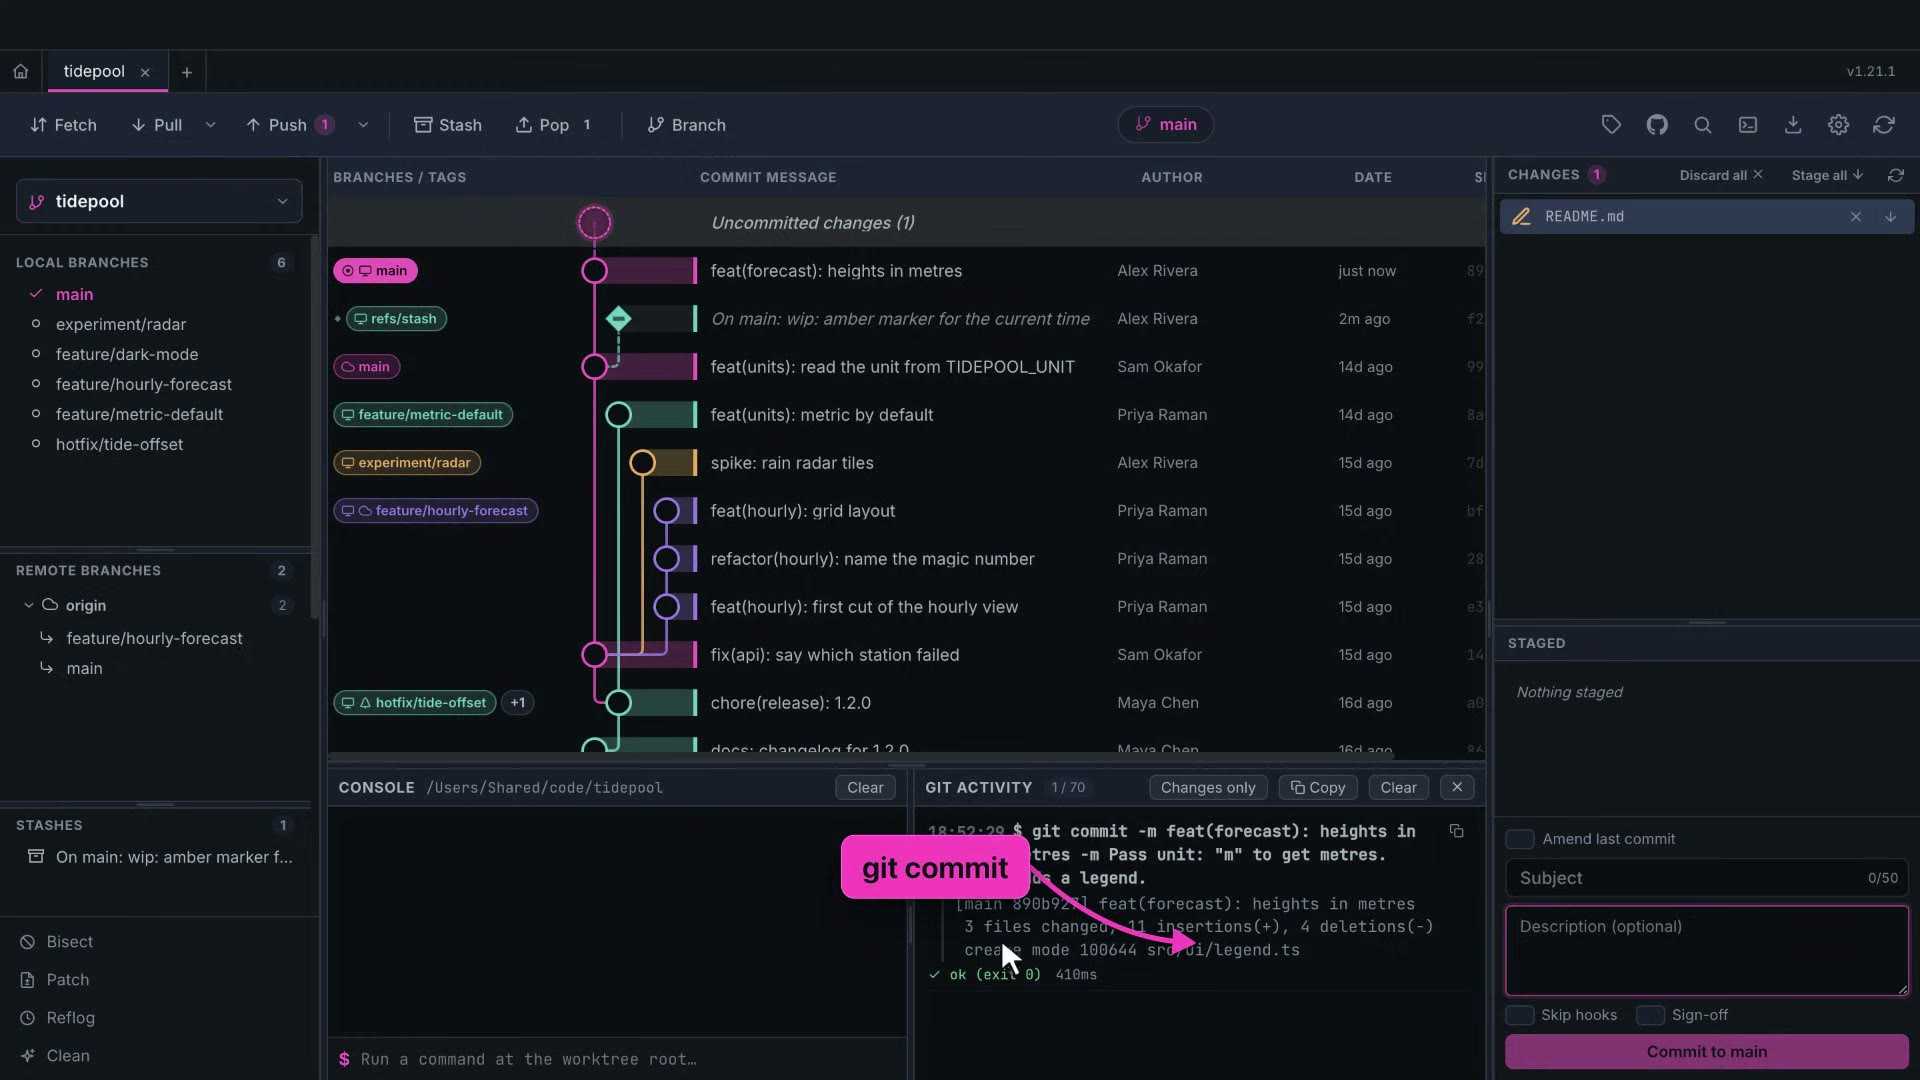
Press ⌘Enter, or click Commit to main. The new commit appears at the top of the graph, and the rest of the README edit is still waiting in your changes.
And in the git activity log, you can see exactly what that cost: a git commit with your message.
4. Branches, tags, stashes and worktrees
The sidebar lists your local branches. The one with the tick is checked out.
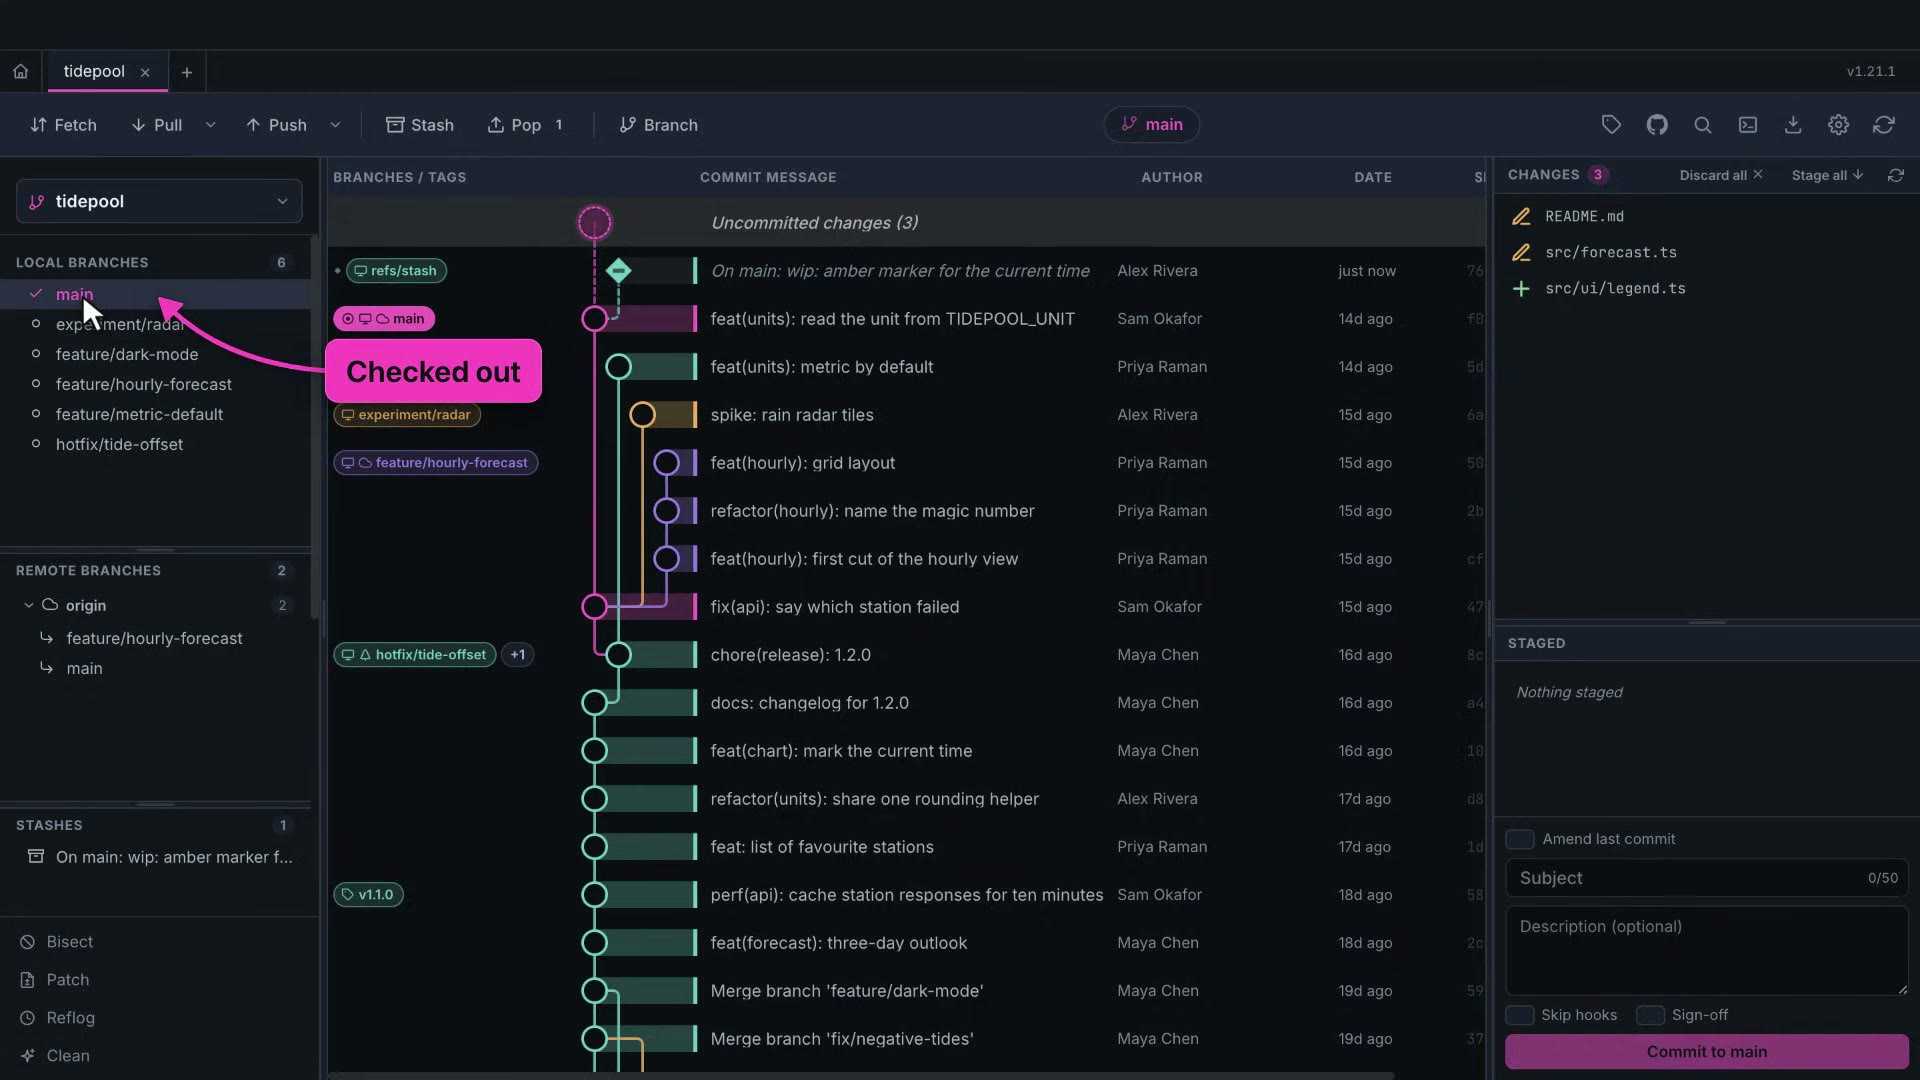
Double-click a branch to check it out. The pill in the toolbar follows, and the graph moves the head marker.
The Branch button makes a new branch from where you are. Type a name, press Create, and you're on it.
Right-click a branch for everything else: rename it, merge it into your current branch, rebase onto it, push it, or delete it.
You can also right-click any commit in the graph and choose Create branch here, to start a branch from the past.
Drag and drop
Here's a shortcut. Drag one branch and drop it on another.
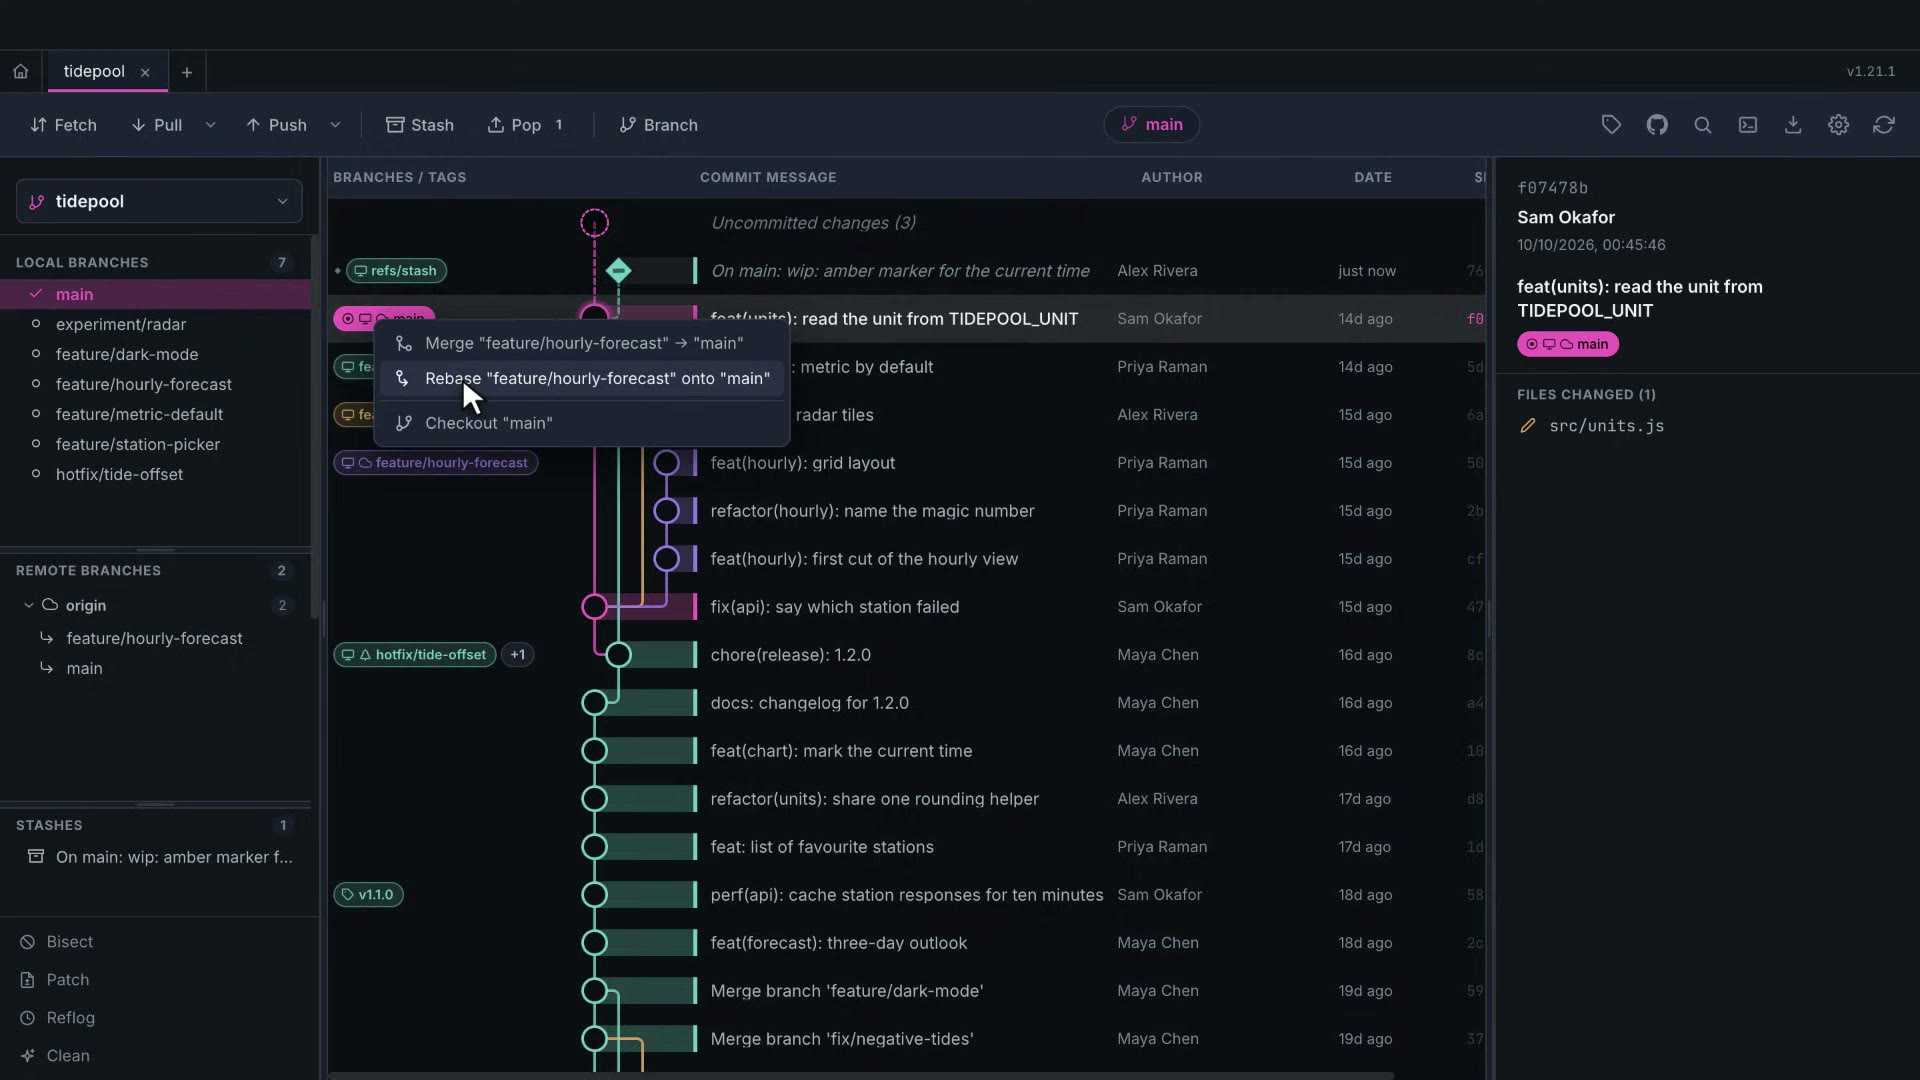
Git Gud asks what you meant: merge one into the other, rebase one onto the other, or just check out the target.
Pick merge, and the merge commit appears in the graph with both lanes joining.
Tags
To tag a release, right-click its commit and choose Create tag here. Git Gud makes an annotated tag.
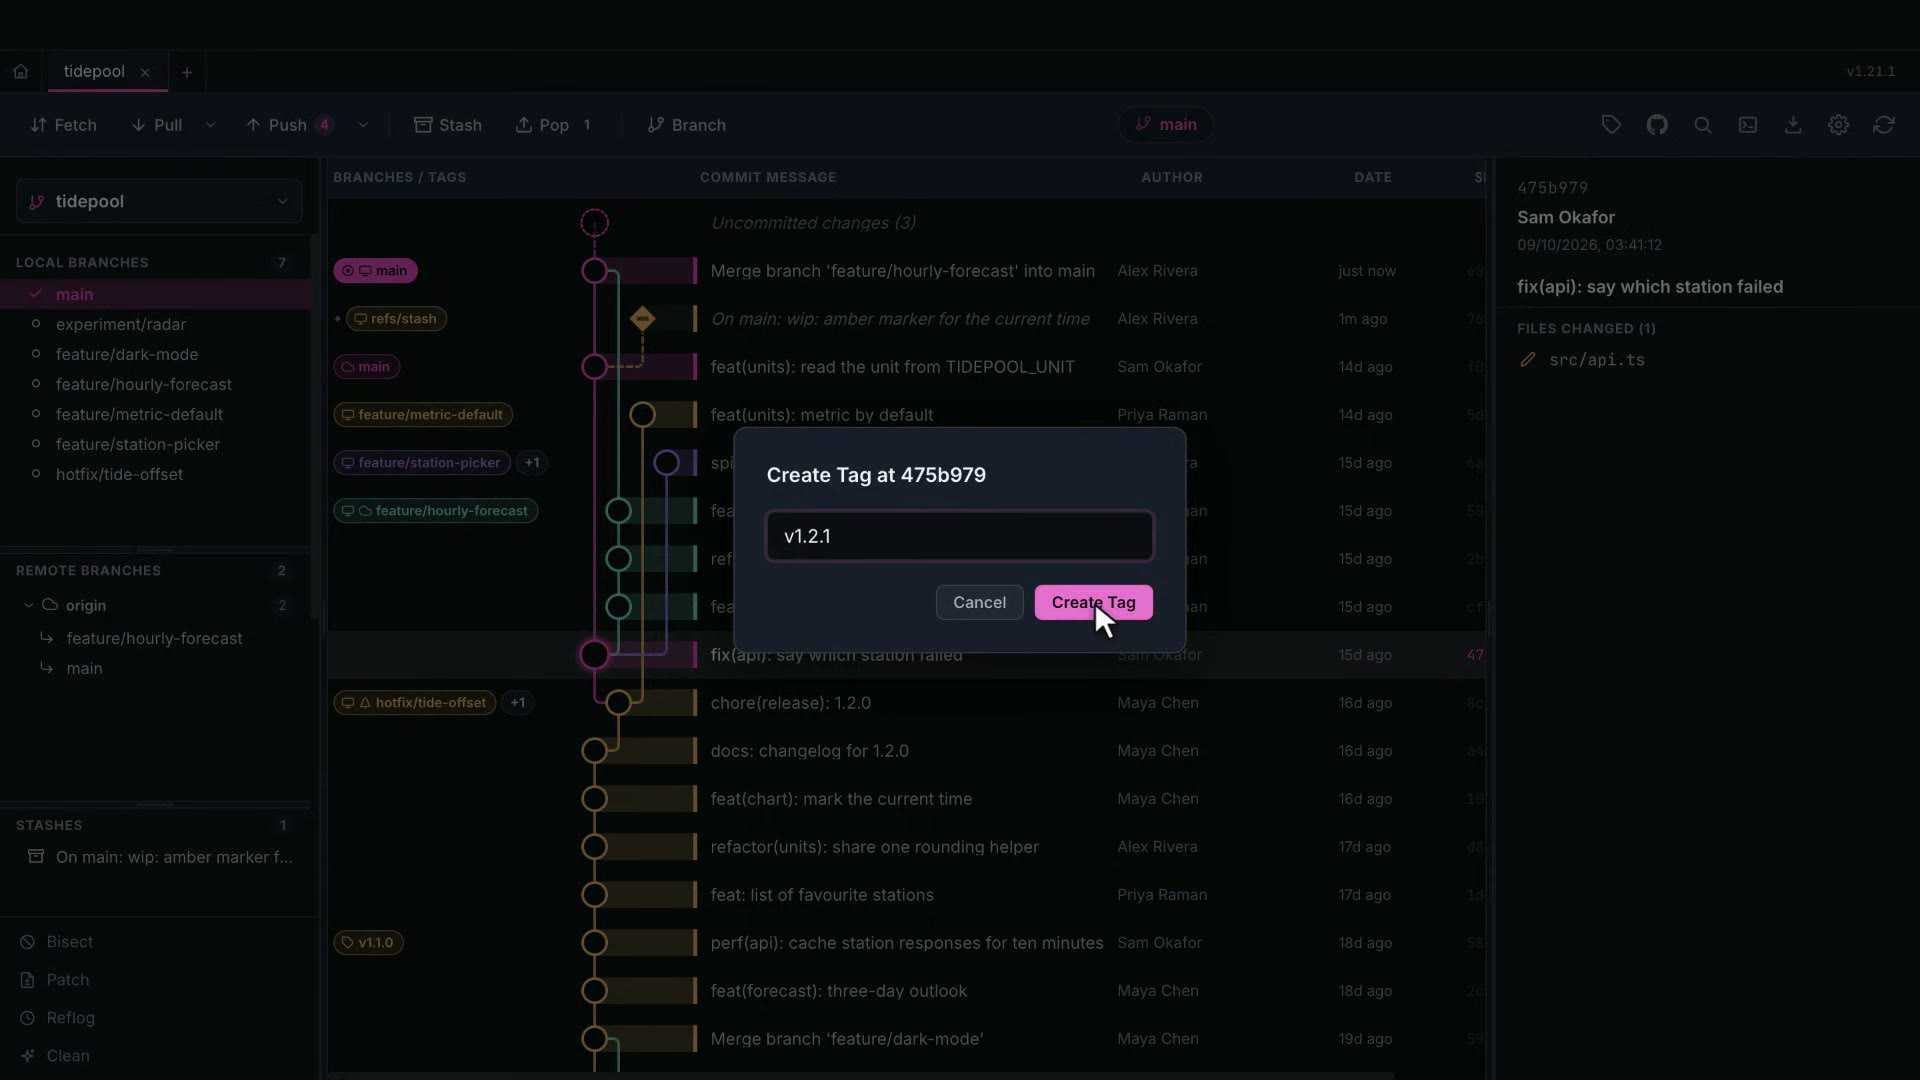
Tags are listed in the sidebar too. Right-click one to push it to the remote, rename it, delete it, or start a branch from it.
Stashes
Stash puts all your uncommitted changes aside, including new files, and leaves a clean working tree. You can give it a message so you remember what it was.
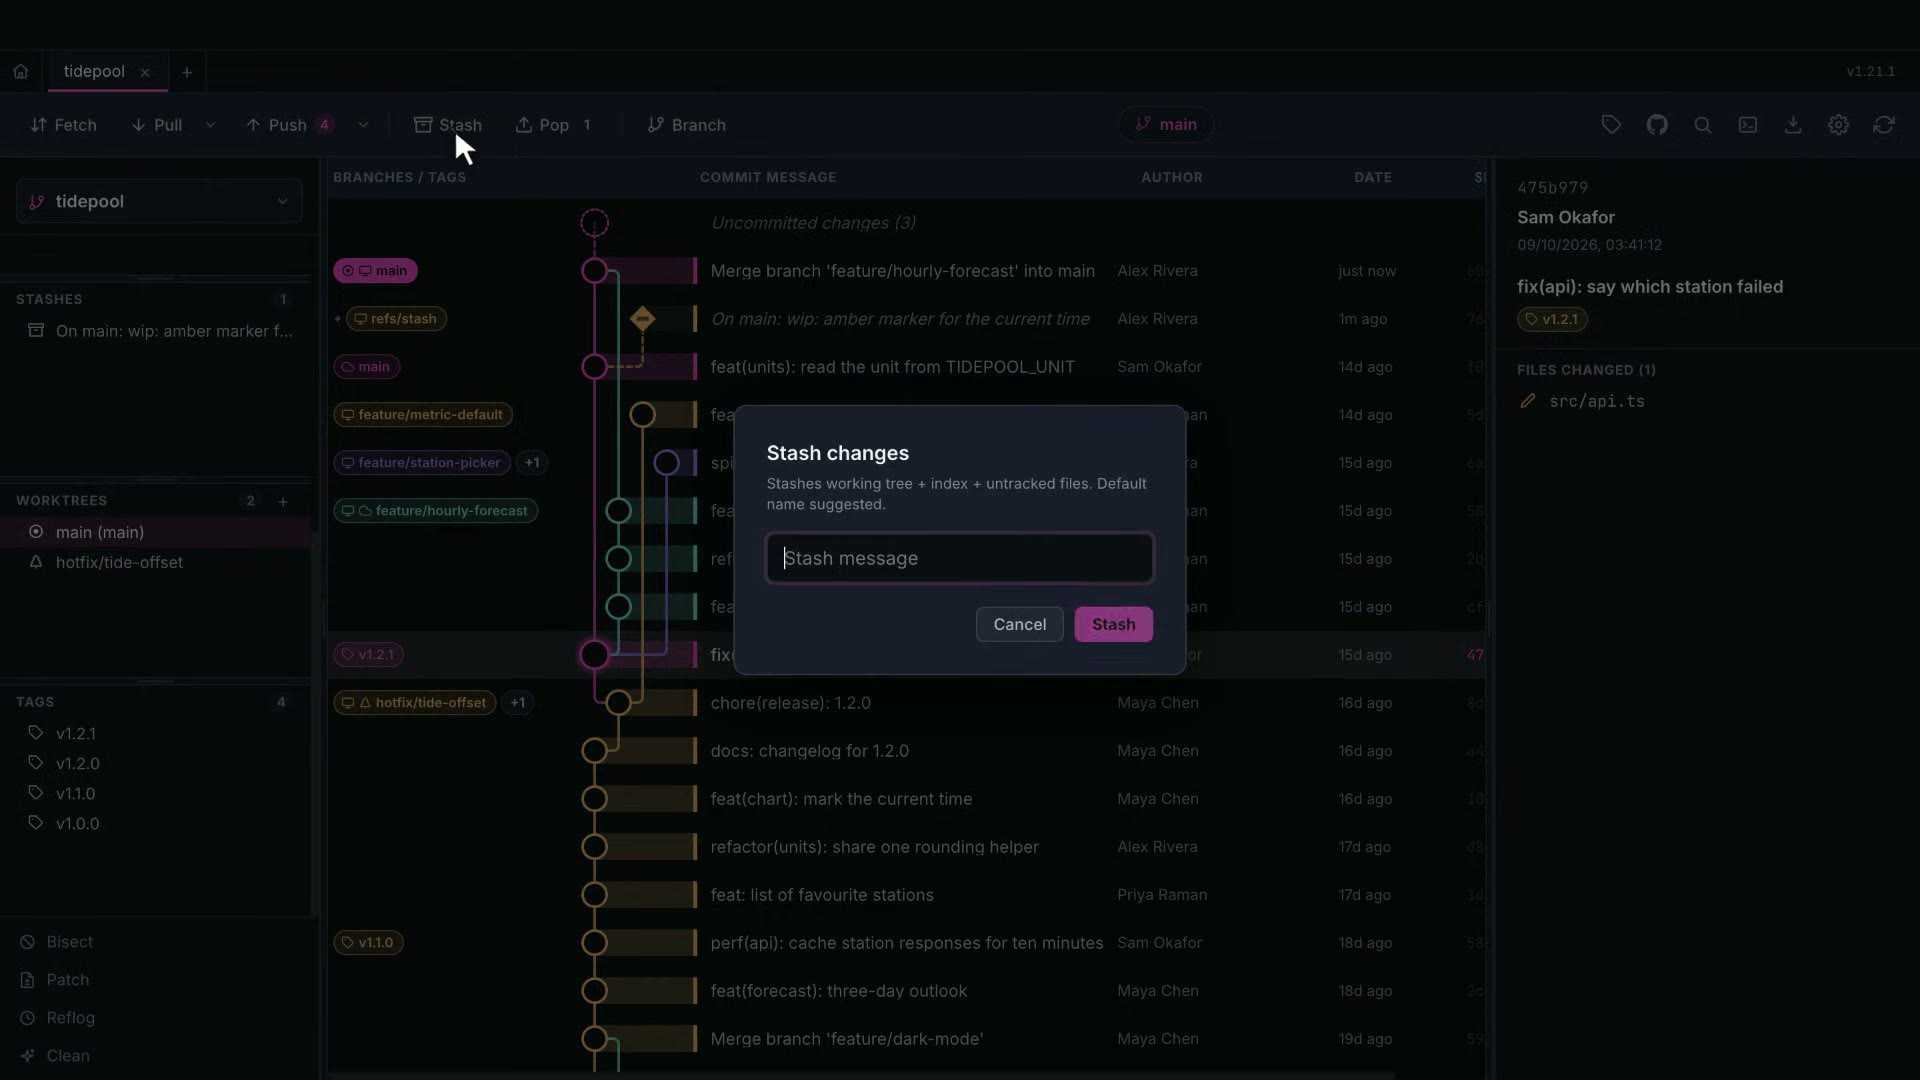
The stash shows up as a diamond in the graph, and in the sidebar's stash list.
Pop brings the most recent stash back and removes it from the list. Right-click a stash to apply it but keep it, drop it, or turn it into a branch.
Worktrees
A worktree is a second checkout of the same repository, in its own folder, on its own branch. It's handy for a hotfix while your feature work stays put.
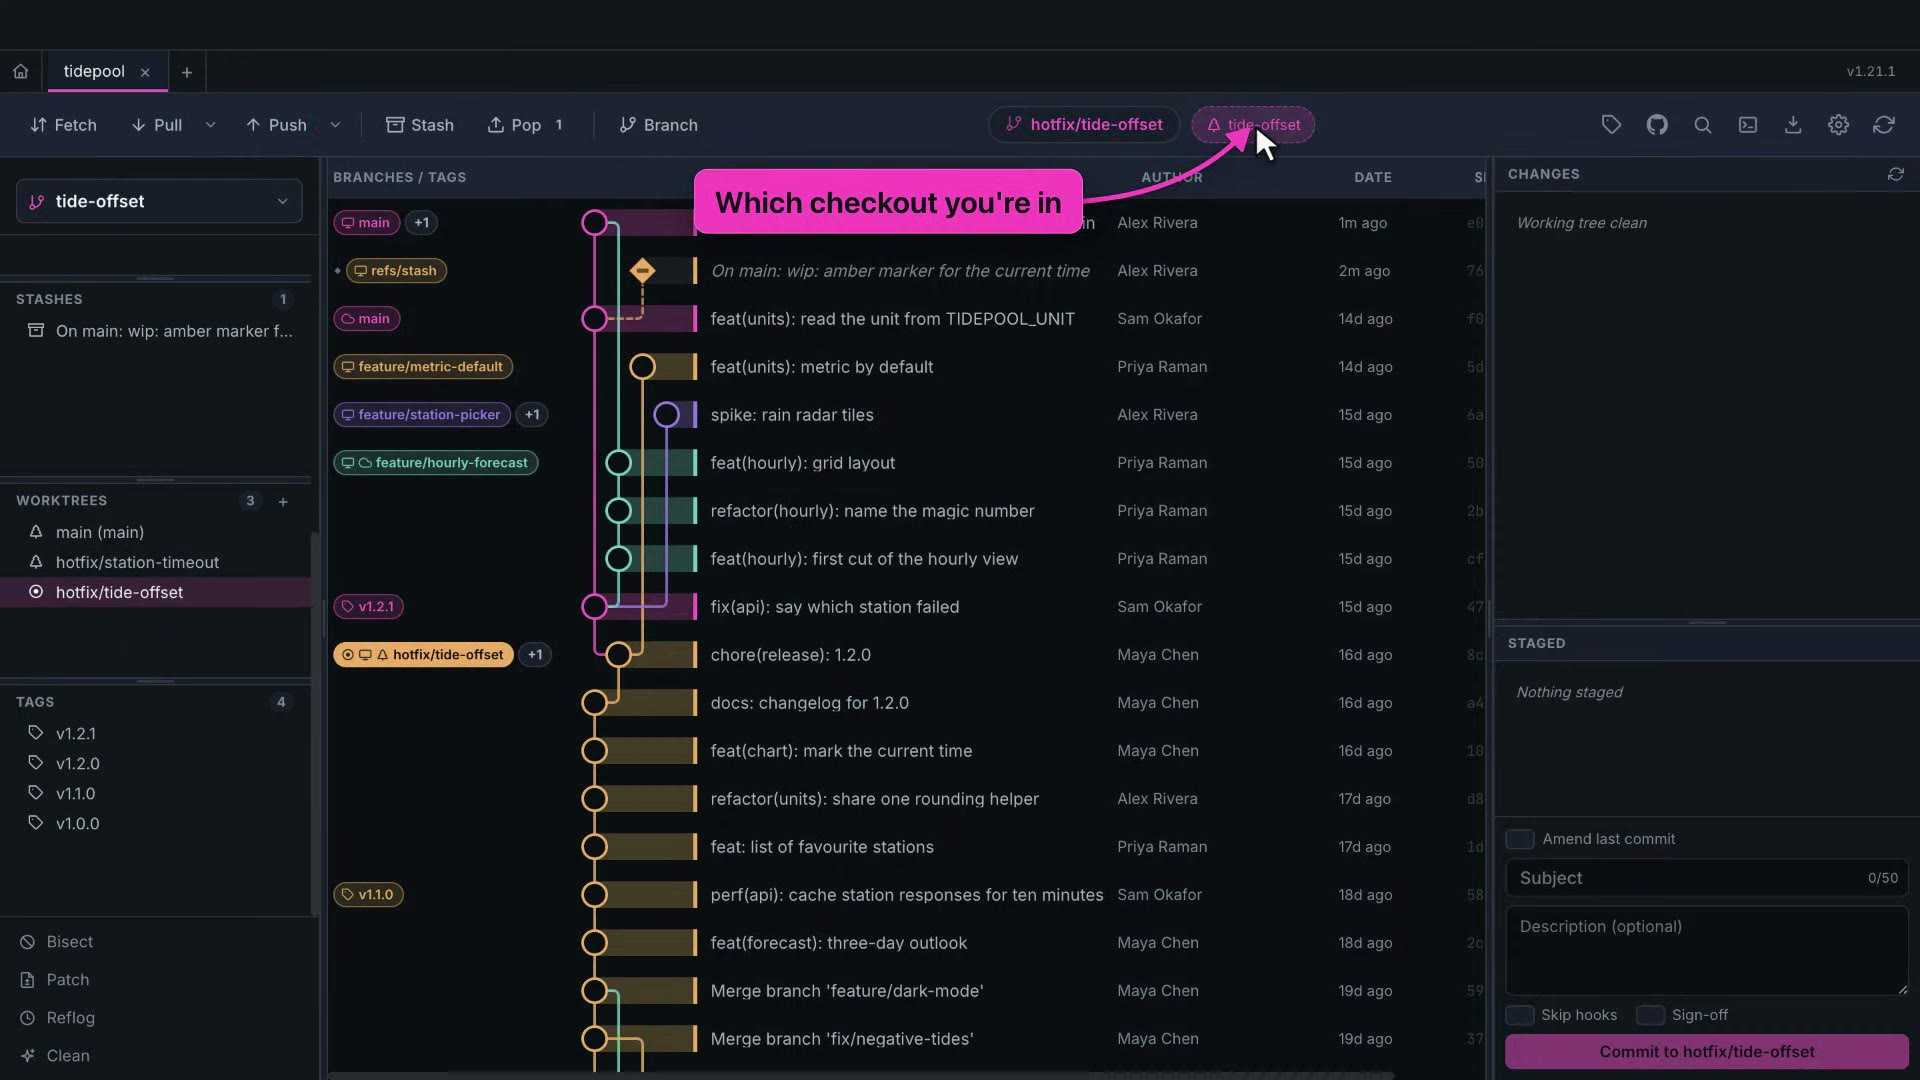
Manage worktrees lists them and adds new ones. Give it a branch, and Git Gud suggests a folder next to your project.
Switch to a worktree from the sidebar, and the badge in the toolbar tells you which checkout you're looking at.
5. Working with remotes
Your repository has a copy on a server, called a remote. Fetch downloads what's new there without touching your work.
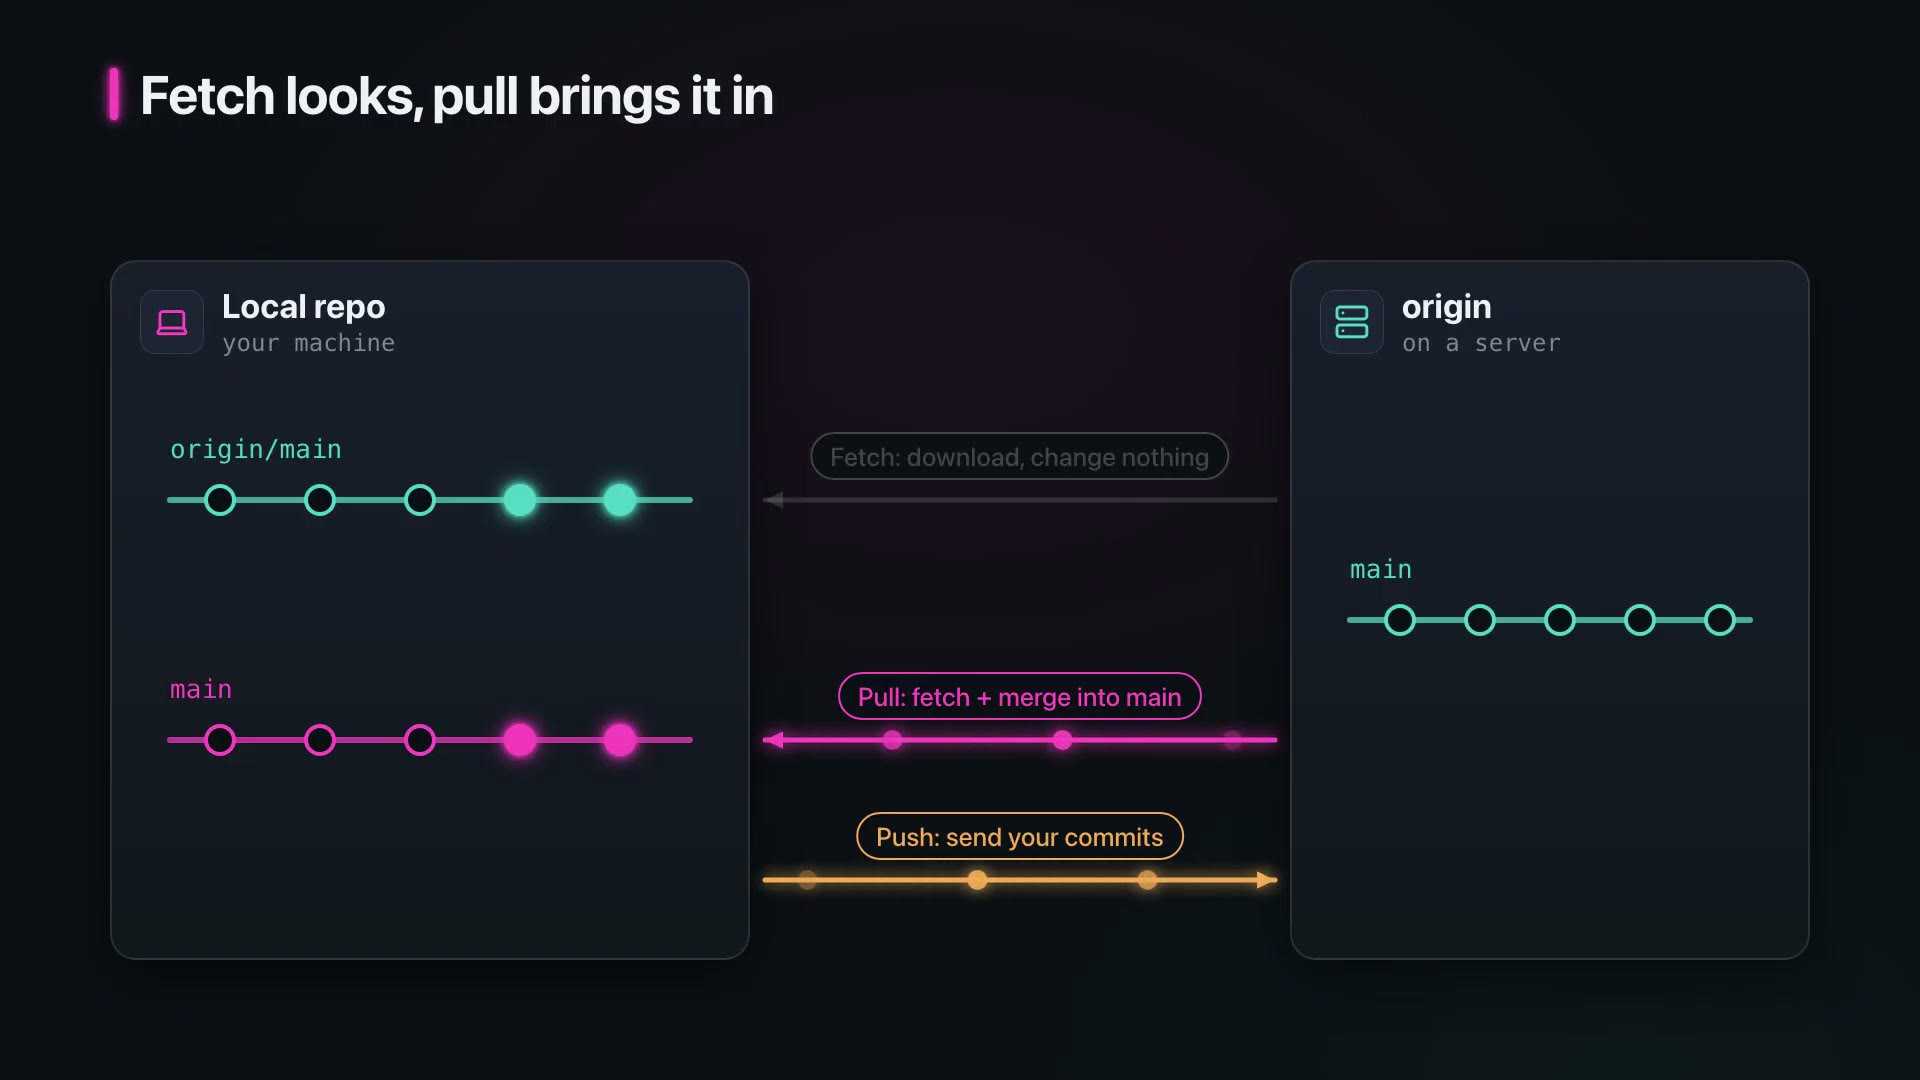
Pull fetches and then brings those commits into your branch. Push sends your commits up.
Fetch, pull and push
Click Fetch. A teammate pushed two commits to main, and now they show up in the graph on the remote branch, above ours.
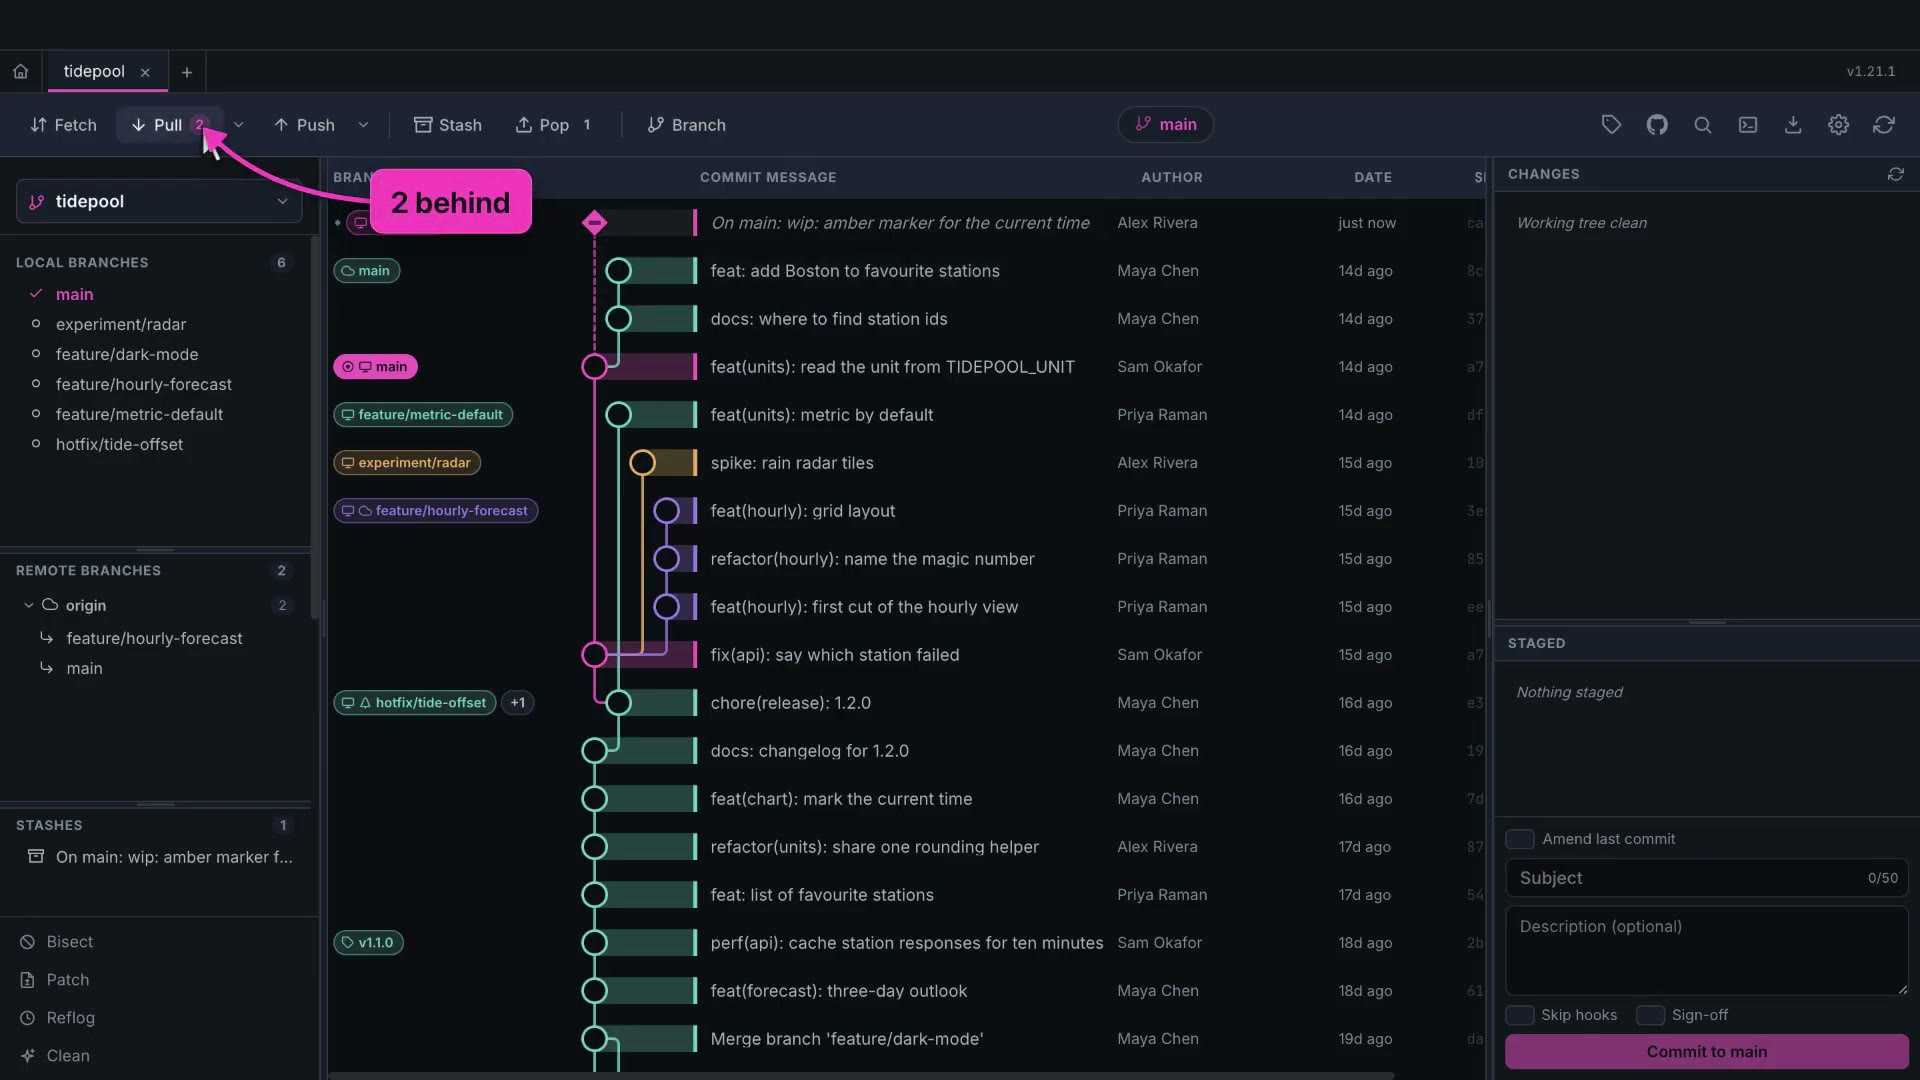
The Pull button counts it for you: two commits behind.
The arrow next to Pull offers three ways to pull: a normal pull, fast-forward only, which refuses to make a merge, or pull with rebase.
A plain pull here fast-forwards main to the new commits.
Now commit something, and the Push button shows one commit ahead. Click Push to send it.
Push has its own menu, with force push. Git Gud always uses force with lease, which refuses to overwrite work you haven't seen.
When branches diverge
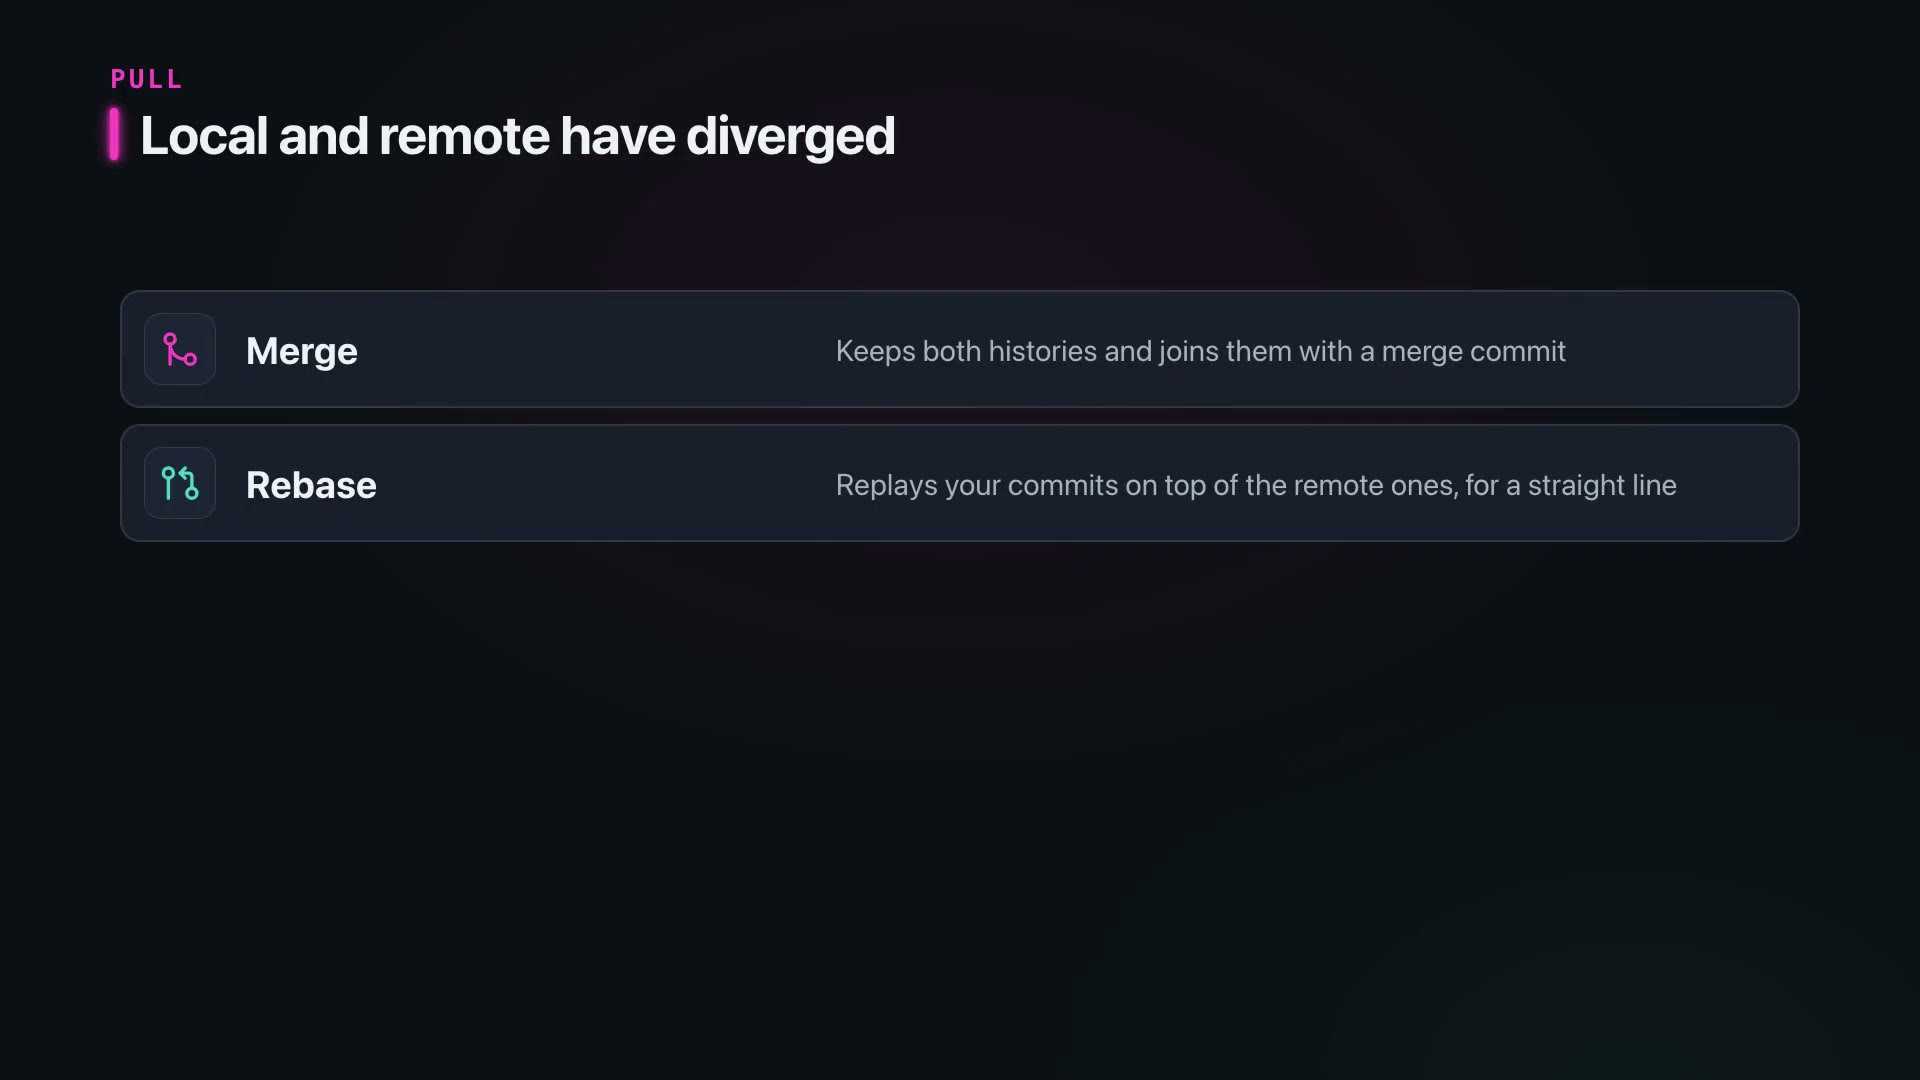
If you and the remote both have new commits, a pull can't simply fast-forward. Git Gud asks whether to merge or to rebase, and explains the difference right there.
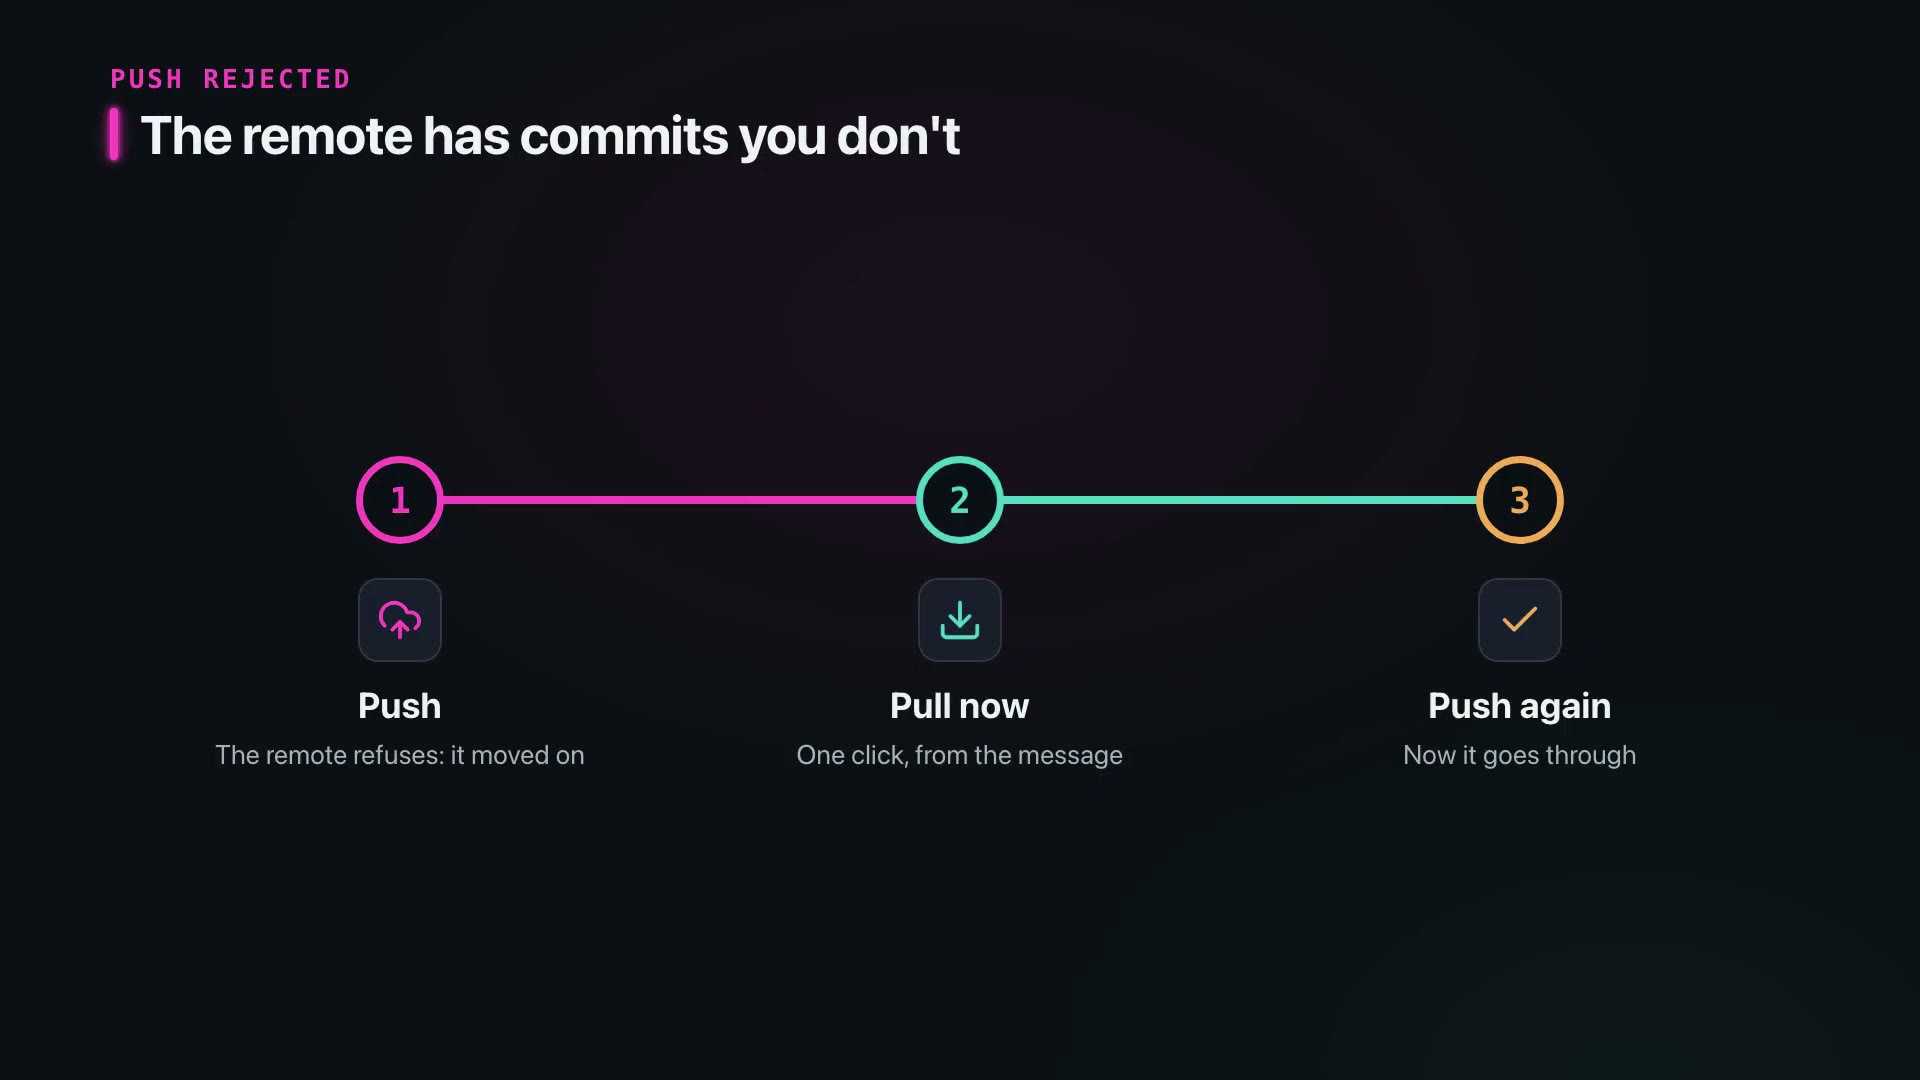
And if a push is rejected because the remote moved, the message offers to pull right away.
Signing in to your host
The GitHub button opens Integrations. Git Gud signs in to GitHub, GitLab and Bitbucket.
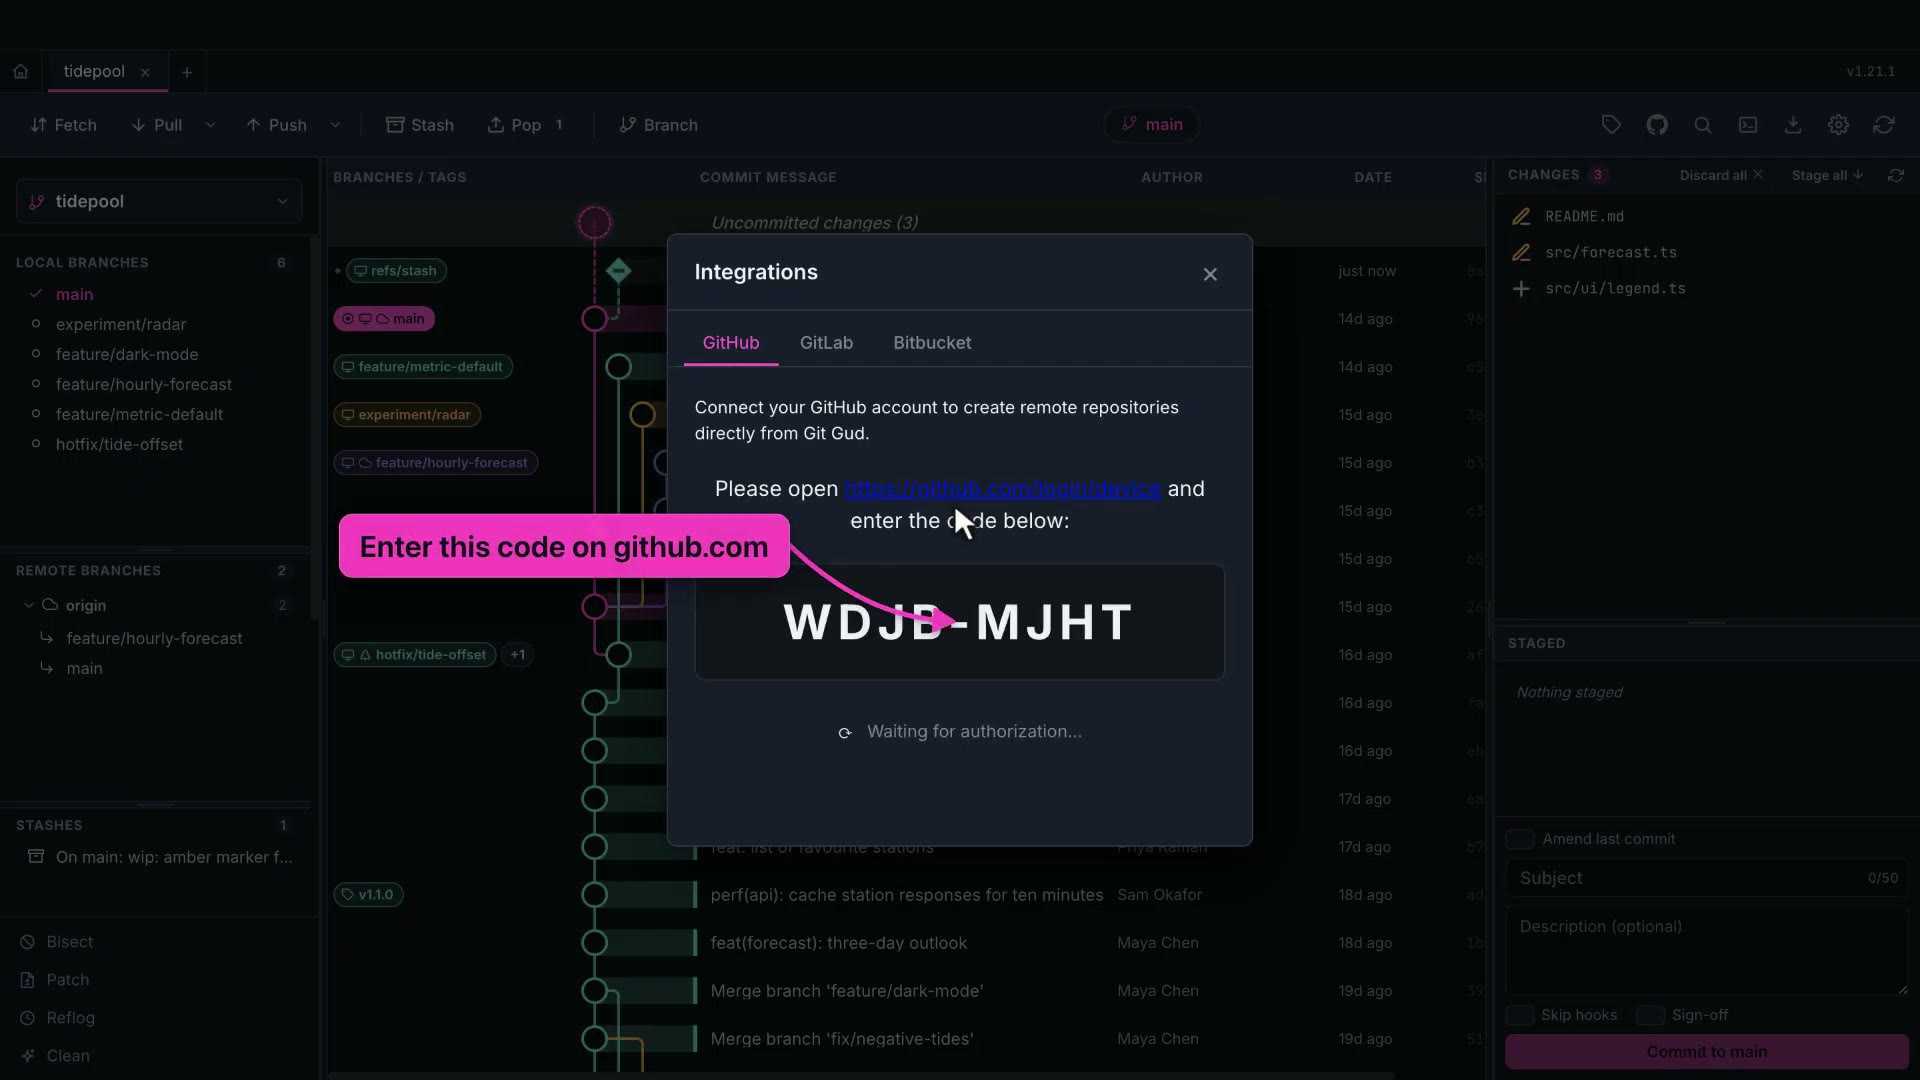
GitHub uses a device code: Git Gud shows a code, you approve it in the browser, and that's it. GitLab and Bitbucket take an access token, and GitLab works with self-hosted servers too.
Once you're signed in, pushing and pulling to that host just works. Git Gud adds your token to each git command for that host only. Tokens are encrypted on your machine.
From here you can also create a new repository on the host for the project you have open, and Git Gud adds it as origin.
And Clone from Remote on the start page clones by URL, or lets you browse your own repositories on each host you're signed in to.
6. Rewriting history
Right-click any commit. This menu is where history gets rewritten.
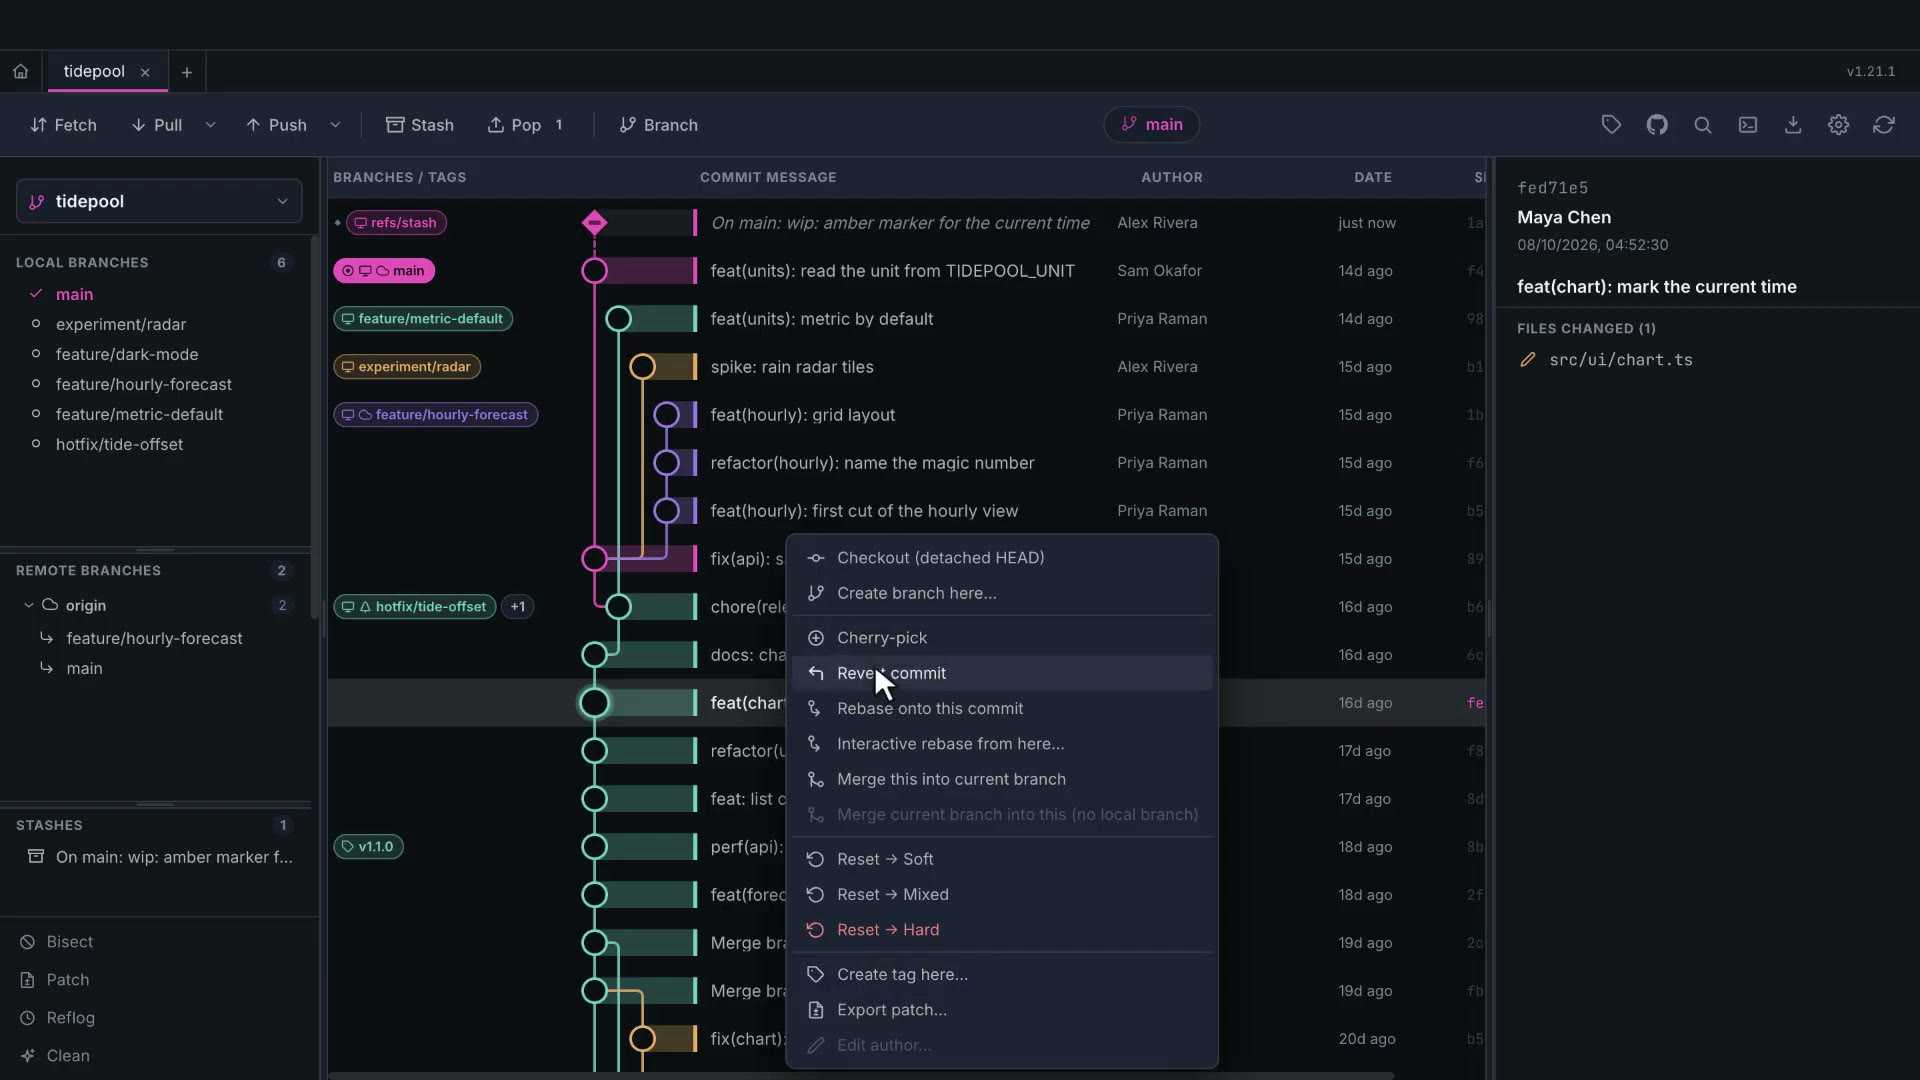
You can check the commit out on its own, start a branch or a tag there, cherry-pick it onto your branch, or revert it.
Reset moves your branch to this commit. Soft keeps the changes staged, mixed keeps them as unstaged changes, and hard throws them away. Hard asks first.
There's also rebase onto this commit, merge it into the current branch, export it as a patch, and edit the author of your last commit.
Cherry-pick and revert
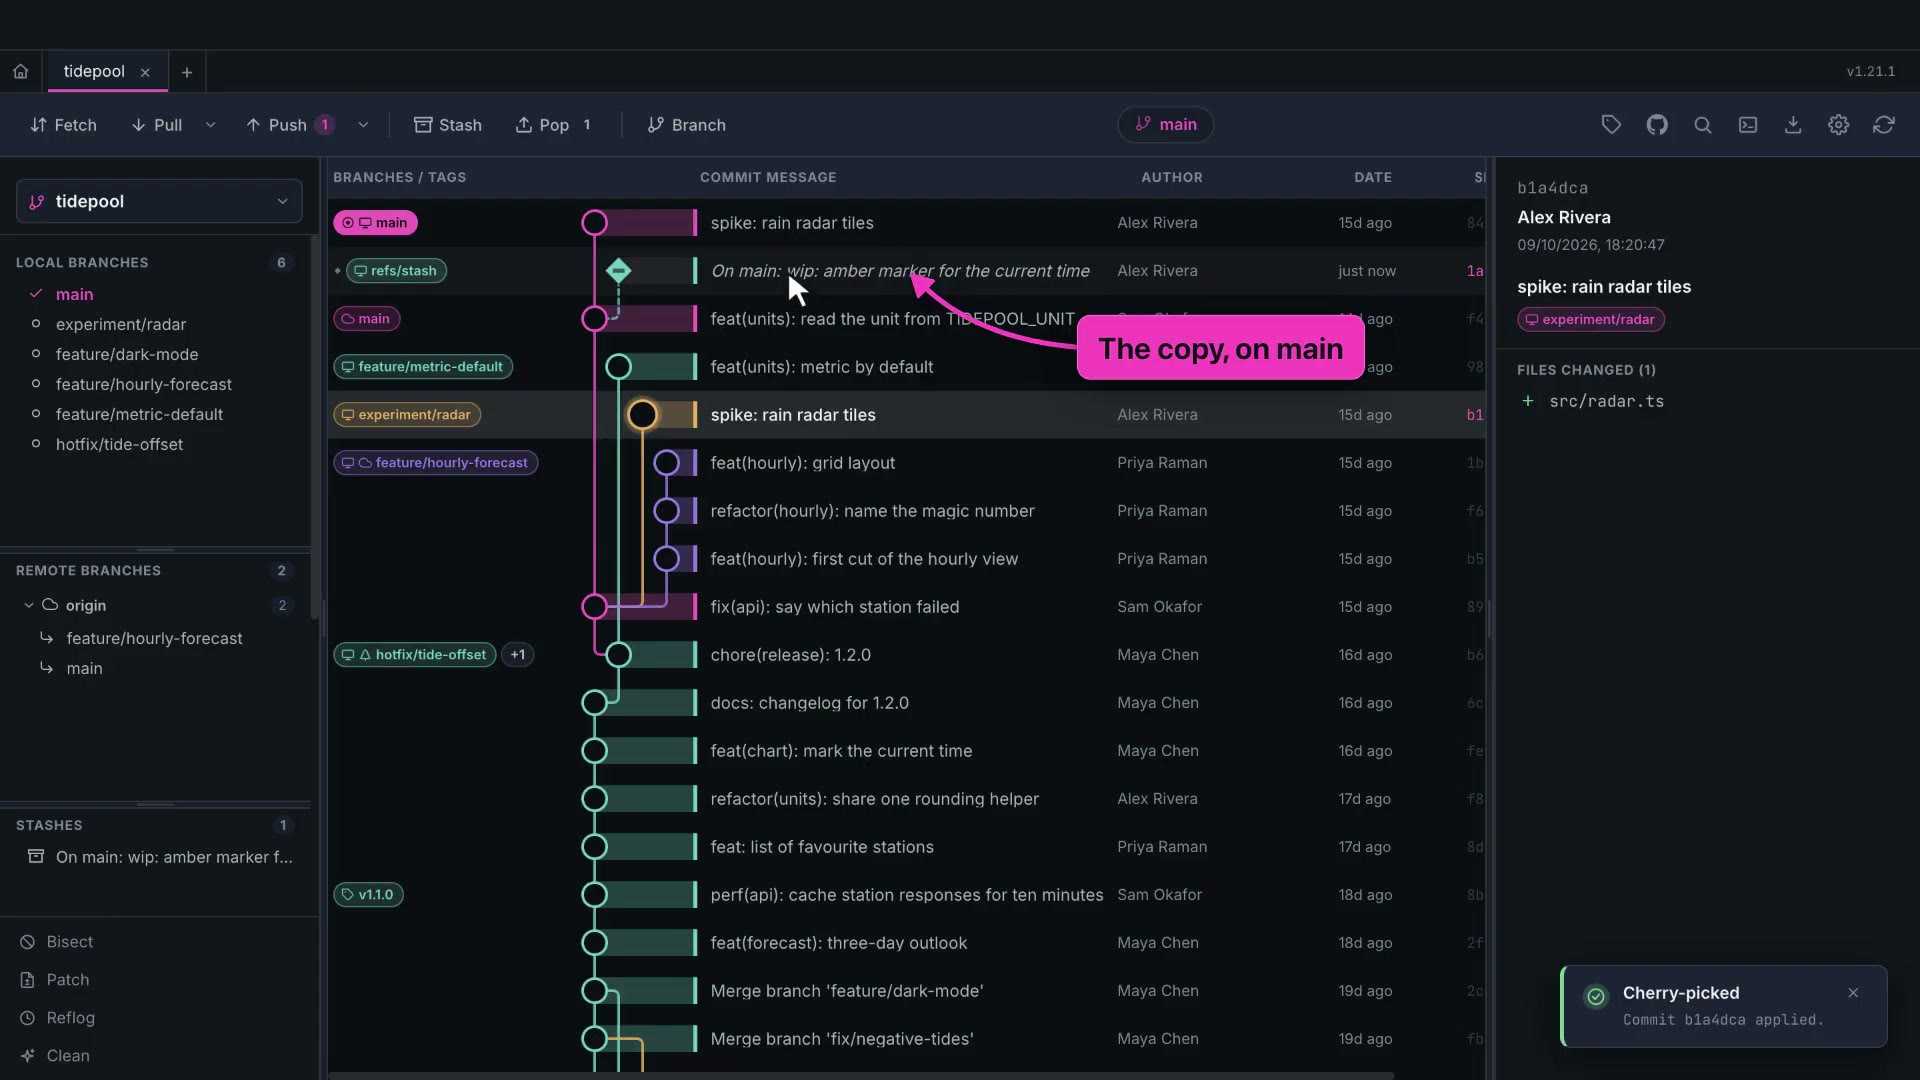
Cherry-pick copies a commit from another branch onto yours. Here's the radar spike, copied onto main as a new commit.
Revert makes a new commit that undoes an old one. History stays honest: the mistake and its fix are both there.
Interactive rebase
Interactive rebase from here opens a list of every commit since the one you clicked.
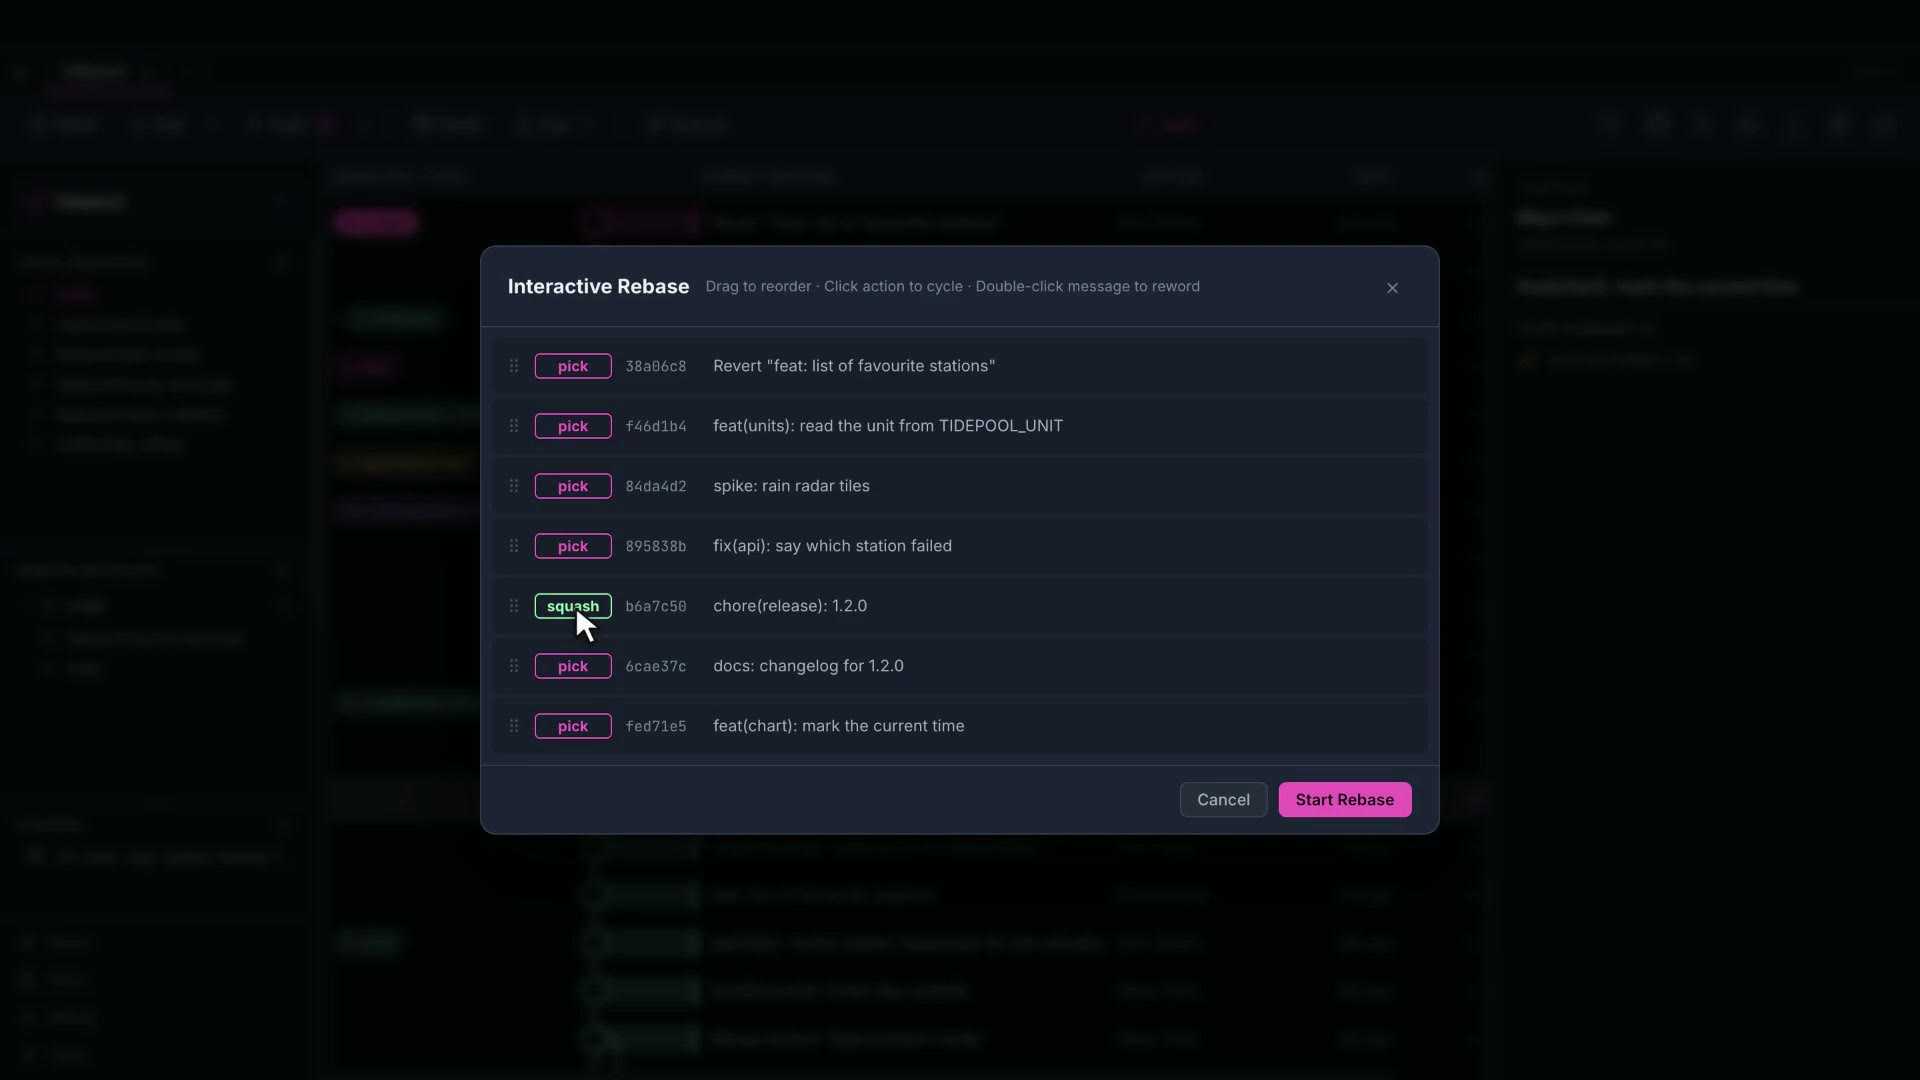
Drag rows to reorder them. Click the action to cycle it: pick keeps a commit, reword changes its message, squash and fixup fold it into the one before, and drop removes it.
Double-click a message to reword it in place.
Click Start Rebase, and Git Gud runs it. The graph redraws with the new history.
Squash and drop a range
For quick cleanups you don't need the dialog. Select a run of commits with shift-click.
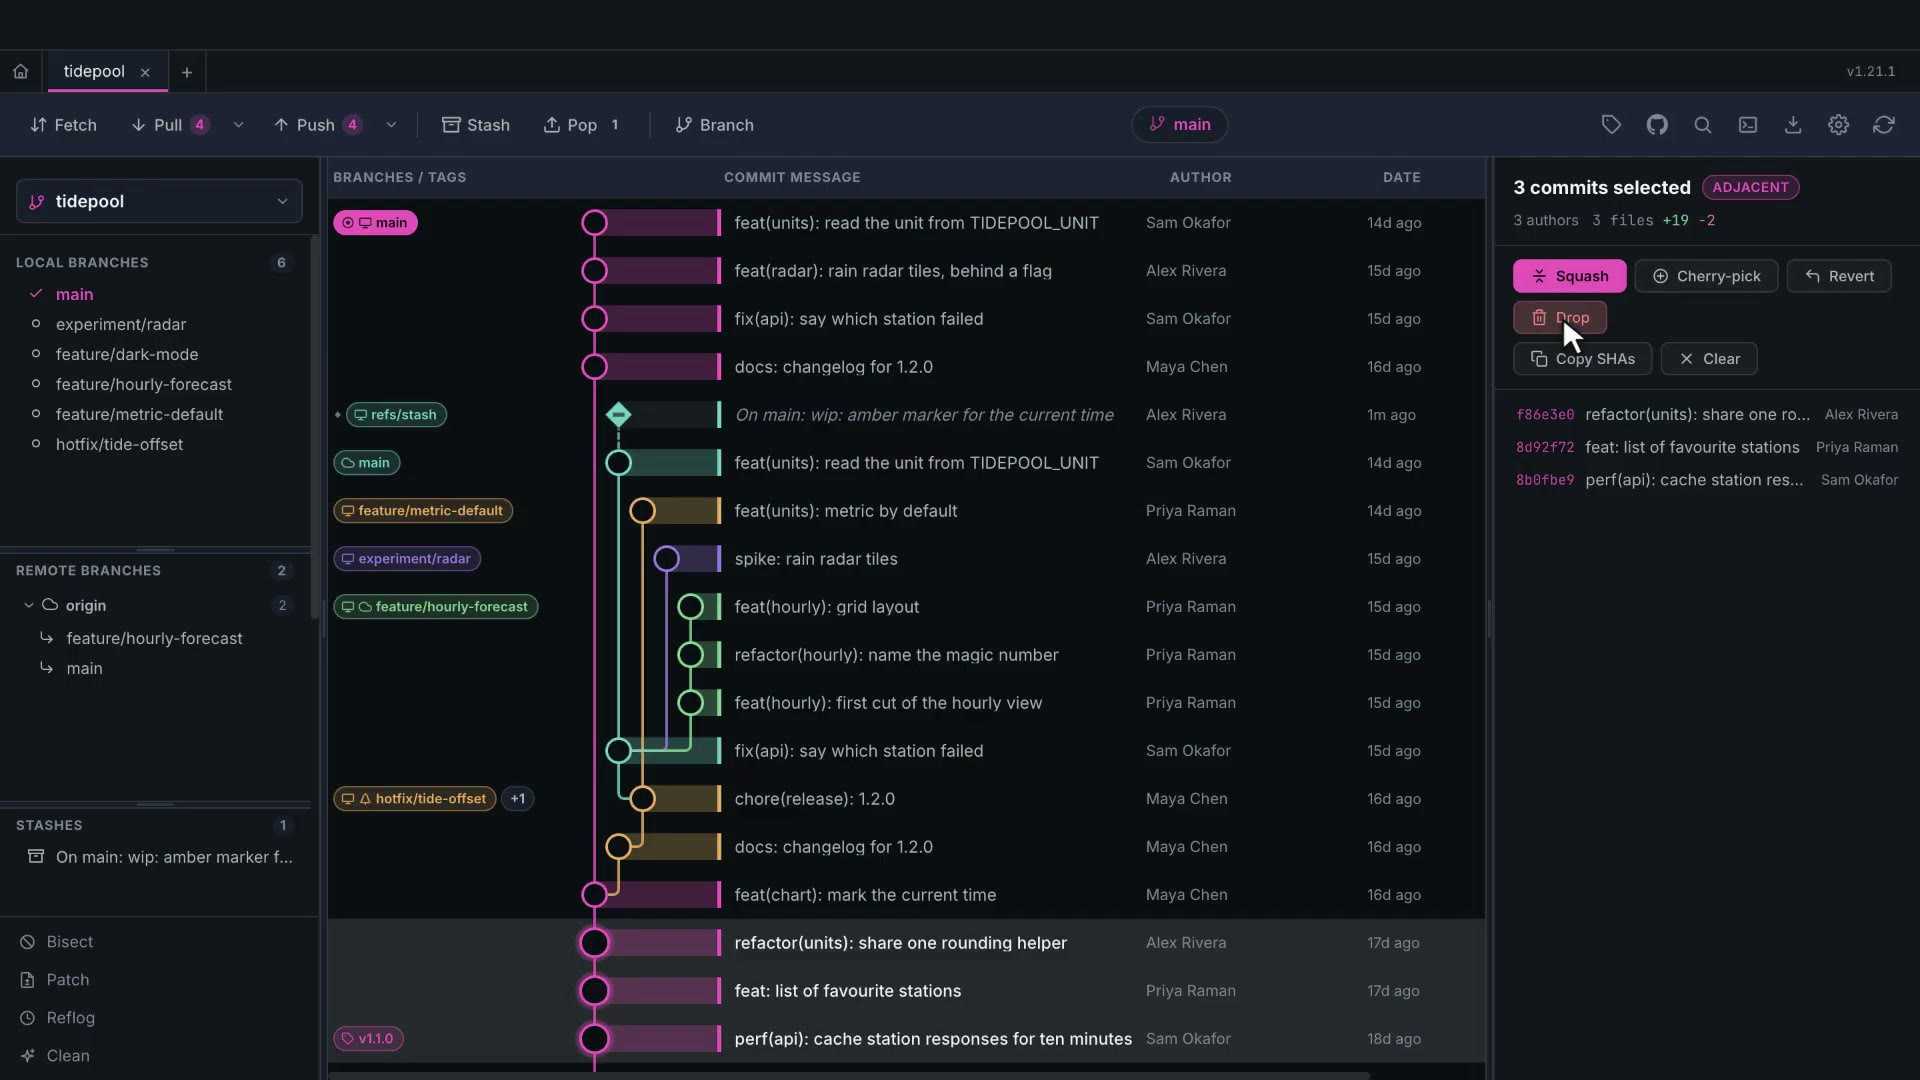
The panel offers squash, cherry-pick, revert and drop for the whole selection. Squash and drop need commits that sit next to each other.
Squash them, and three small commits become one.
Every one of these is an ordinary git command in the activity log. If you don't like the result, the reflog can take you back. That's in Recovery and power tools.
7. Conflicts and auto-fix
Let's merge feature/metric-default into main. Both branches changed the same line of src/units.js, so git can't decide alone.
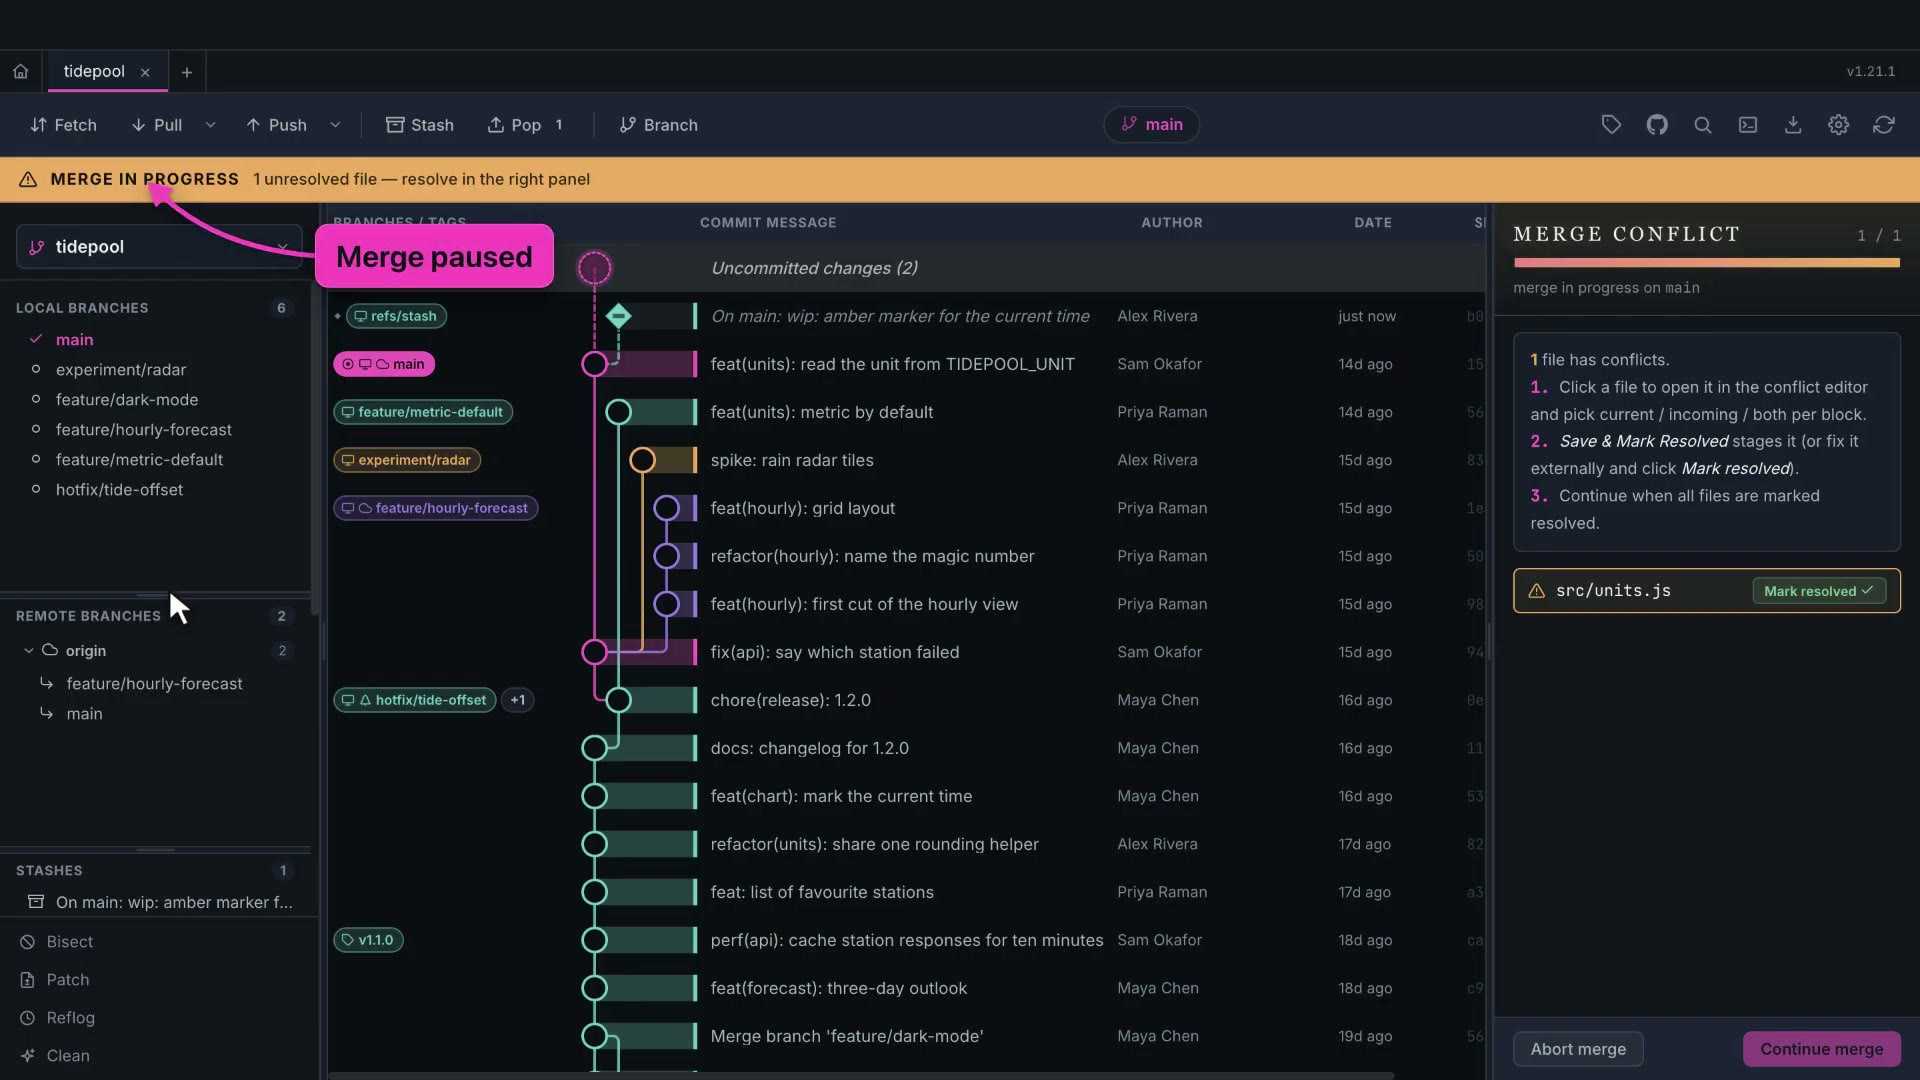
Git Gud switches into conflict mode. The top bar says a merge is paused, and the right panel lists the files that need you.
Each file can be opened in the conflict editor. When they're all resolved, Continue finishes the merge. Abort puts everything back as it was.
The conflict editor
The conflict editor shows three panes. Current is your branch. Incoming is the branch you're merging. In the middle is the result you're writing.
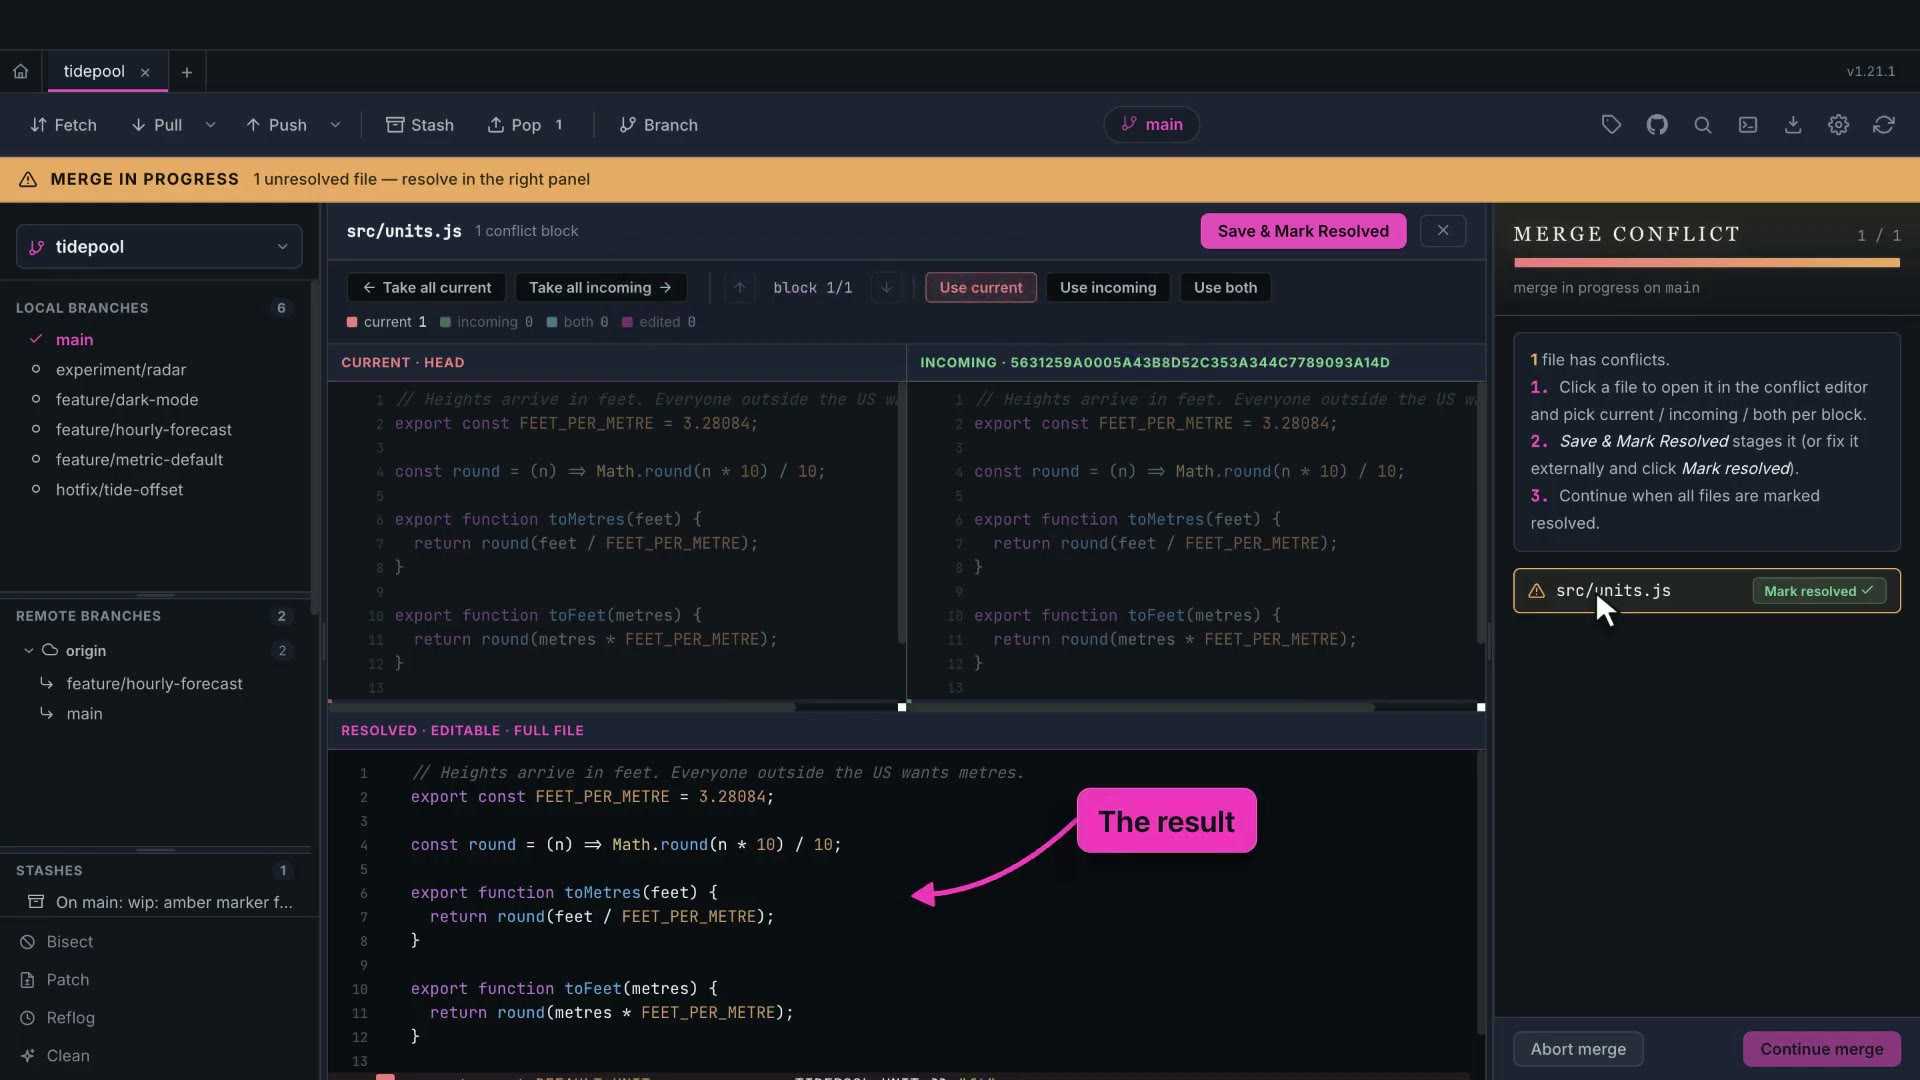
Lines both sides share are lightly tinted. Lines that differ are strongly tinted, and the words that changed are marked.
Each conflict block has buttons: use this side, or keep both. The arrows jump between blocks.
You can also click any single line in a side pane, and it's inserted into the result at your cursor.
The result is a real editor, with syntax highlighting. Here the best answer is a mix of both: read the environment variable, and fall back to metres.
The gutter tags show where every line came from: current, incoming, both, or edited by you. The legend counts them.
Save and mark resolved writes the file and stages it. If conflict markers are still in there, it warns you first.
Continue, and the merge commit is made.
Remembering resolutions
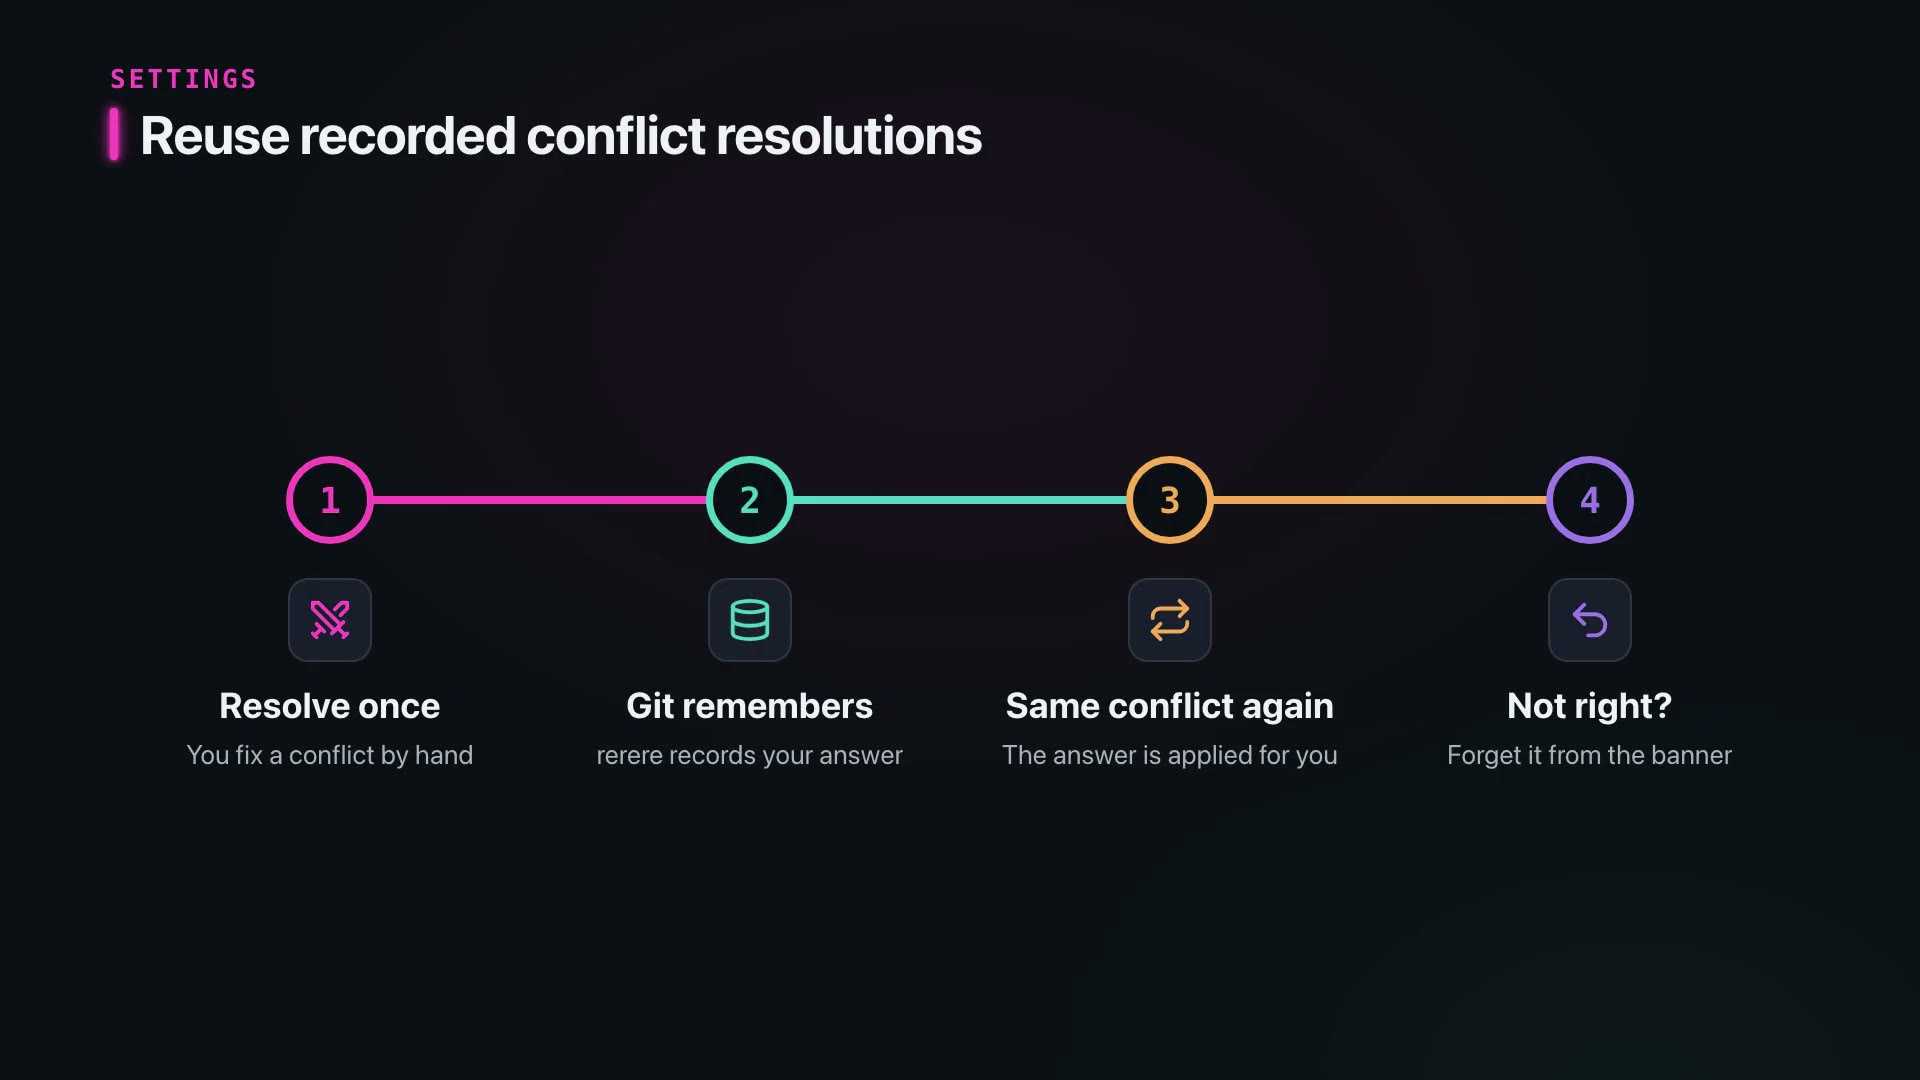
If you resolve the same conflict again and again, for example while rebasing a long branch, turn on Reuse recorded conflict resolutions in Settings.
Auto-fix for blocked actions
Git often refuses to act because of uncommitted changes. Checking out a branch, pulling, cherry-picking: they all stop if your edits would be overwritten.
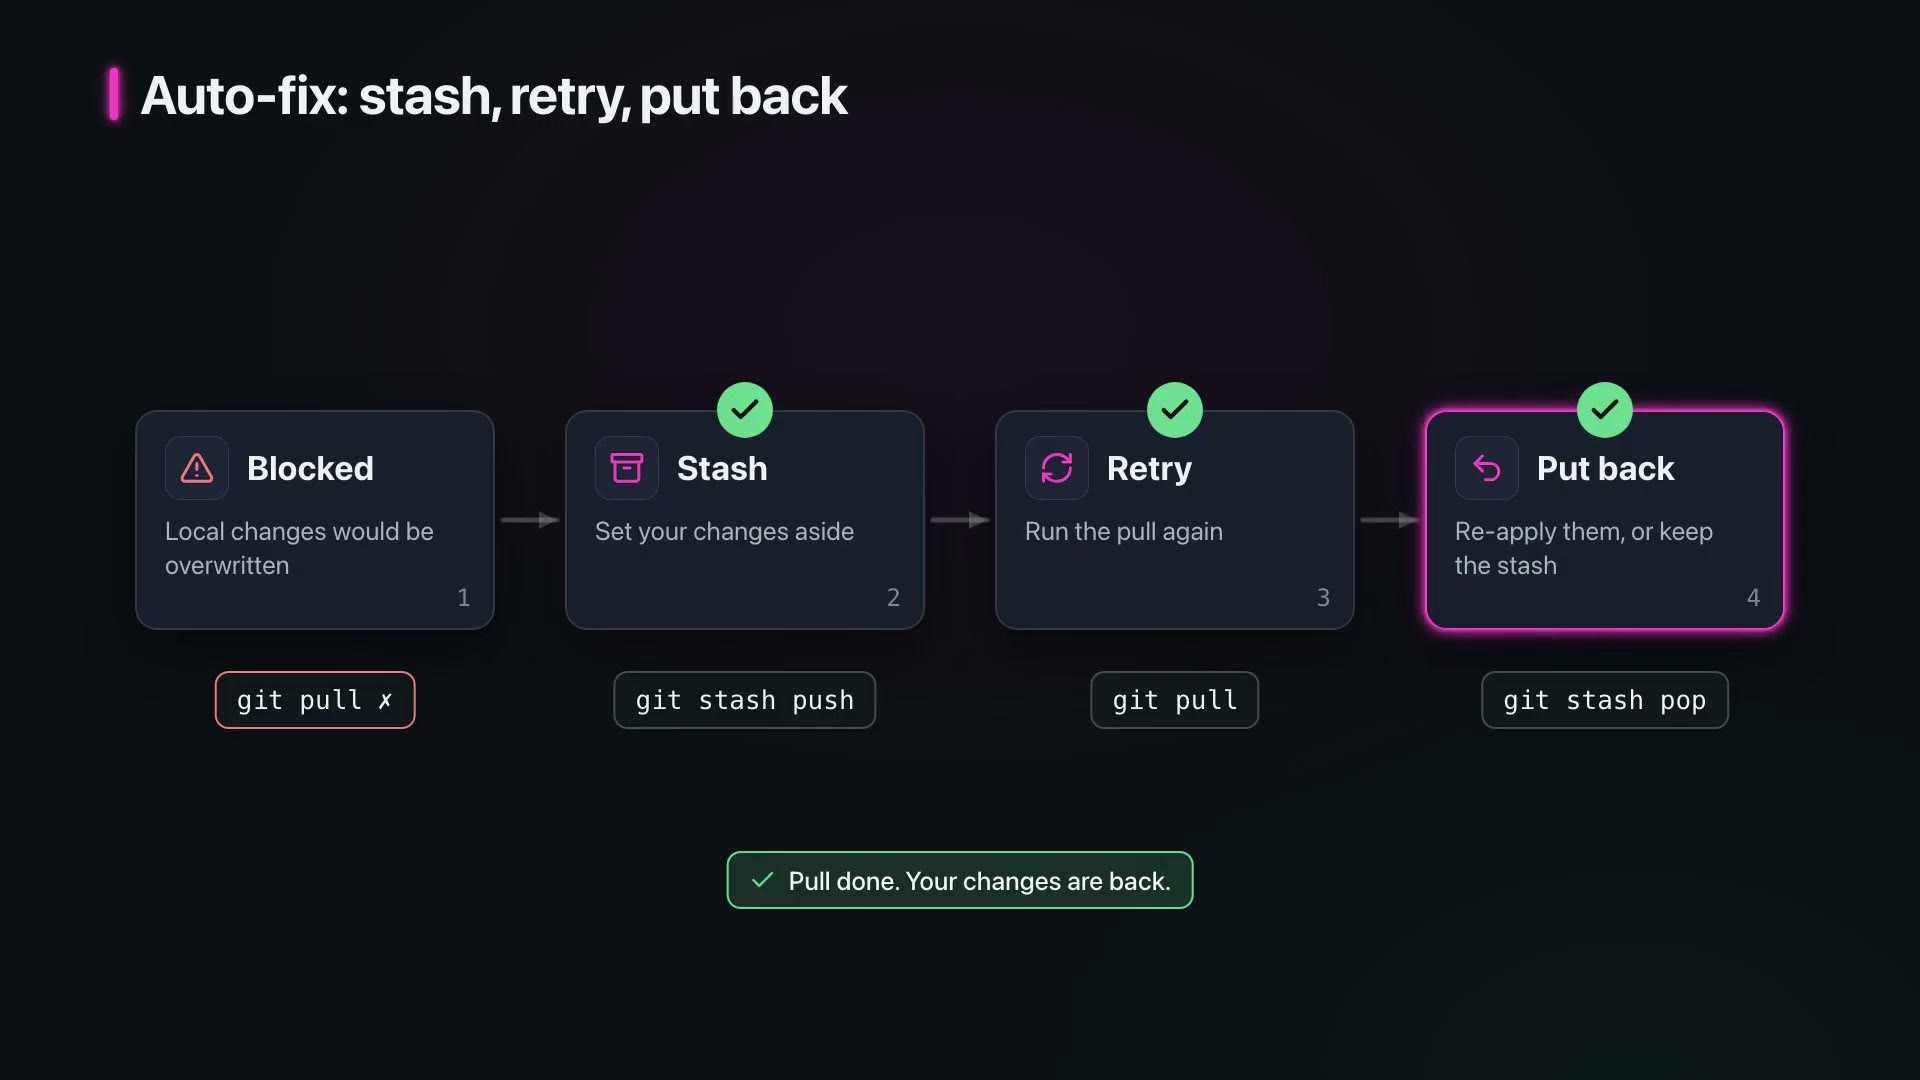
I have local edits to the README, and I double-click a branch that changes the README too.
Instead of an error, Git Gud stashes my edits, retries the checkout, and tells me exactly what it did, step by step.
For a checkout it keeps the stash rather than dropping my edits onto another branch. The message offers to pop it right now if I want them here.
For a pull, the edits are put back automatically once the pull is done. If putting them back conflicts, the stash is kept safe and the conflict panel opens.
If you'd rather decide yourself every time, switch off Auto-fix blocked actions in Settings, and you'll get the old prompts back.
8. Recovery and power tools
First, a mistake. I reset main hard, three commits back. Main's label drops down the graph, and if those commits had never been pushed, nothing would point at them any more.
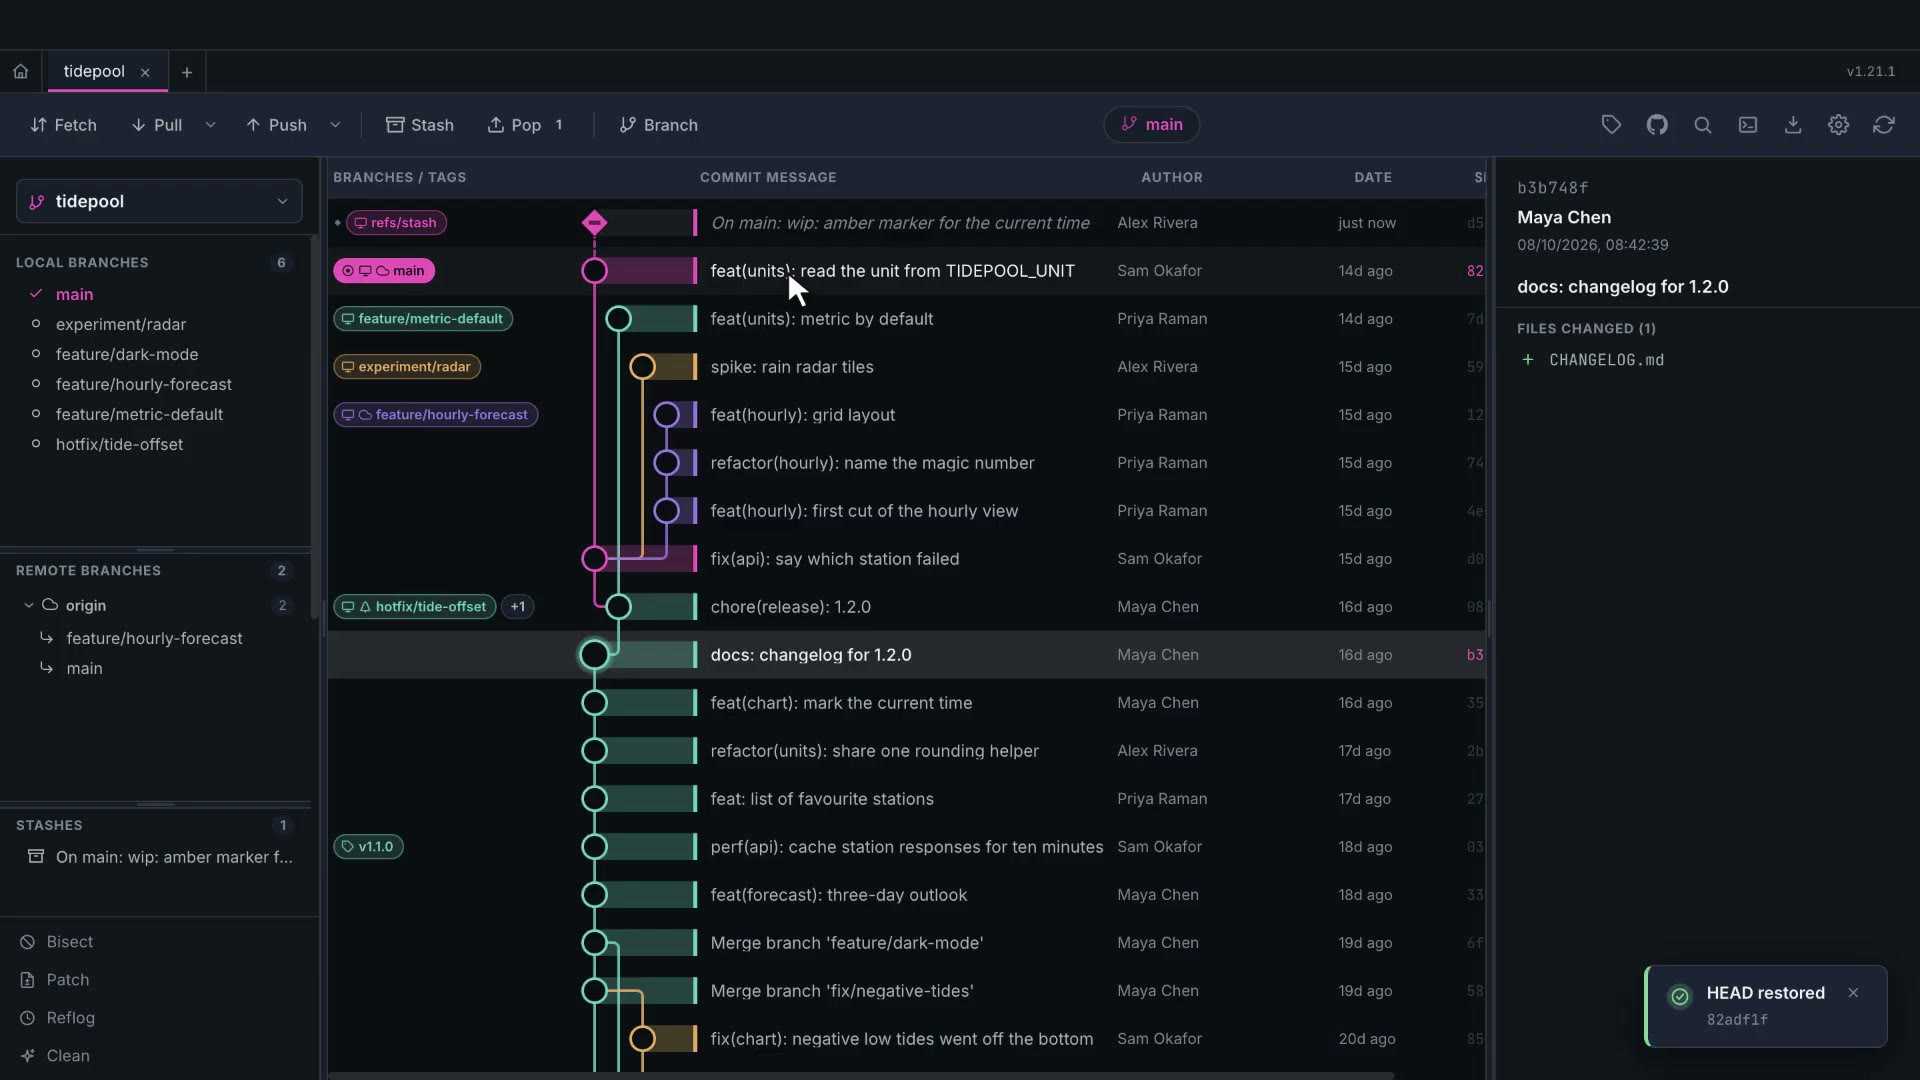
They're not really gone. Git records every place your branch has been, in the reflog. Open it from the sidebar.
Each entry is a moment: the reset, the commit before it, the checkout before that. Pick the entry from before the reset, and choose Restore HEAD here.
Git Gud asks to confirm, and main is back where it was, with all three commits.
Bisect
Tidepool's unit tests fail on main. They passed at v1.0.0. Somewhere between, a commit broke them. Bisect finds it.
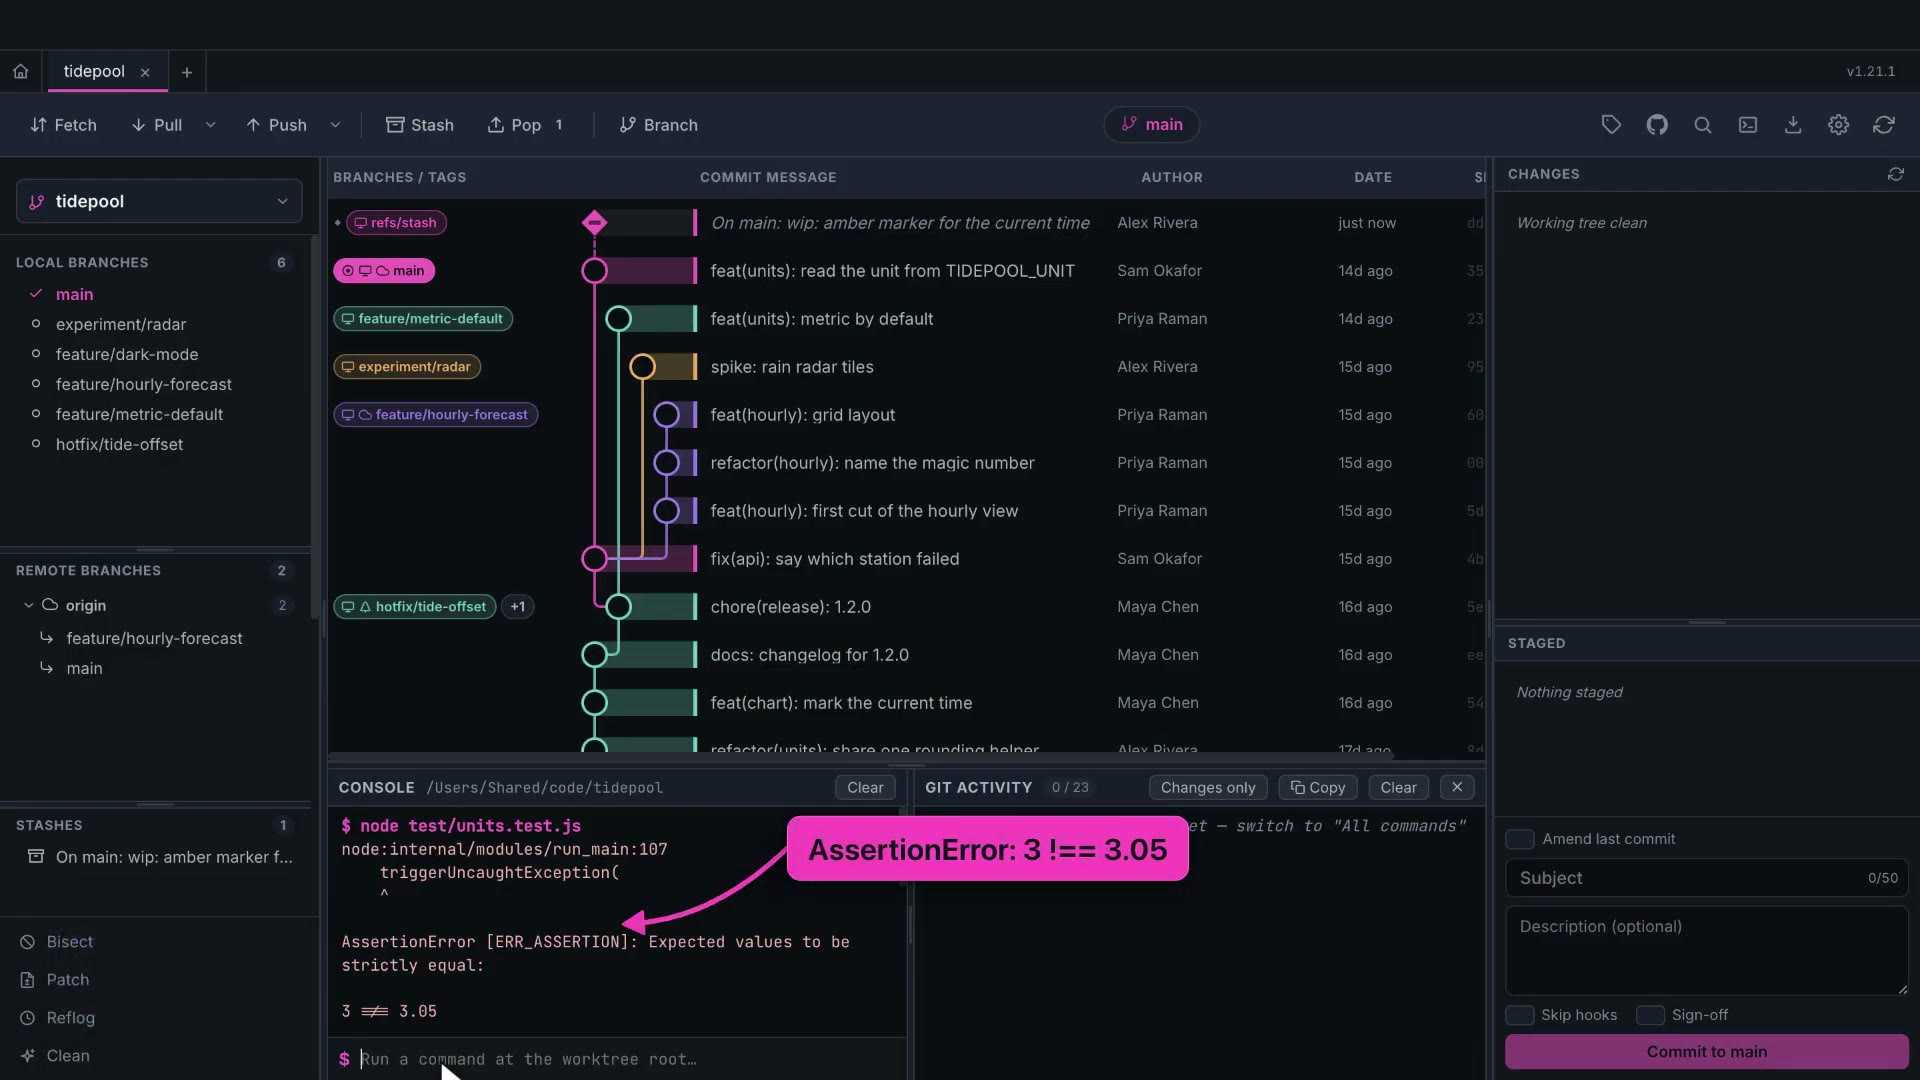
Open Bisect. Leave the bad commit empty to mean the current one, and pick v1.0.0 as good. Start Bisect.
Git checks out a commit halfway between. I run the tests in the console. They pass, so I mark it good.
Git jumps halfway again. This time the tests fail, so I mark it bad.
Two more steps, and Git Gud names the first bad commit: share one rounding helper. Rounding to one decimal broke the conversions.
Reset bisect puts you back where you started.
Patches
Patch turns changes into a file you can mail or paste. Export writes your uncommitted changes, or any commit from the graph's menu, as a patch.
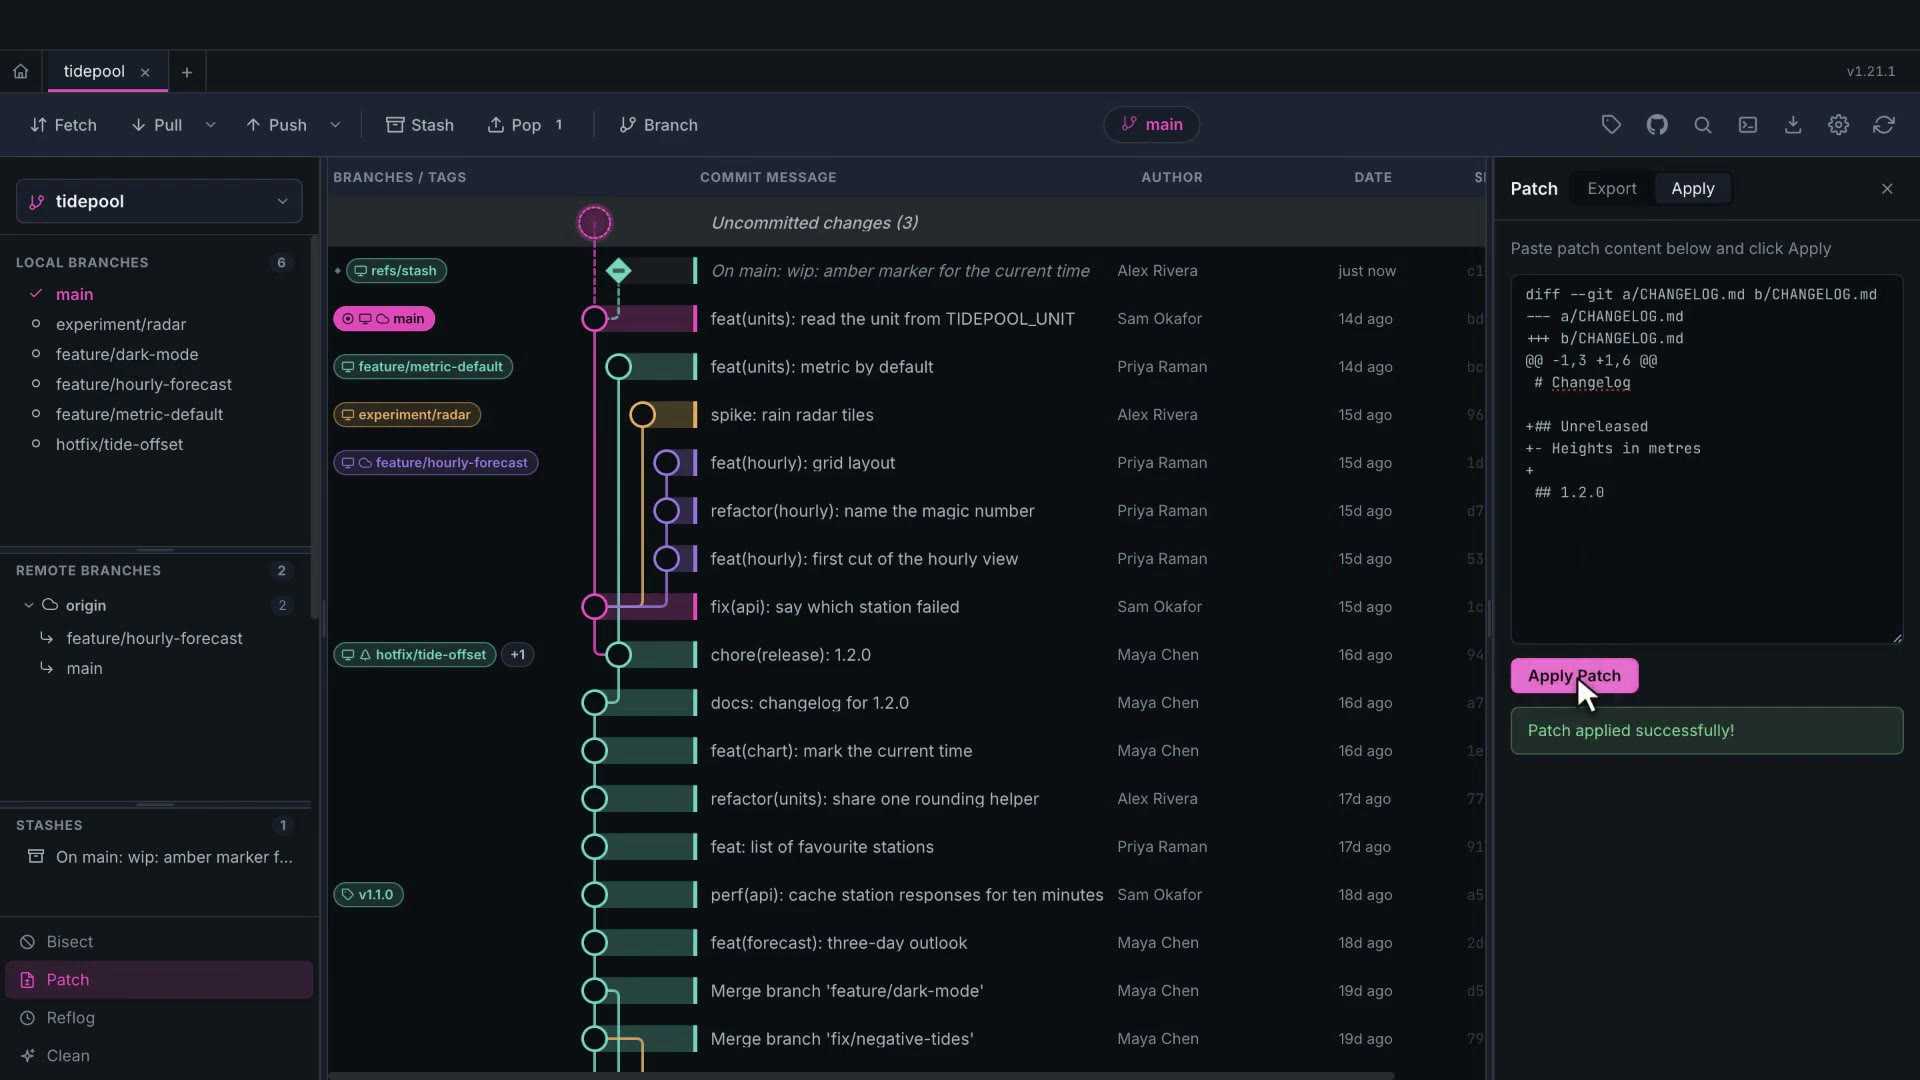
Apply takes patch text, pastes it in, and applies it to your working tree.
Clean
Clean deletes files git doesn't track, like build output. First it shows exactly what would go, and you can untick anything you want to keep.
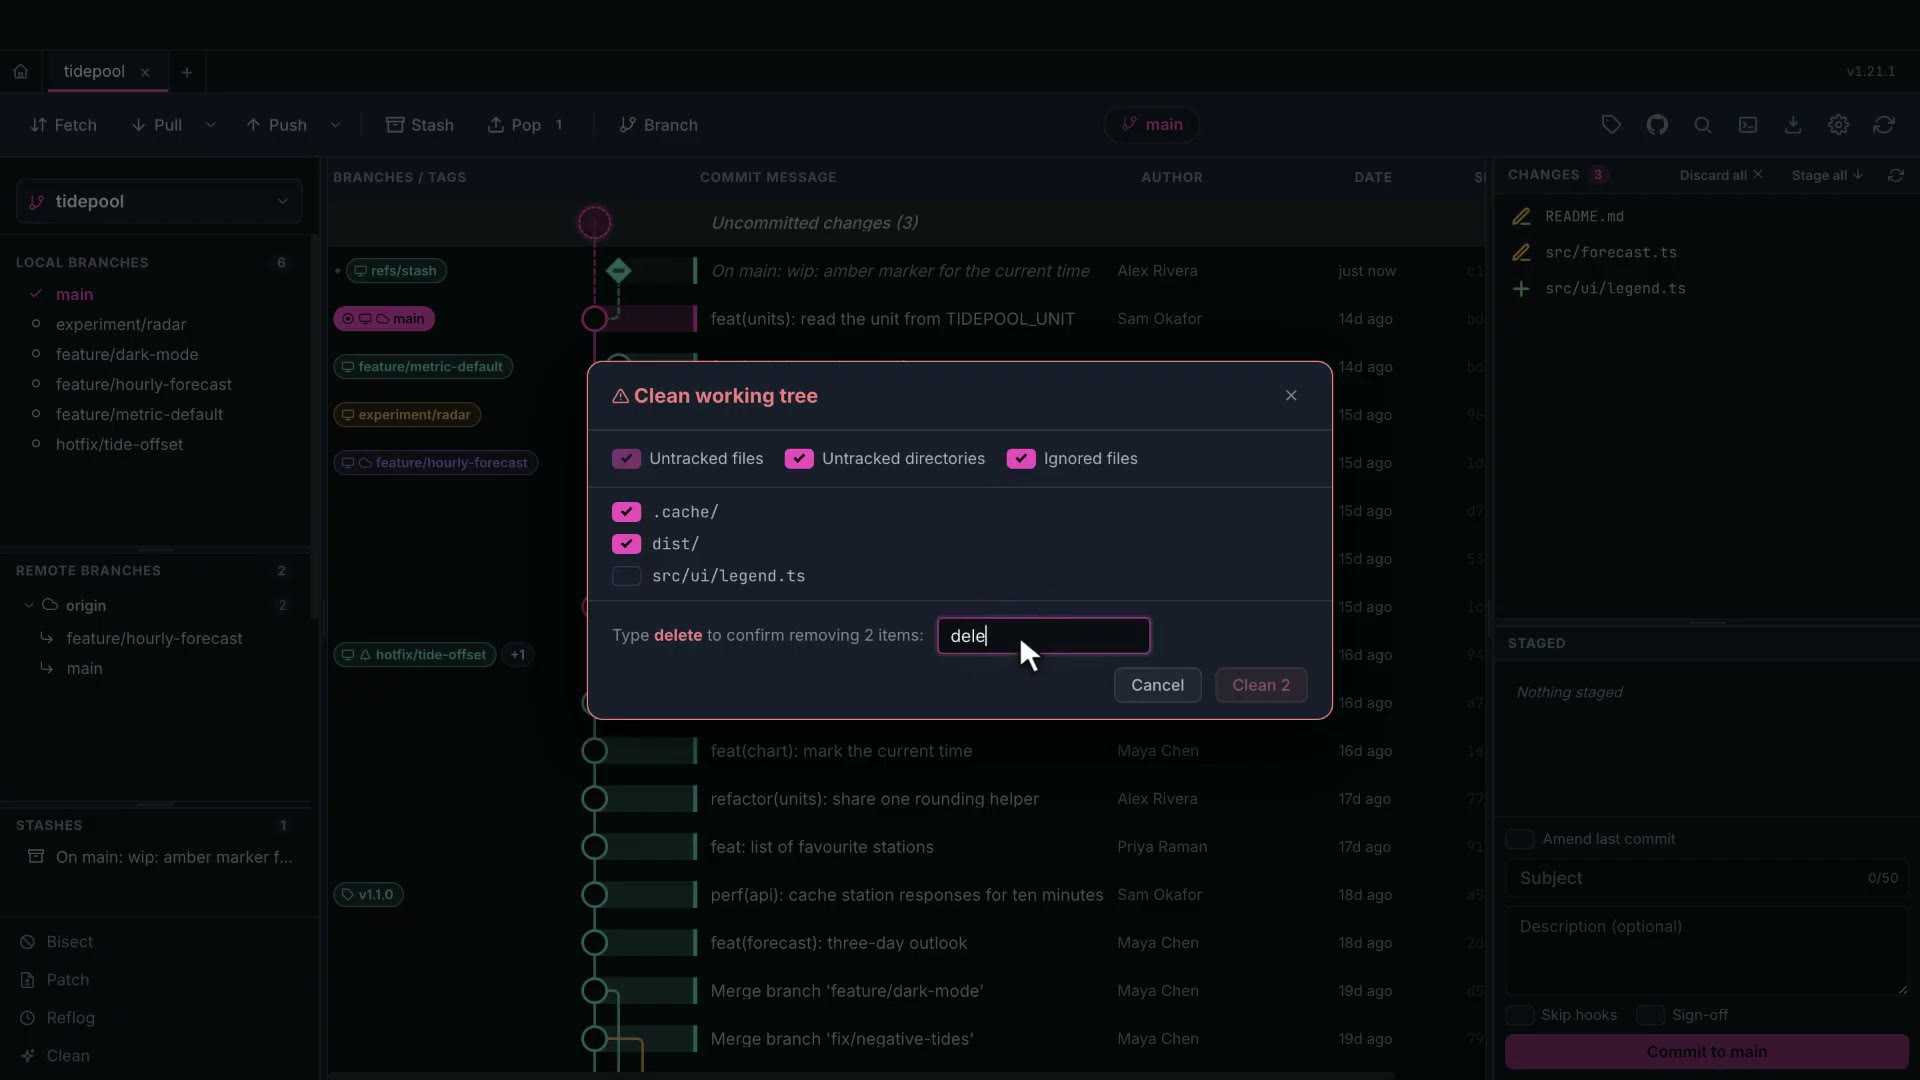
Because there's no undo, you type the word delete before the button unlocks.
The console dock
The console runs any command at the root of your repository. Up and down recall earlier commands, and Stop ends a long one.
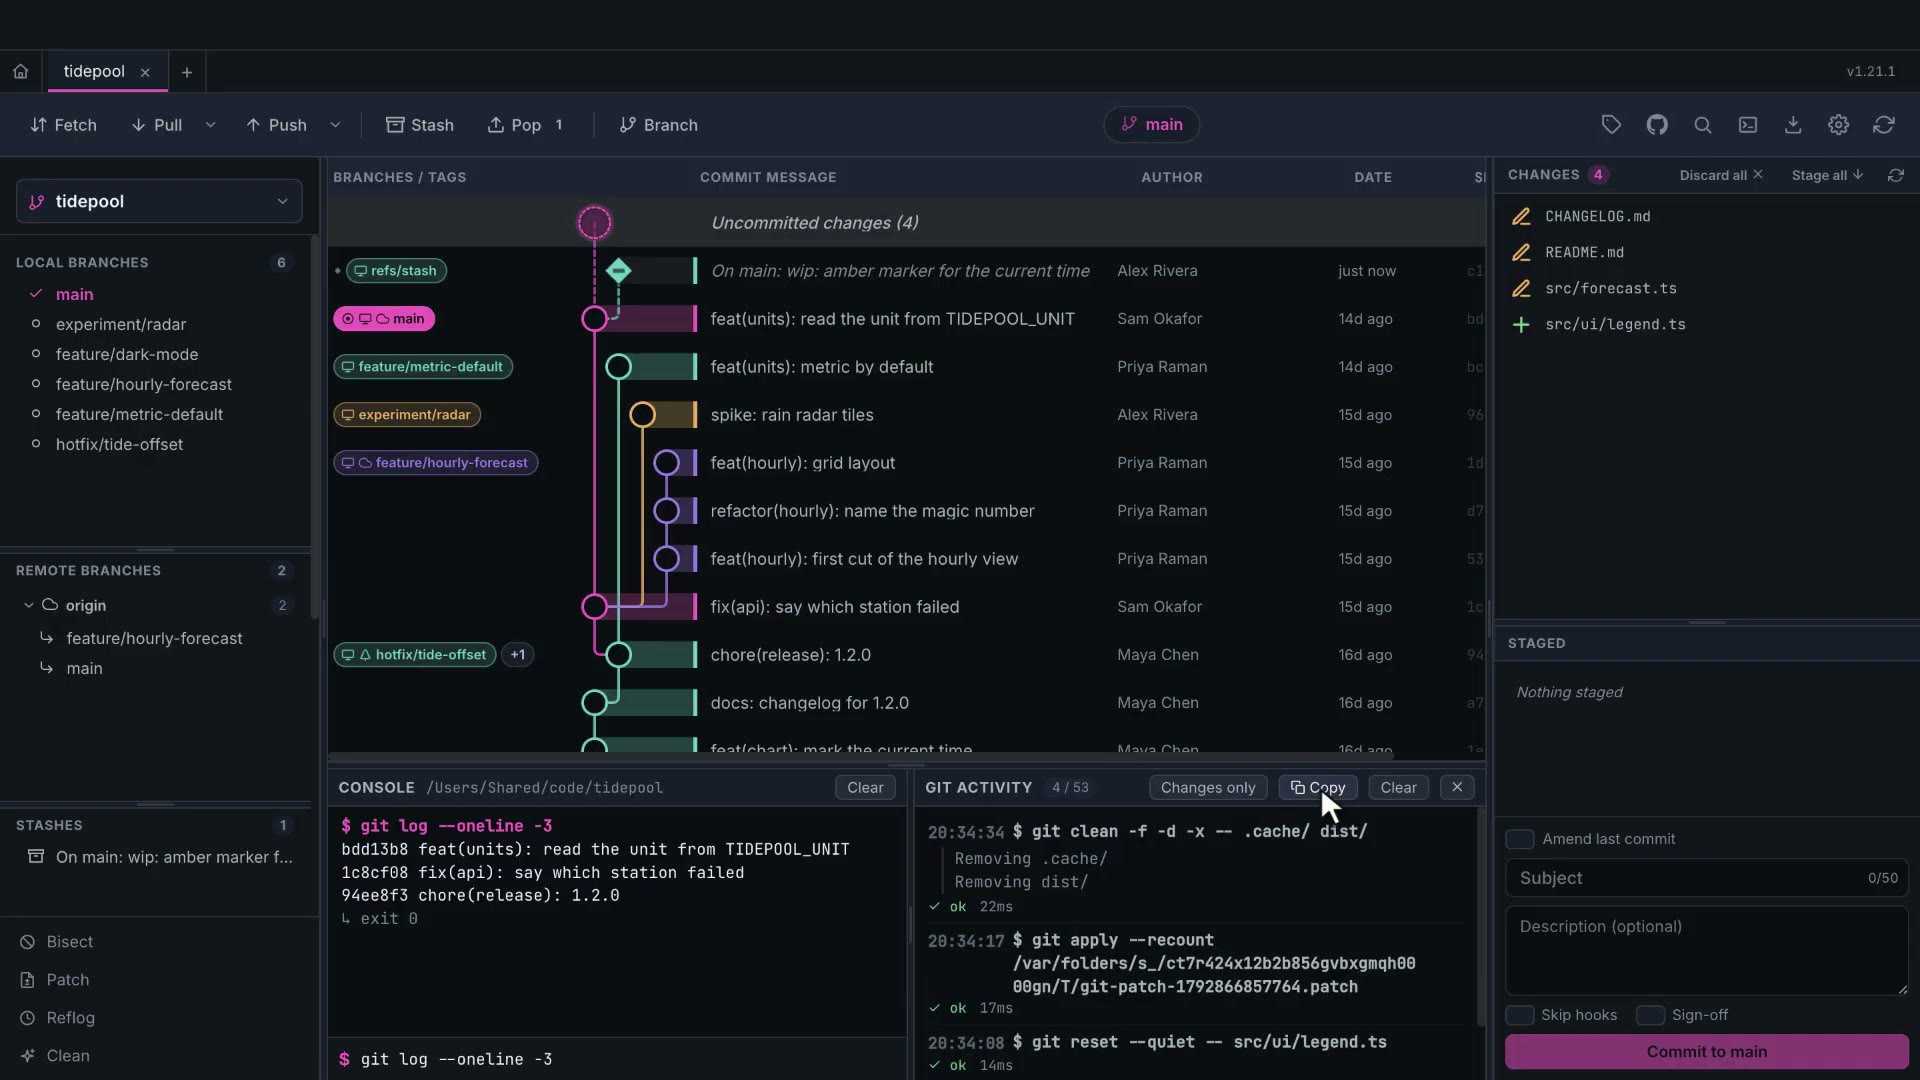
Next to it, the git activity log lists every git command Git Gud ran, with its output and exit code. Changes only hides the read-only queries, so you see what actually changed your repository.
Copy grabs the whole log, which is handy for a bug report. Nothing Git Gud does is hidden from you.
9. Gerrit mode
Gerrit is a code review server used by projects like Android and Chromium. It doesn't use pushed branches. You push your commit to a special ref, and every amend becomes a new patch set of the same change.
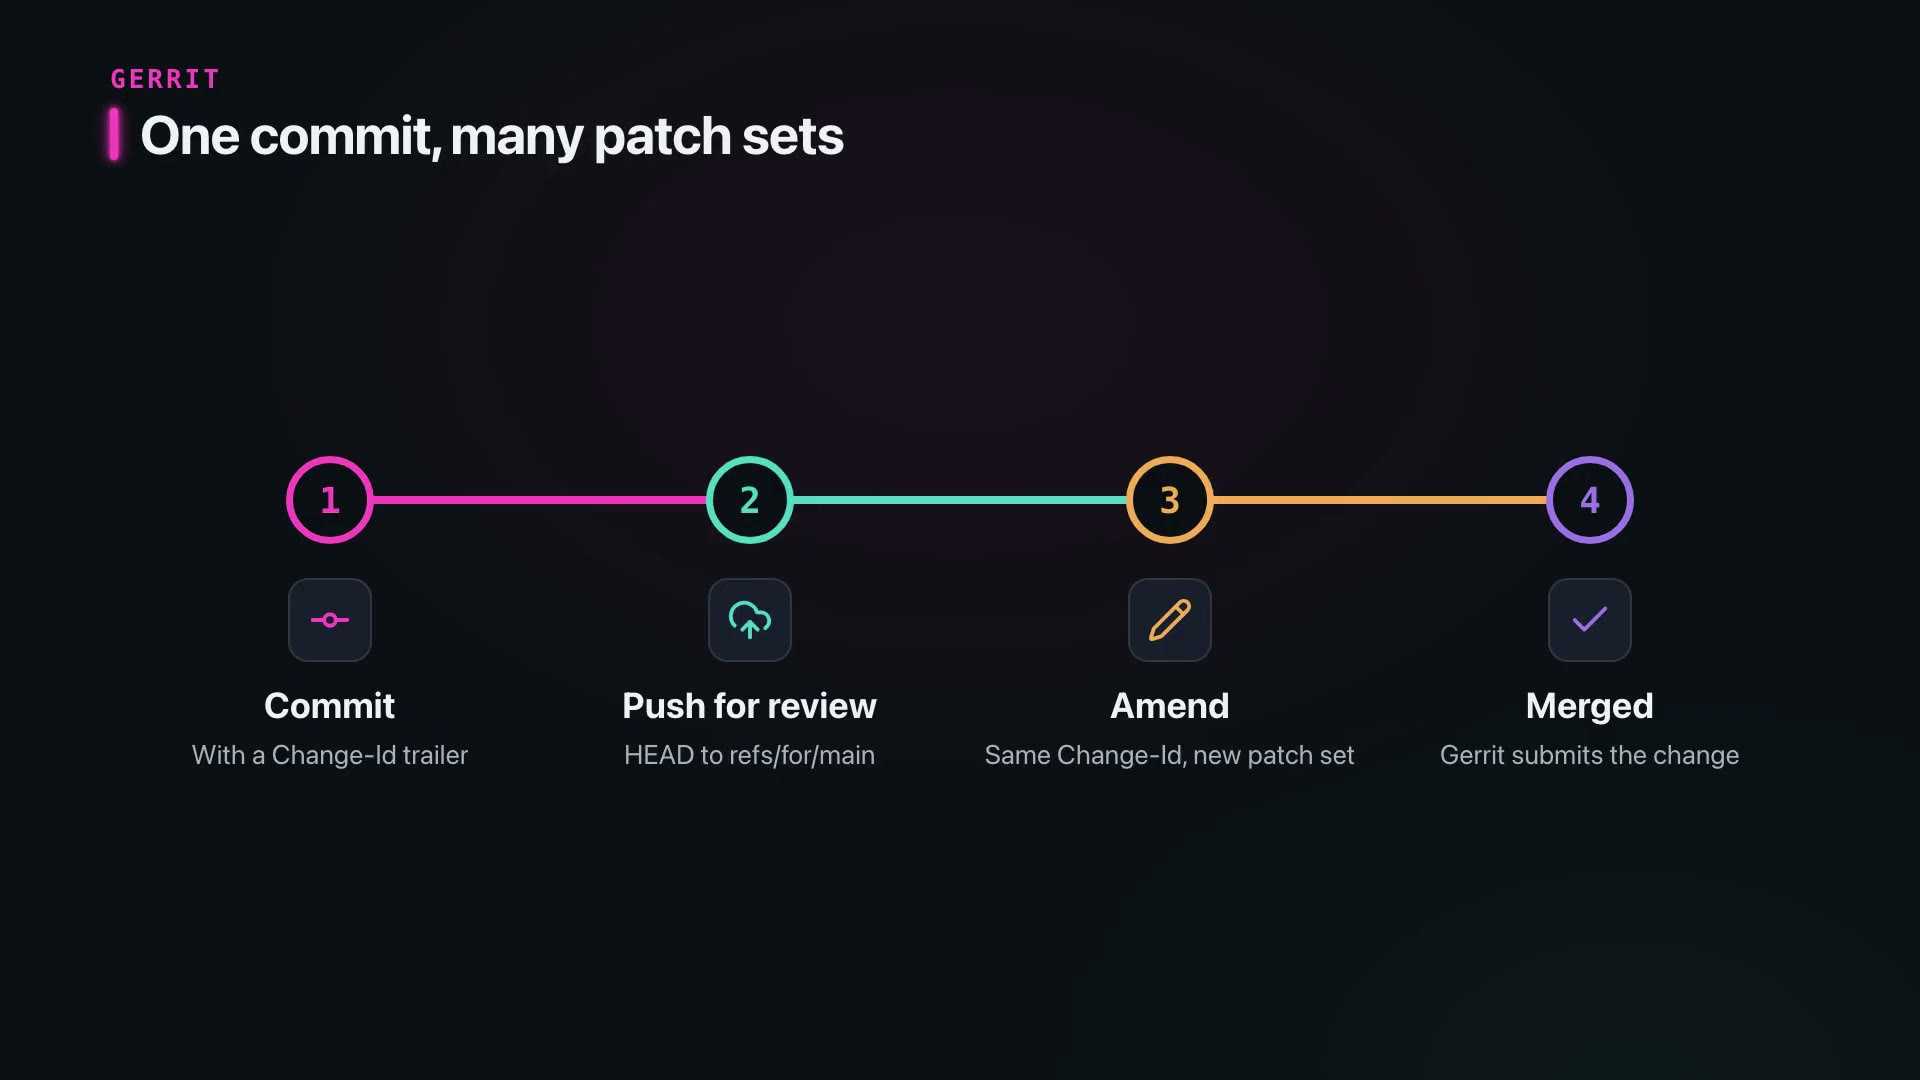
Turning it on
Git Gud notices when a repository talks to Gerrit: a .gitreview file, a Change-Id hook, or a Gerrit-looking host. It offers Gerrit mode in a banner.
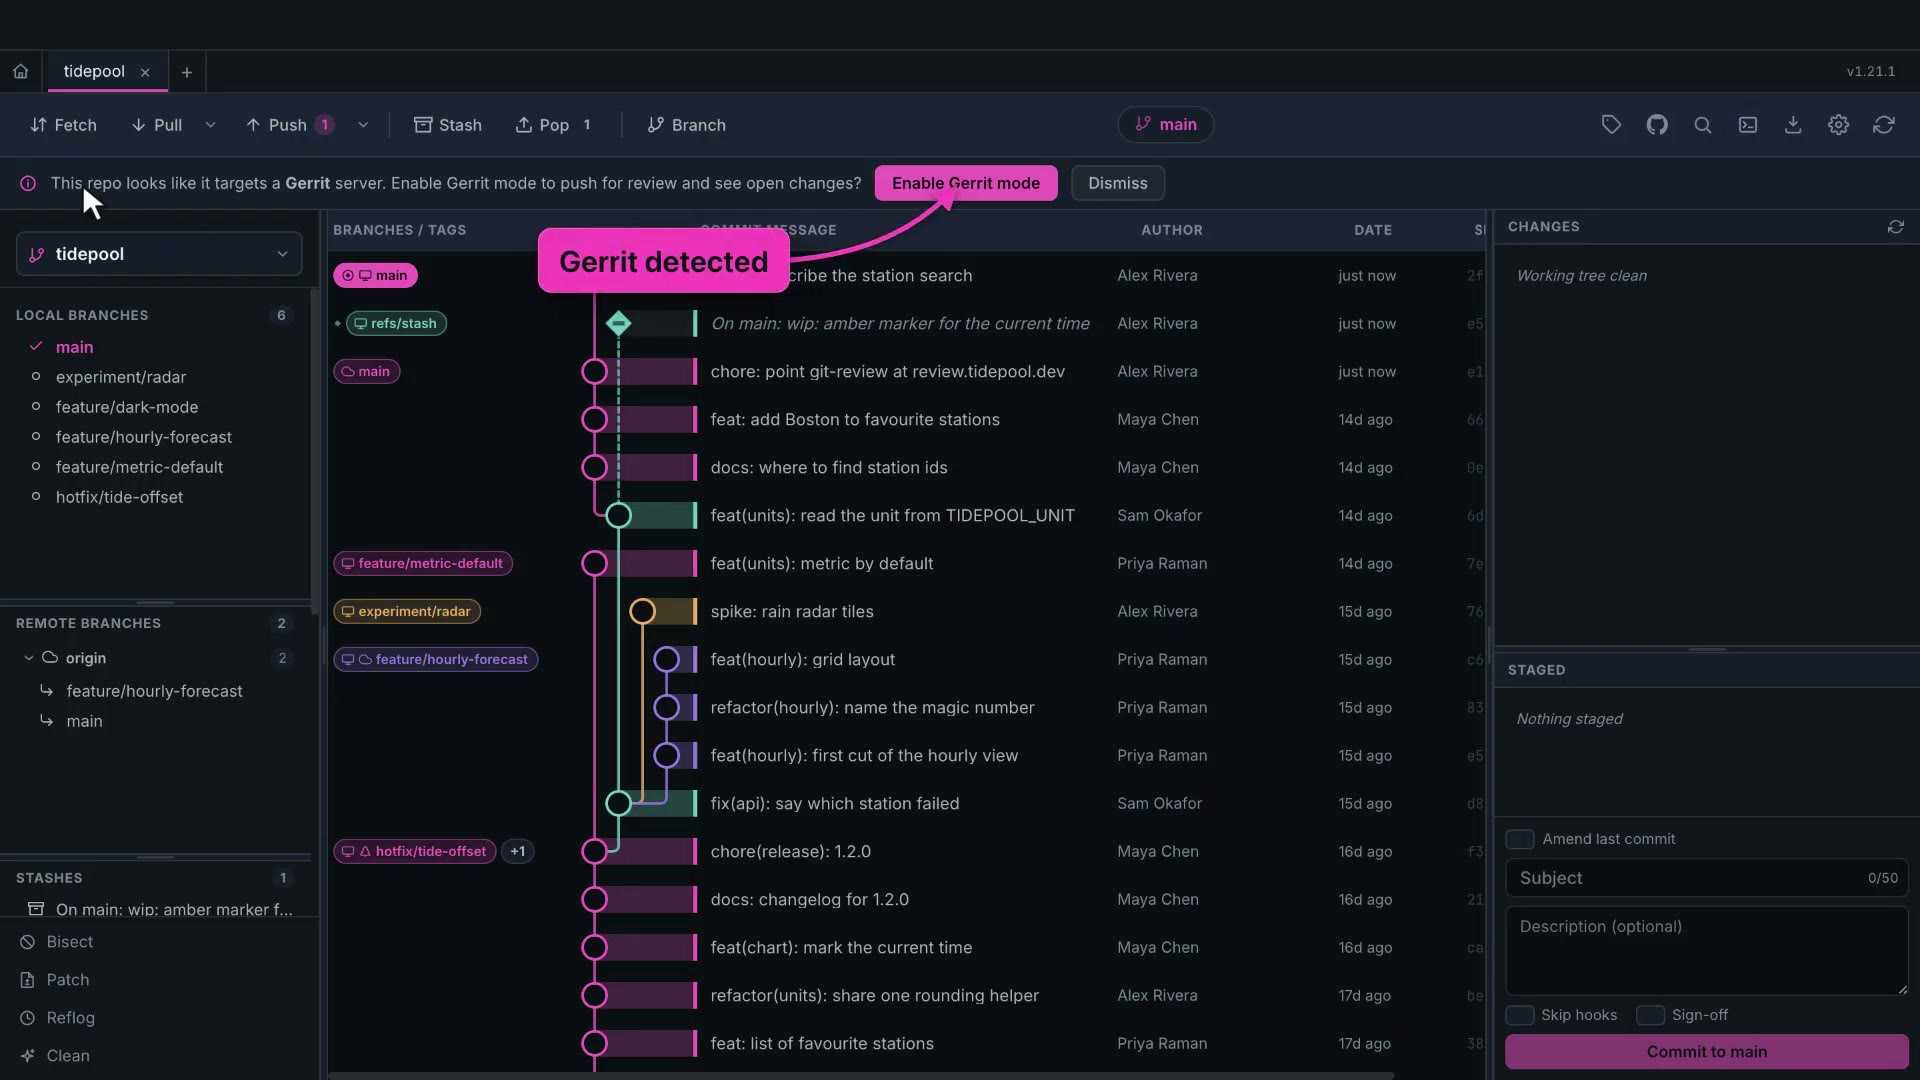
Enable it and confirm the host, the project and the target branch. Nothing changes for repositories that don't use Gerrit.
Changes in the graph
Now the open changes on the server appear in the graph, each with a dashed pill and its change number.
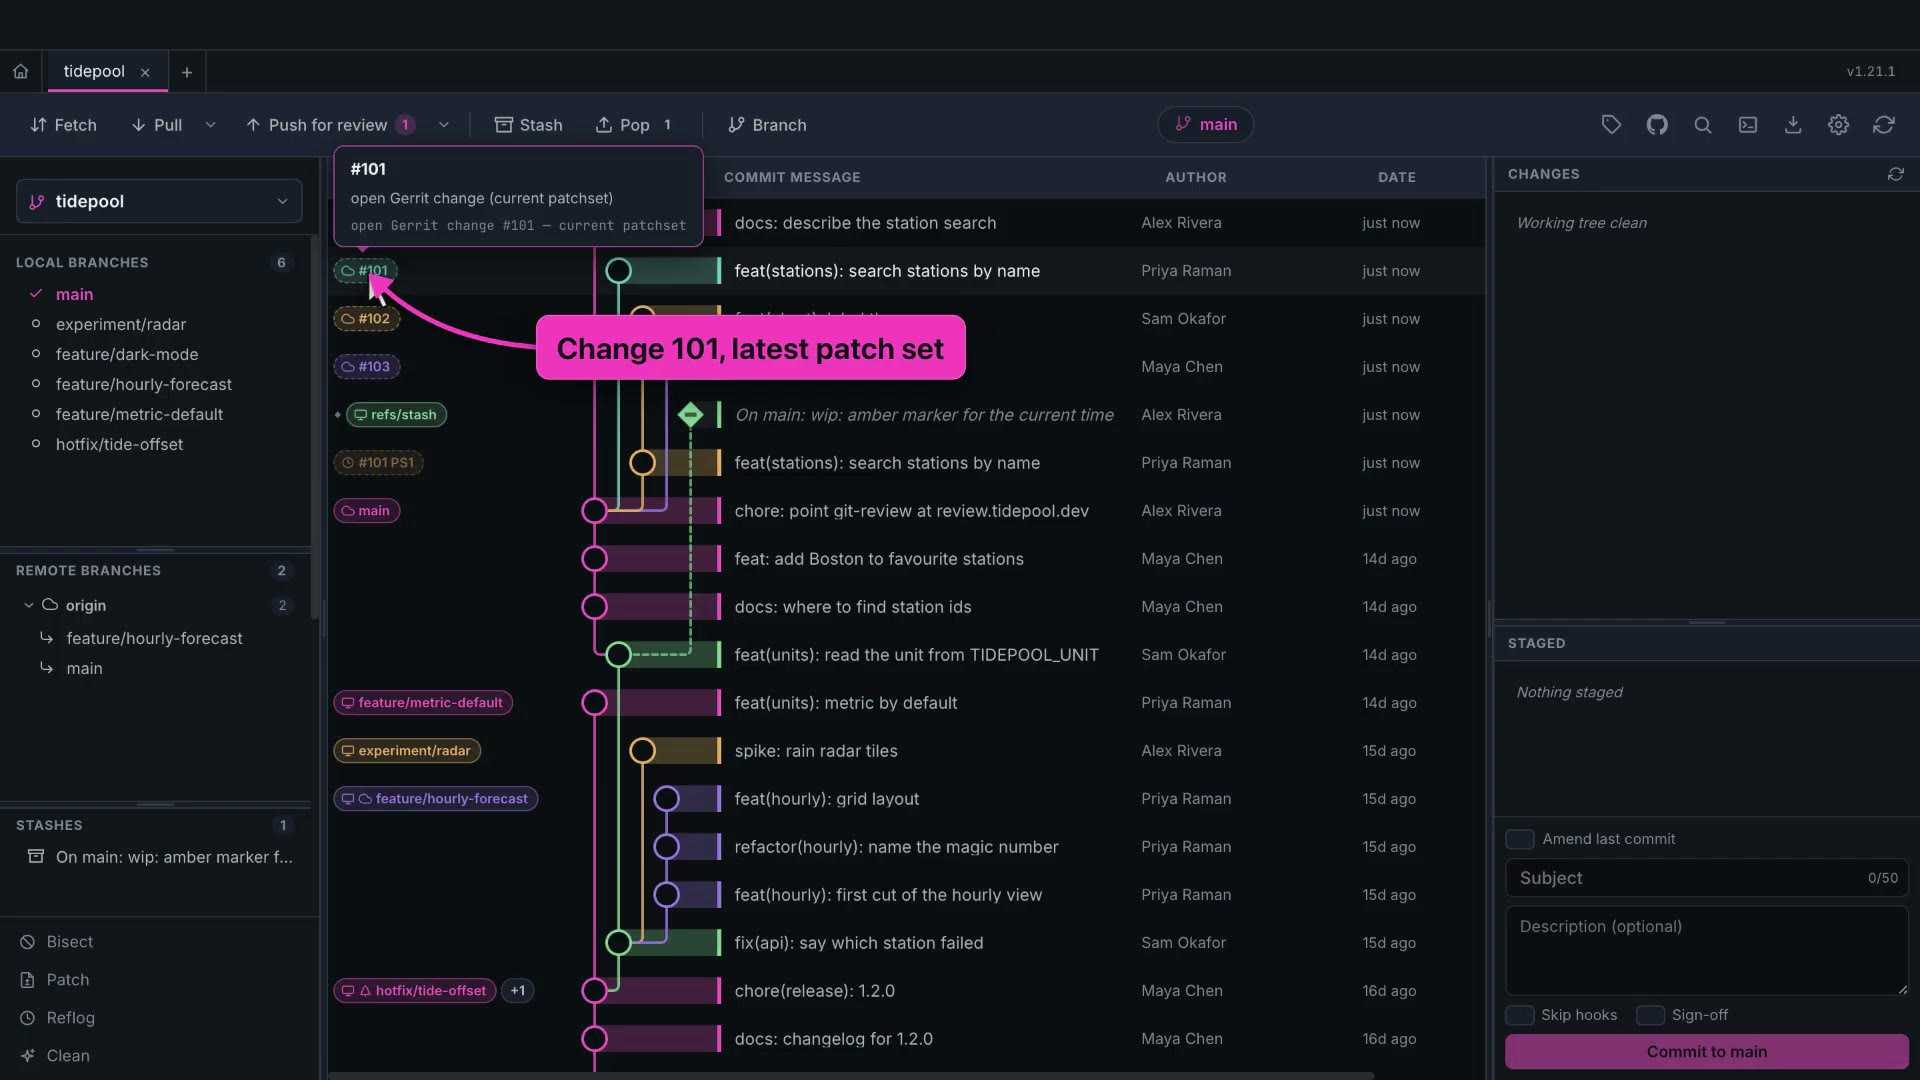
Select one, and the detail panel lists every patch set: when it was uploaded and what kind of change it was. A button opens the change in your browser.
The toolbar switch shows only the latest patch set of each change, or all of them.
Push for review
Push for review becomes the main button. Choose the target branch, add a topic if you like, and mark it work in progress or private.
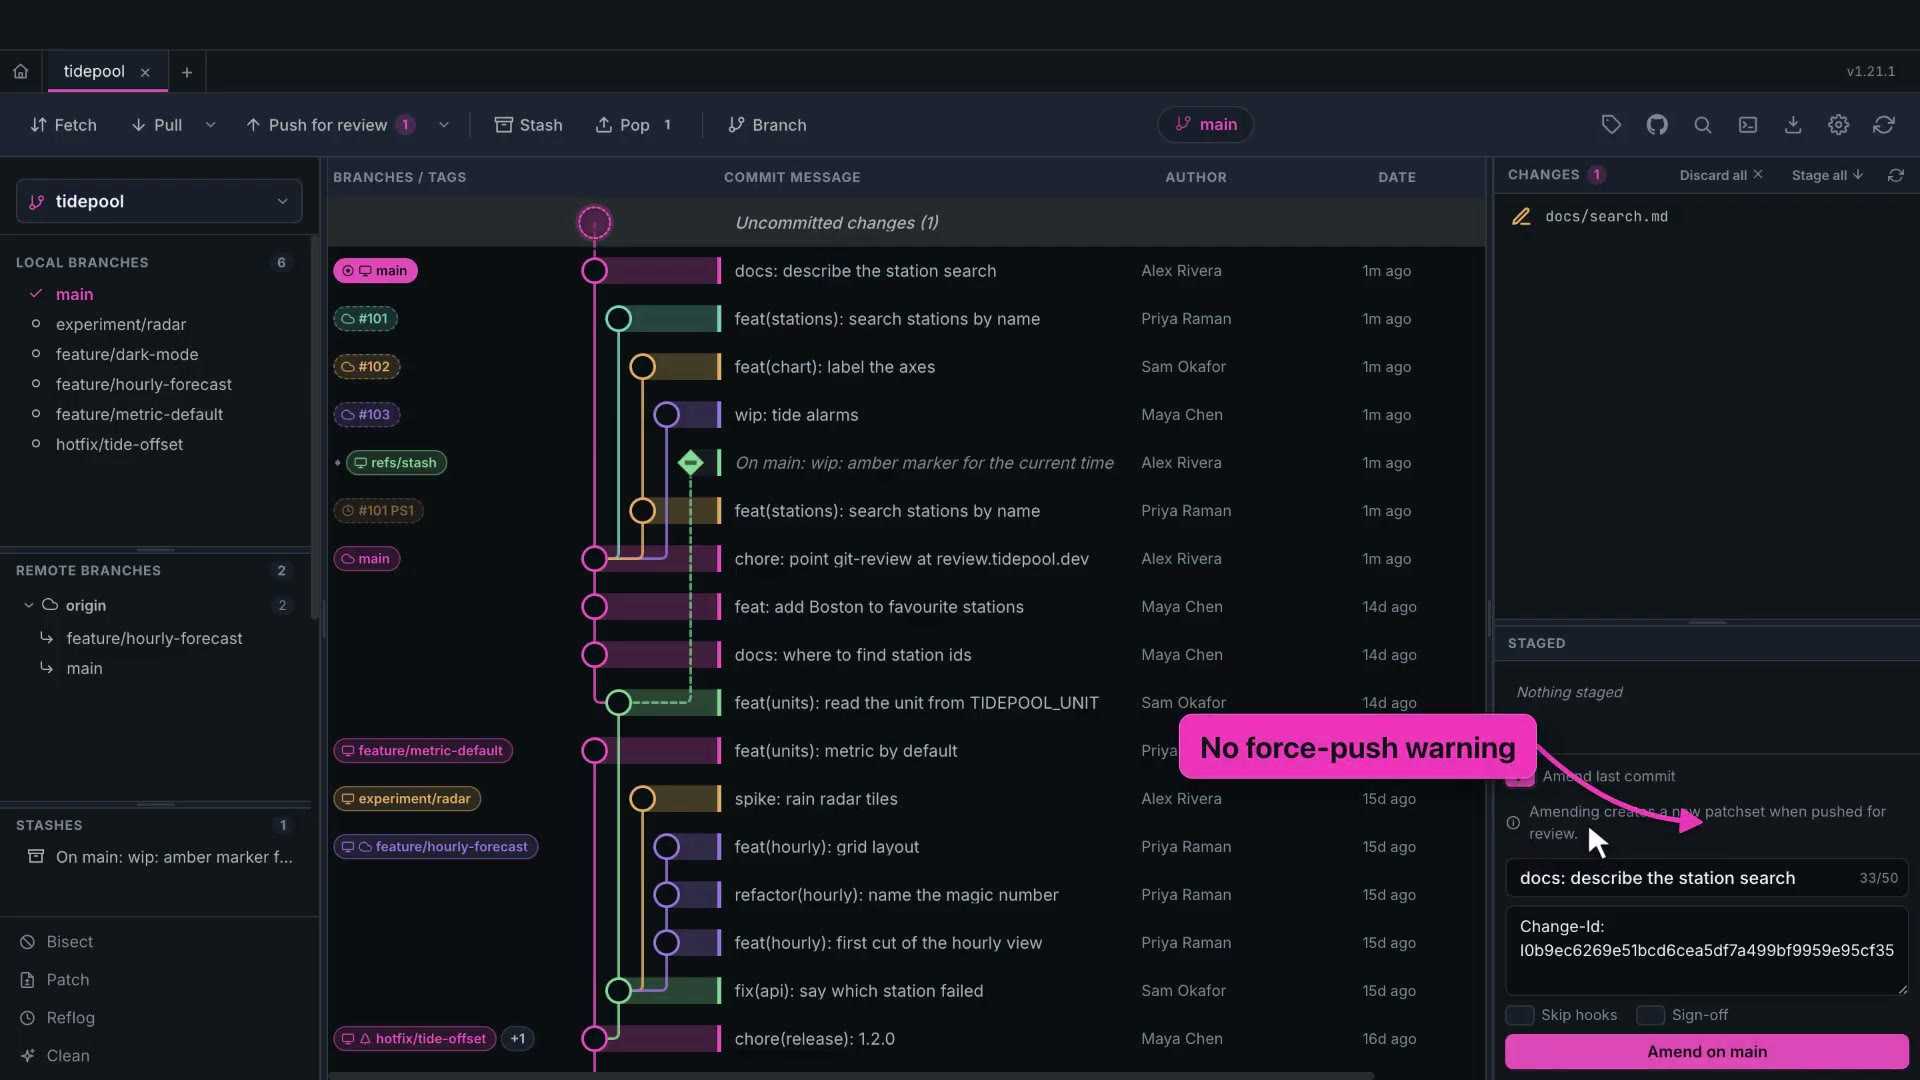
Git Gud pushes HEAD to refs/for/main. If Gerrit refuses, for example because the Change-Id is missing, you get a message that says how to fix it.
And amending is welcome here. Instead of a force-push warning, Git Gud tells you the amend will become a new patch set.
10. Settings and updates
The gear opens Settings. Text size scales the whole interface, from 70% to 180%.
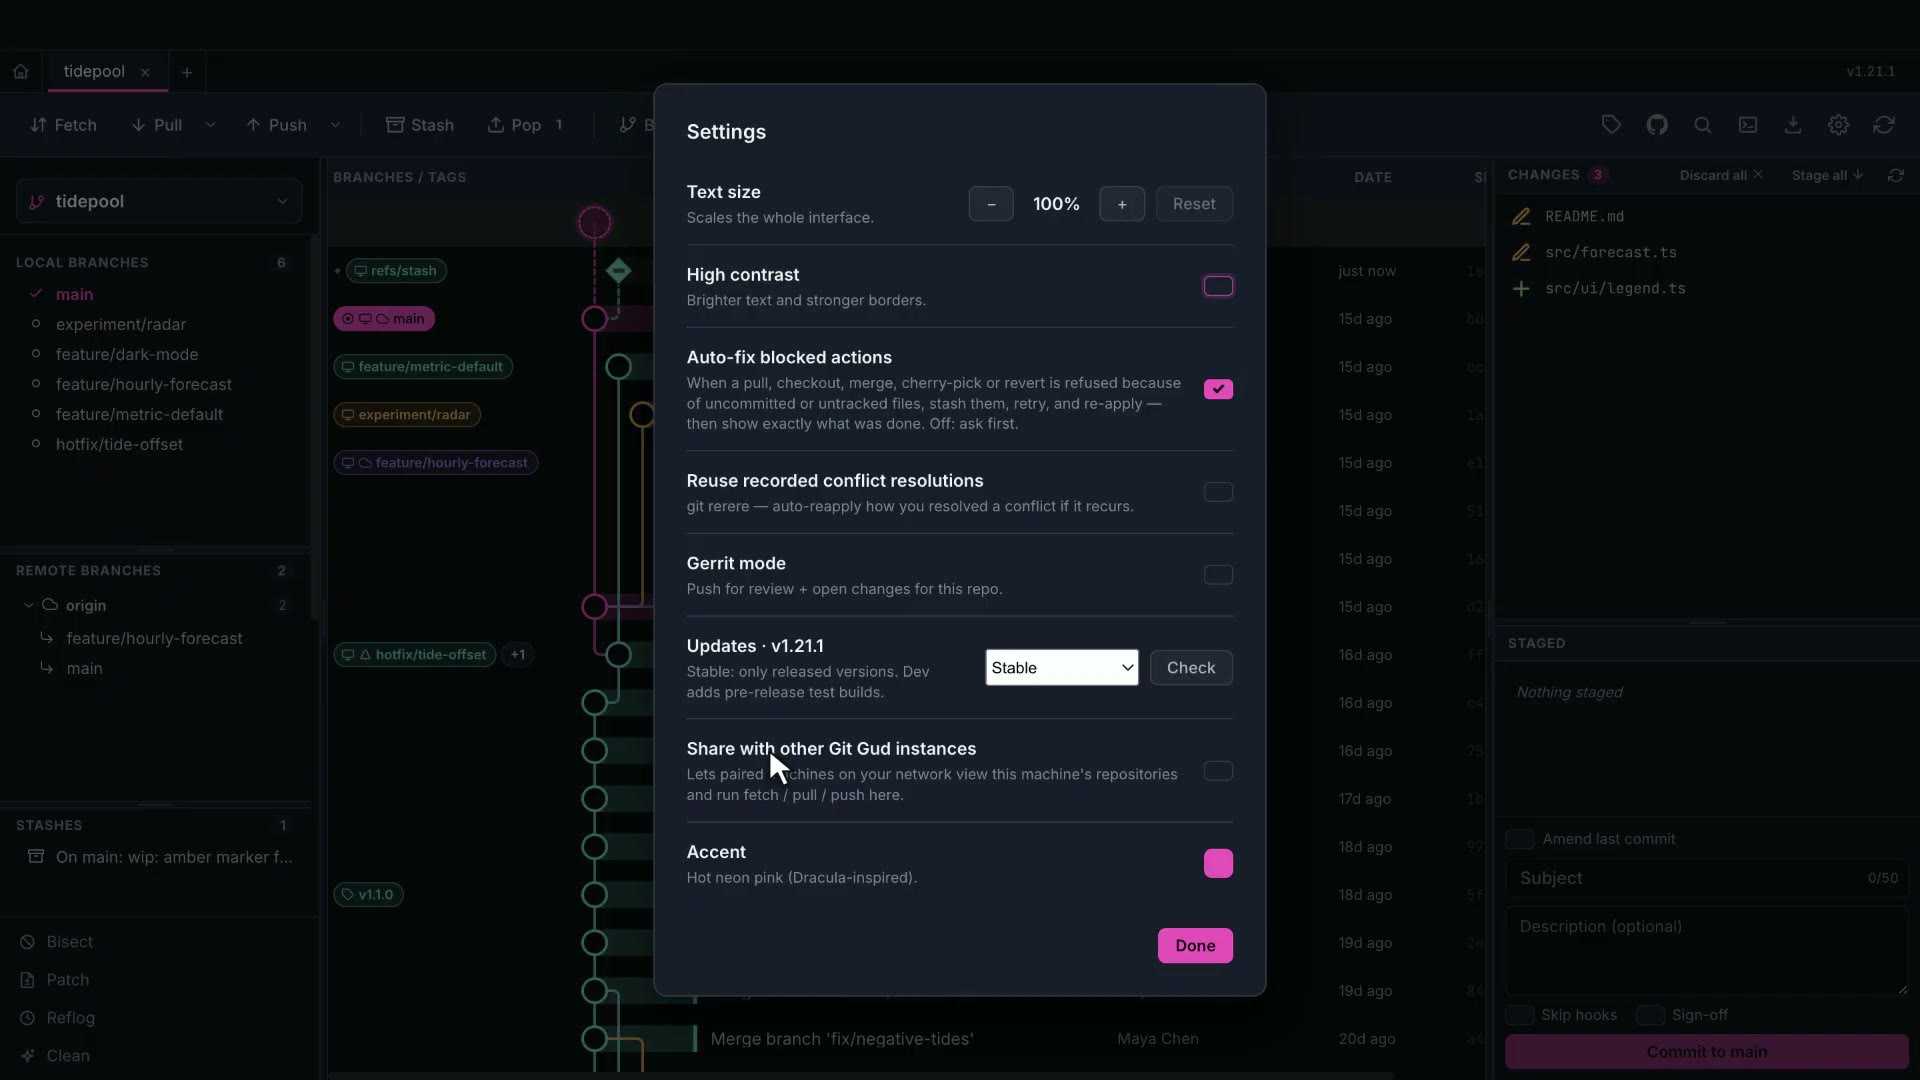
High contrast brightens text and borders, for glare or tired eyes.
Auto-fix blocked actions and reuse recorded resolutions are here, which we met in Conflicts and auto-fix.
Gerrit mode has its settings here per repository, along with the Gerrit login, which is stored encrypted.
Sharing with other Git Gud instances lives here too. That's the next section.
Updates
Under Updates, choose a channel. Stable gets releases. Dev gets pre-releases as soon as they're built.
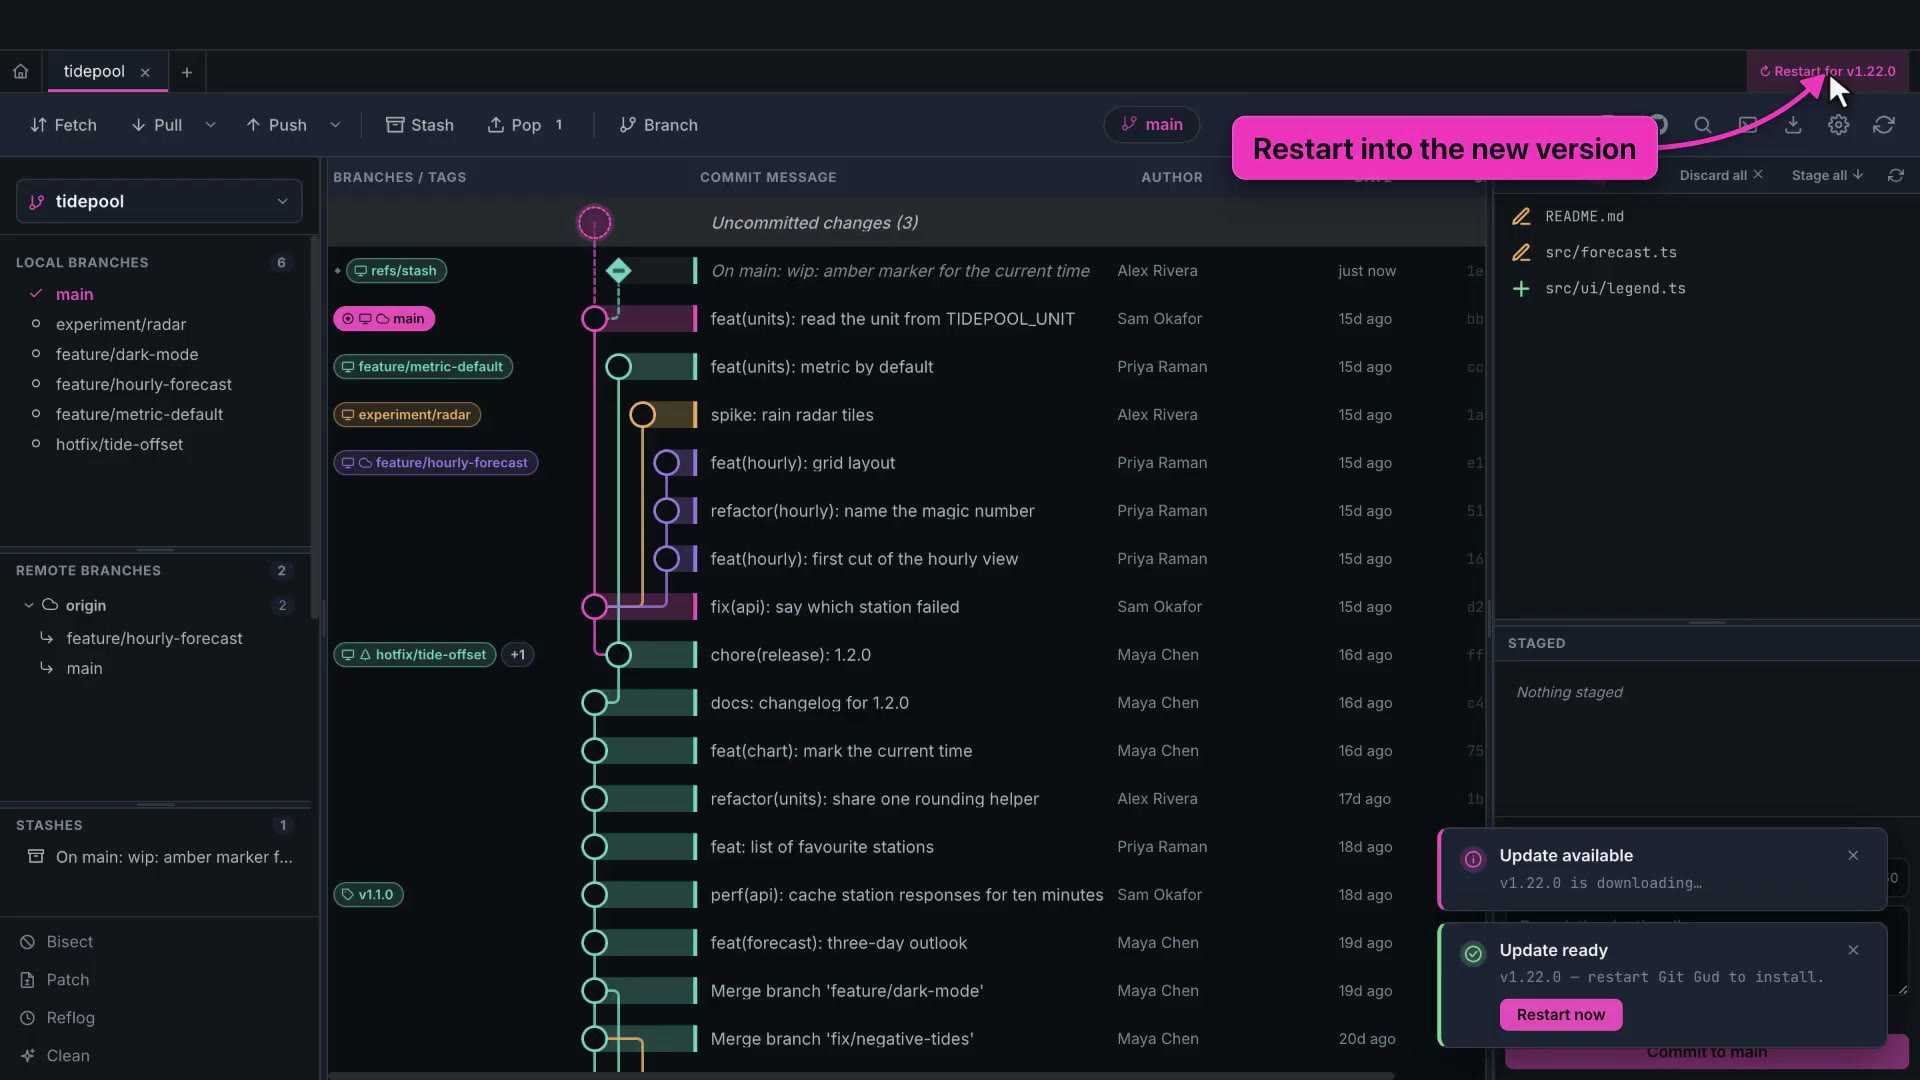
Git Gud checks for updates on its own. When one is ready, a button in the tab bar shows the download, and then offers to restart into the new version.
The version you're running is always in the corner of the tab bar.
11. Peer connections
Peer connections let one Git Gud drive the repositories on another machine. Your desktop, a laptop, a build box under the desk.
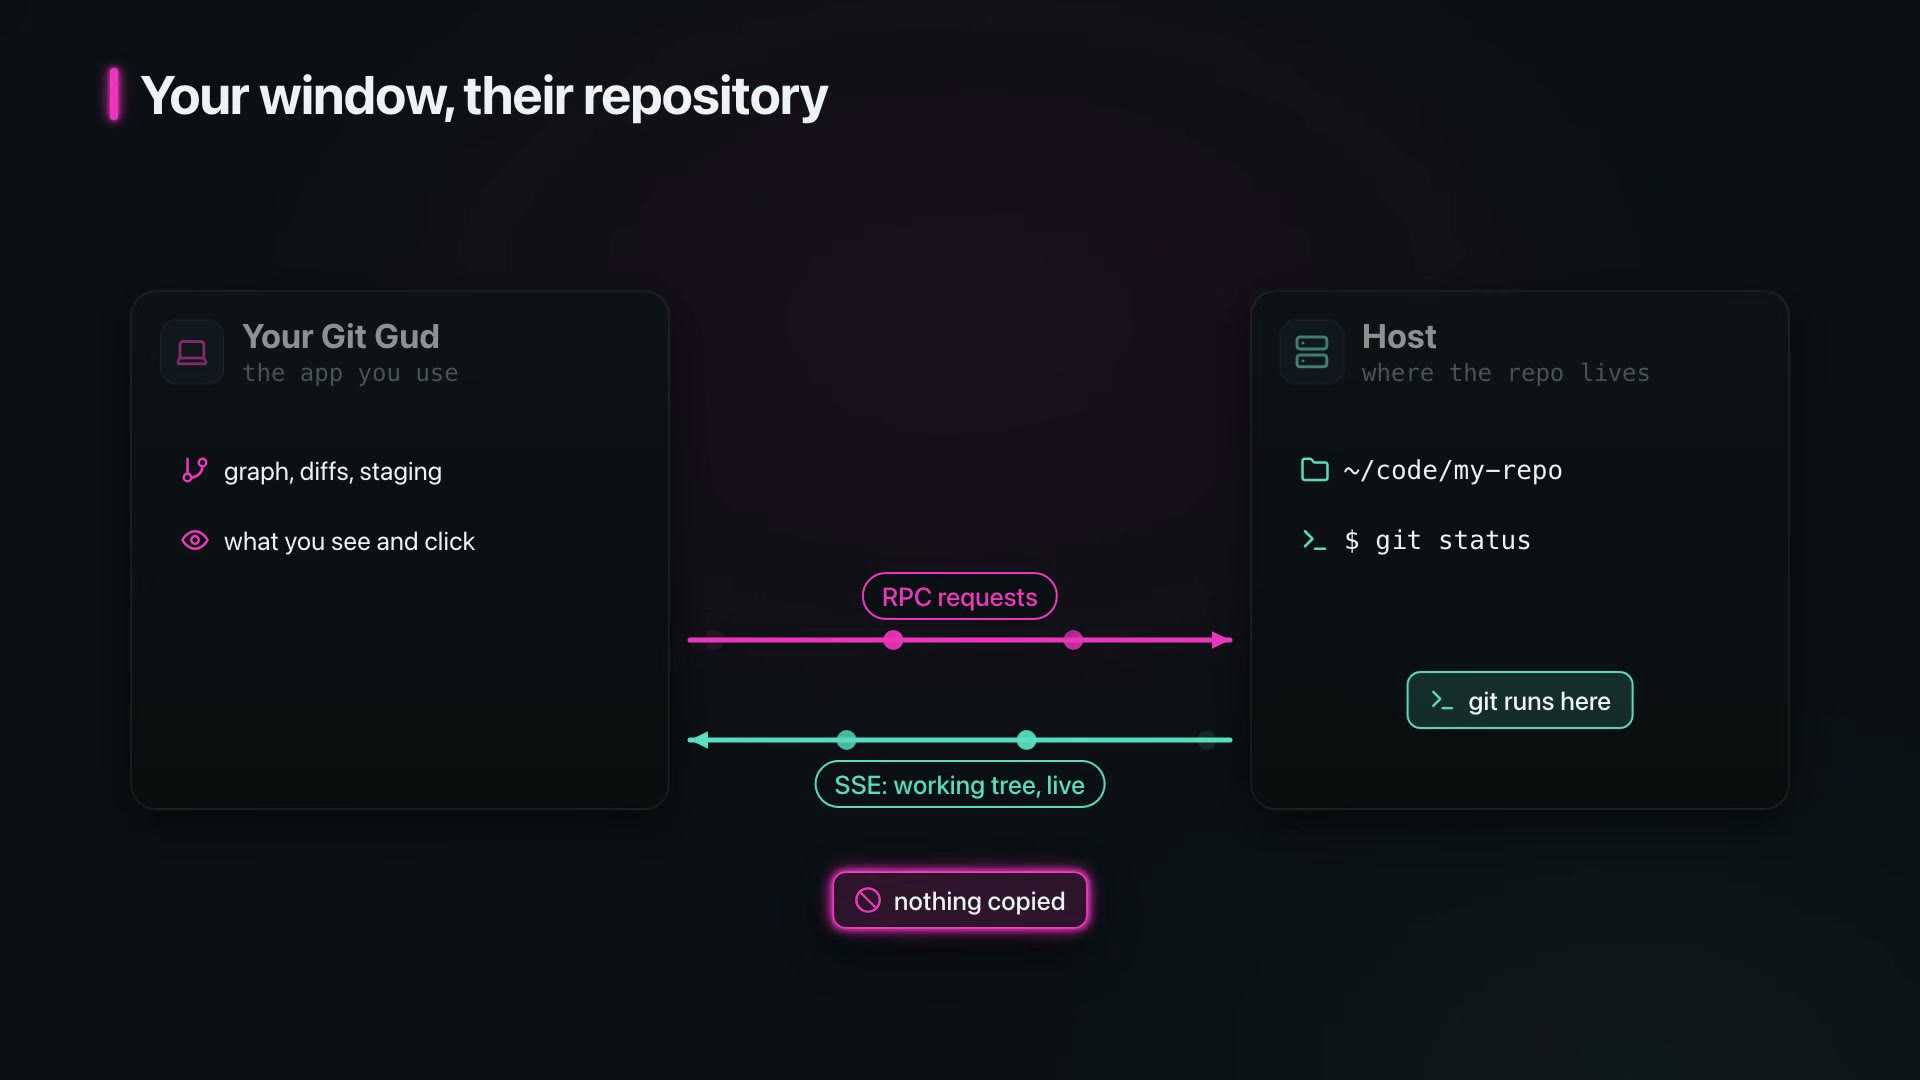
The machine with the repository is the host. It runs every git command itself. Your Git Gud only shows the results, and streams the host's working tree live as files change.
Nothing is copied. You're looking at the real repository on the other machine.
Sharing a machine
Here are two Git Guds on two machines. This one is the build box, and it has tidepool open.
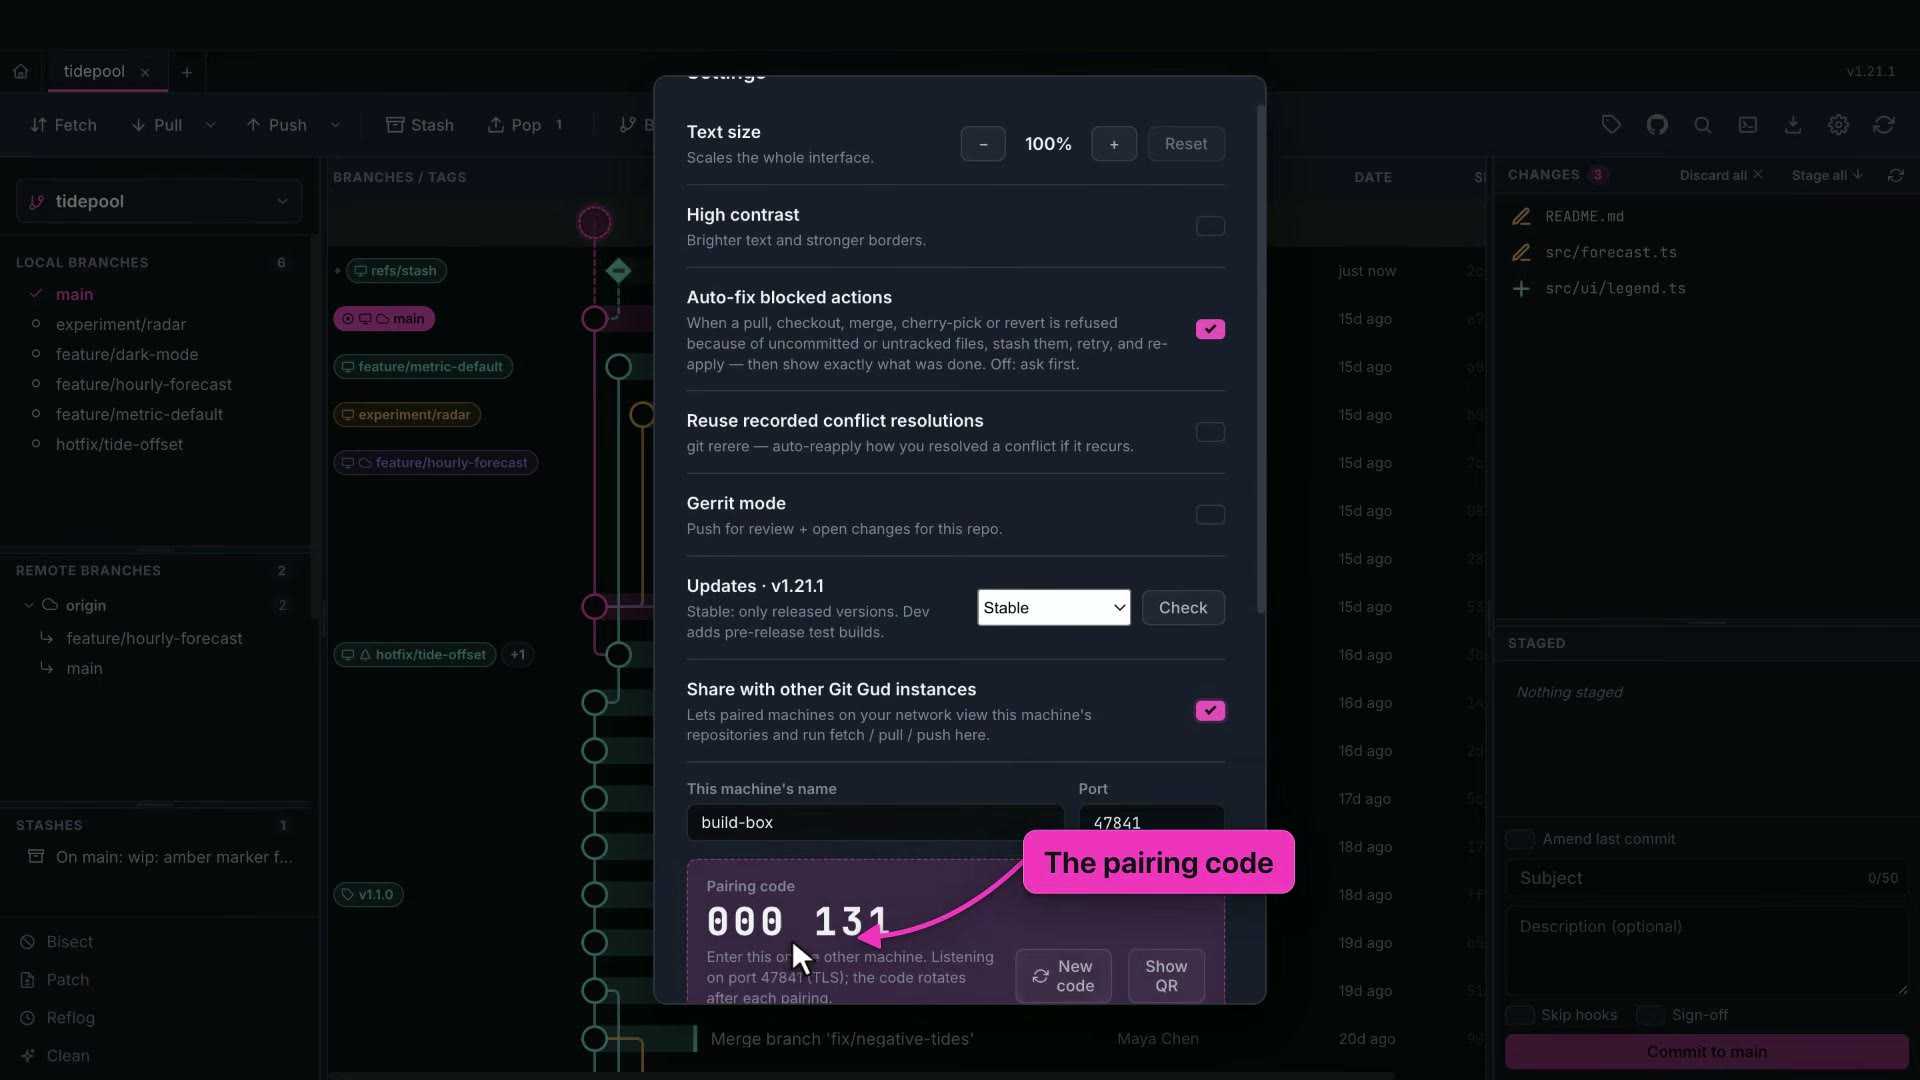
On the build box, open Settings and switch on Share with other Git Gud instances.
It shows this machine's name, the port it listens on, and a six-digit pairing code. Generate a new code at any time.
Pairing
On the left, choose Connect to a Peer. Git Gud finds machines on the same network by itself. The build box is listed under Nearby.
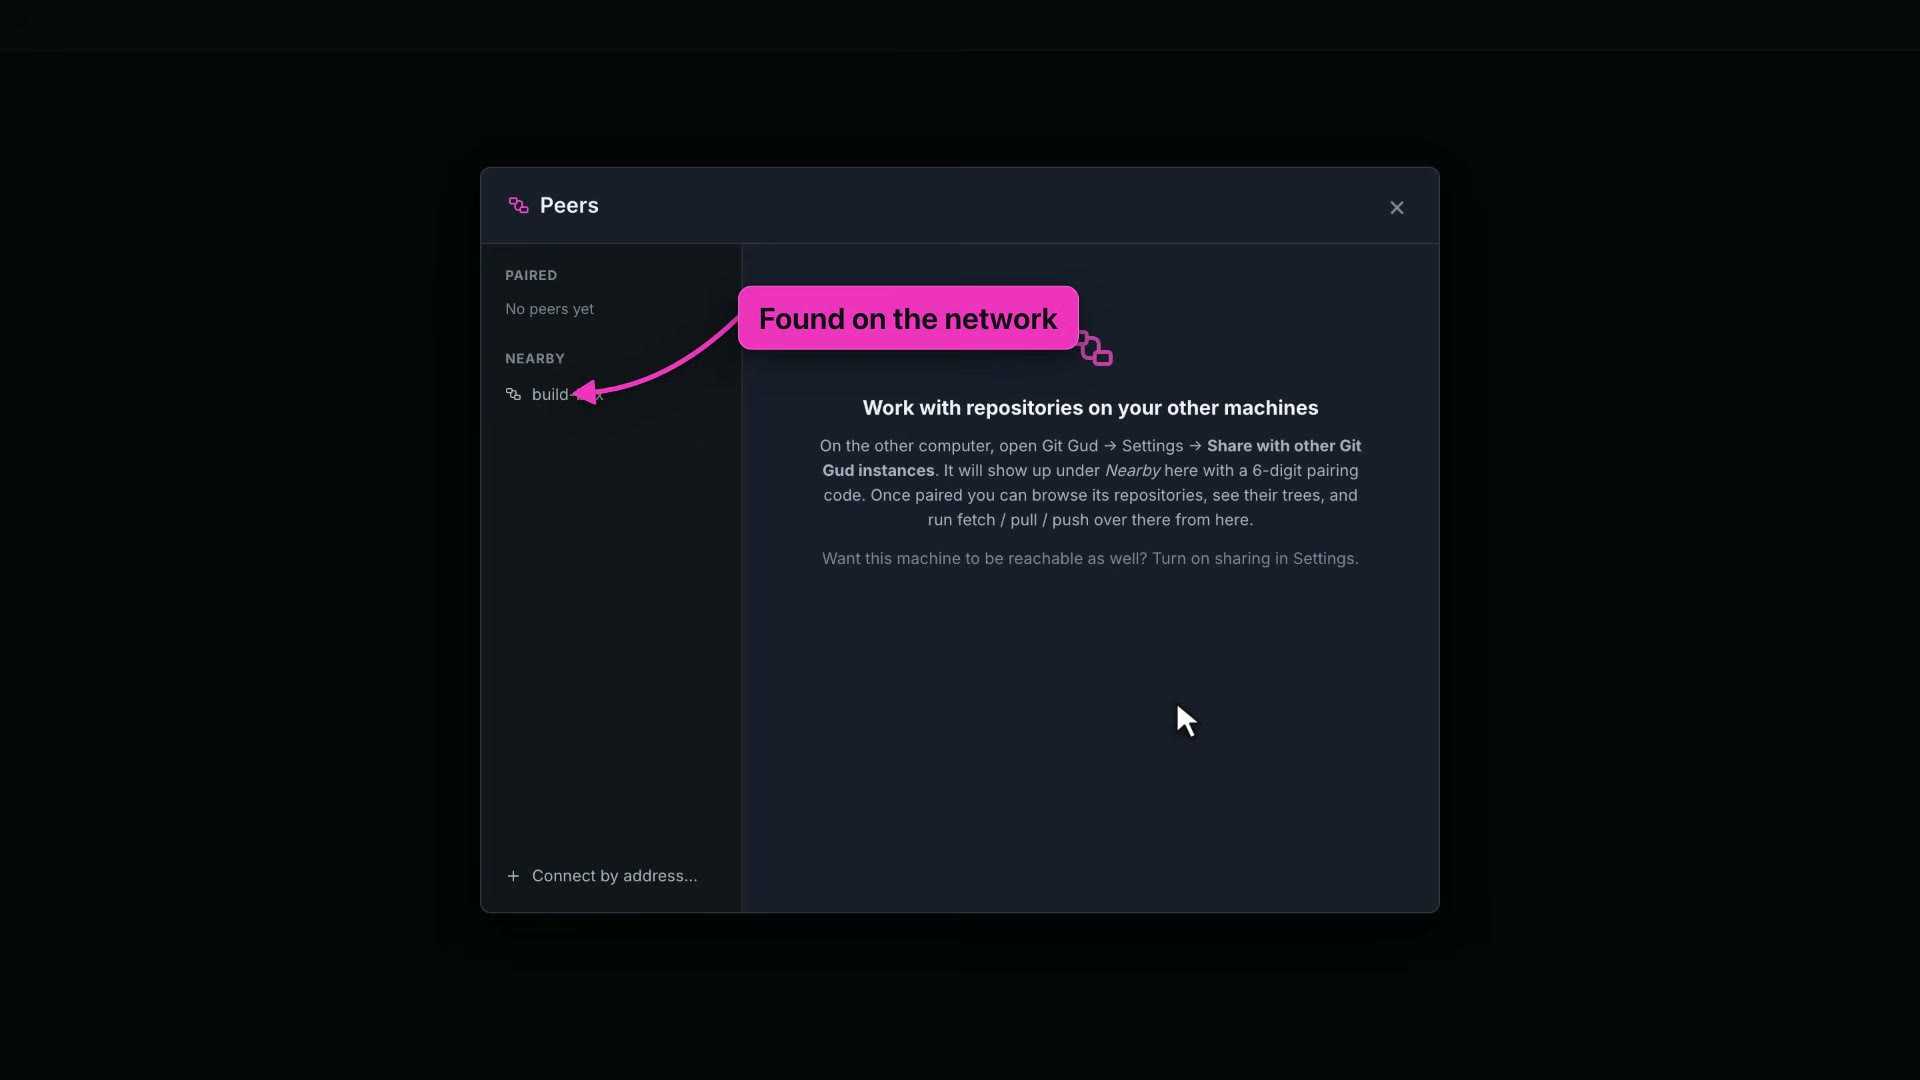
Click it, and type the six-digit code from the build box.
That's it. The two are paired, and the build box lists its repositories.
Open tidepool. The tab says where it lives. Everything you saw in the earlier sections works here, and the build box runs it.
Live and safe
Back on the laptop: edit a file on the build box, and the change shows up here within a second.
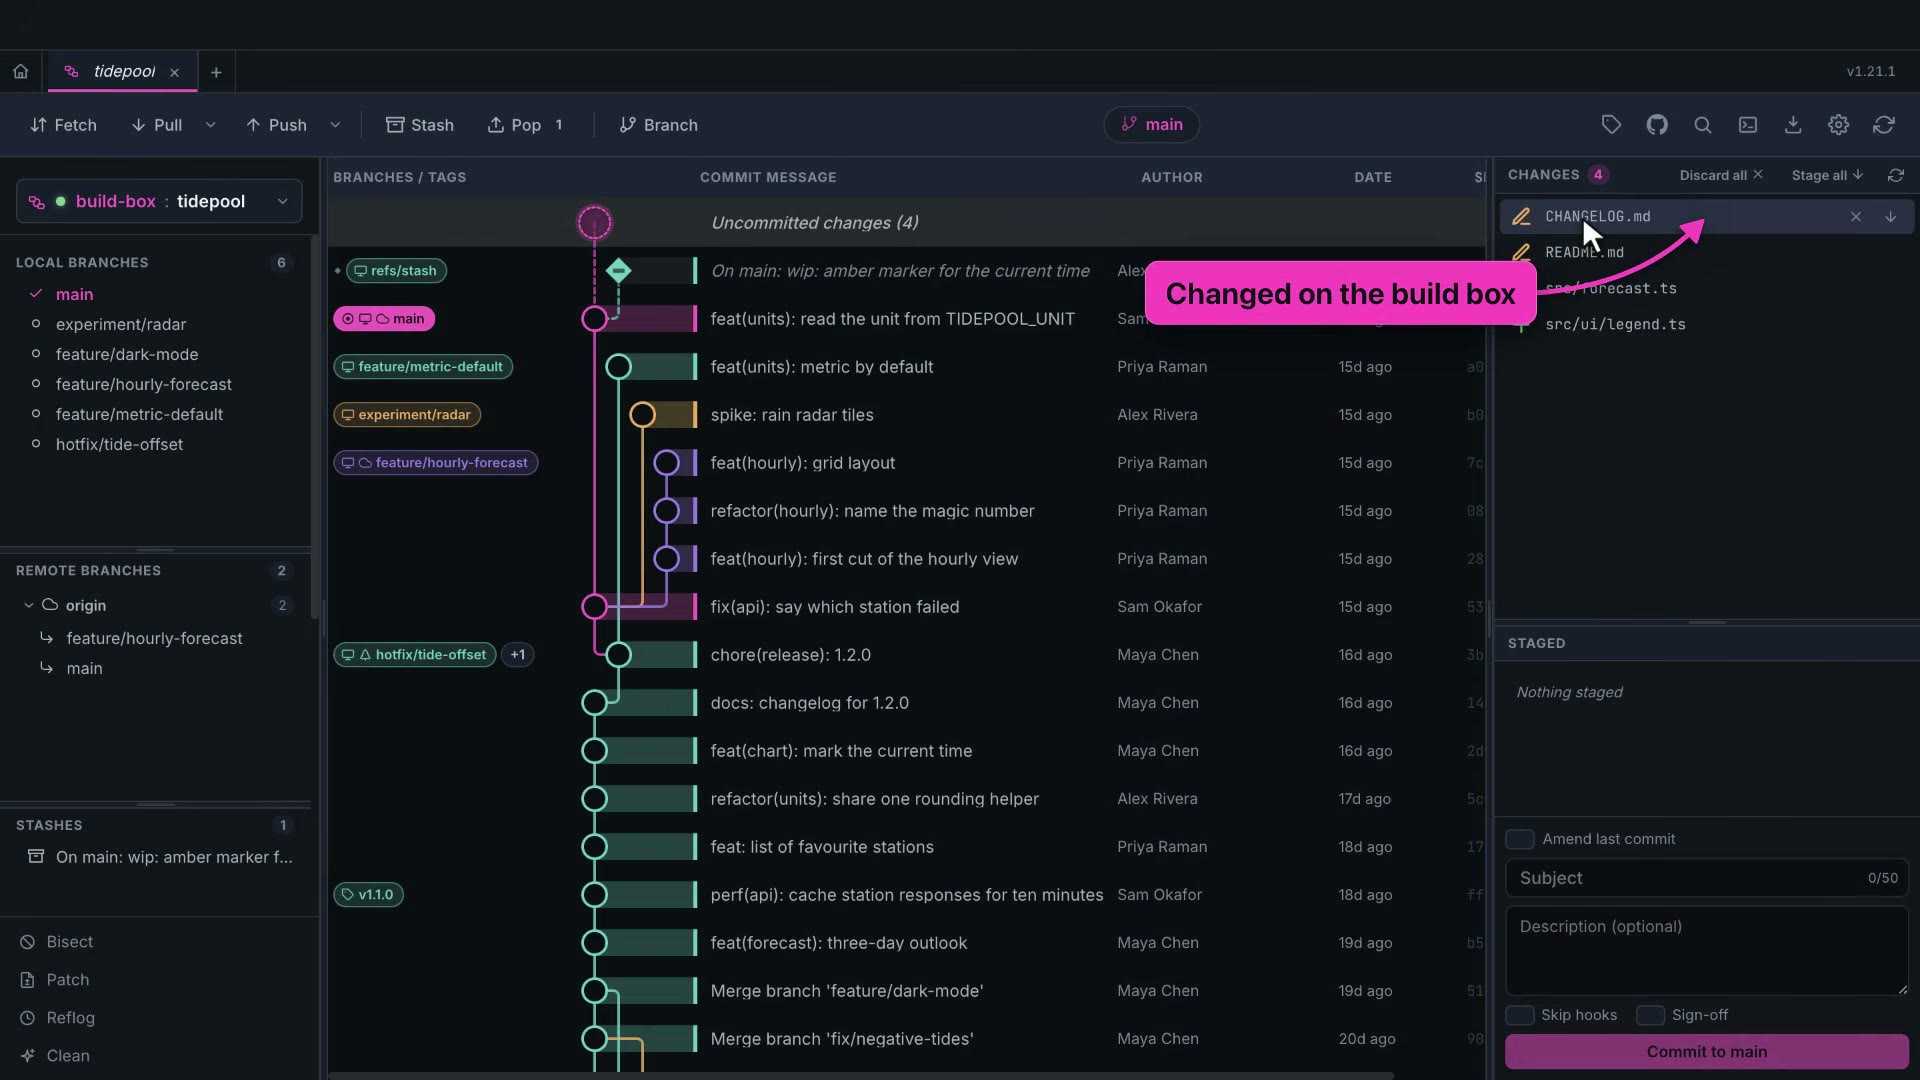
Commit from the laptop, and the commit is made on the build box. Its own window shows the new commit straight away.
The host stays in charge. In its sharing settings, each paired device has a read-only switch, and Revoke cuts a device off for good.
A global read-only switch locks every device at once, for when you only want to look.
How pairing stays secure
Pairing is built so the code never crosses the network. When you connect, the host shows its certificate, and your Git Gud remembers its fingerprint.
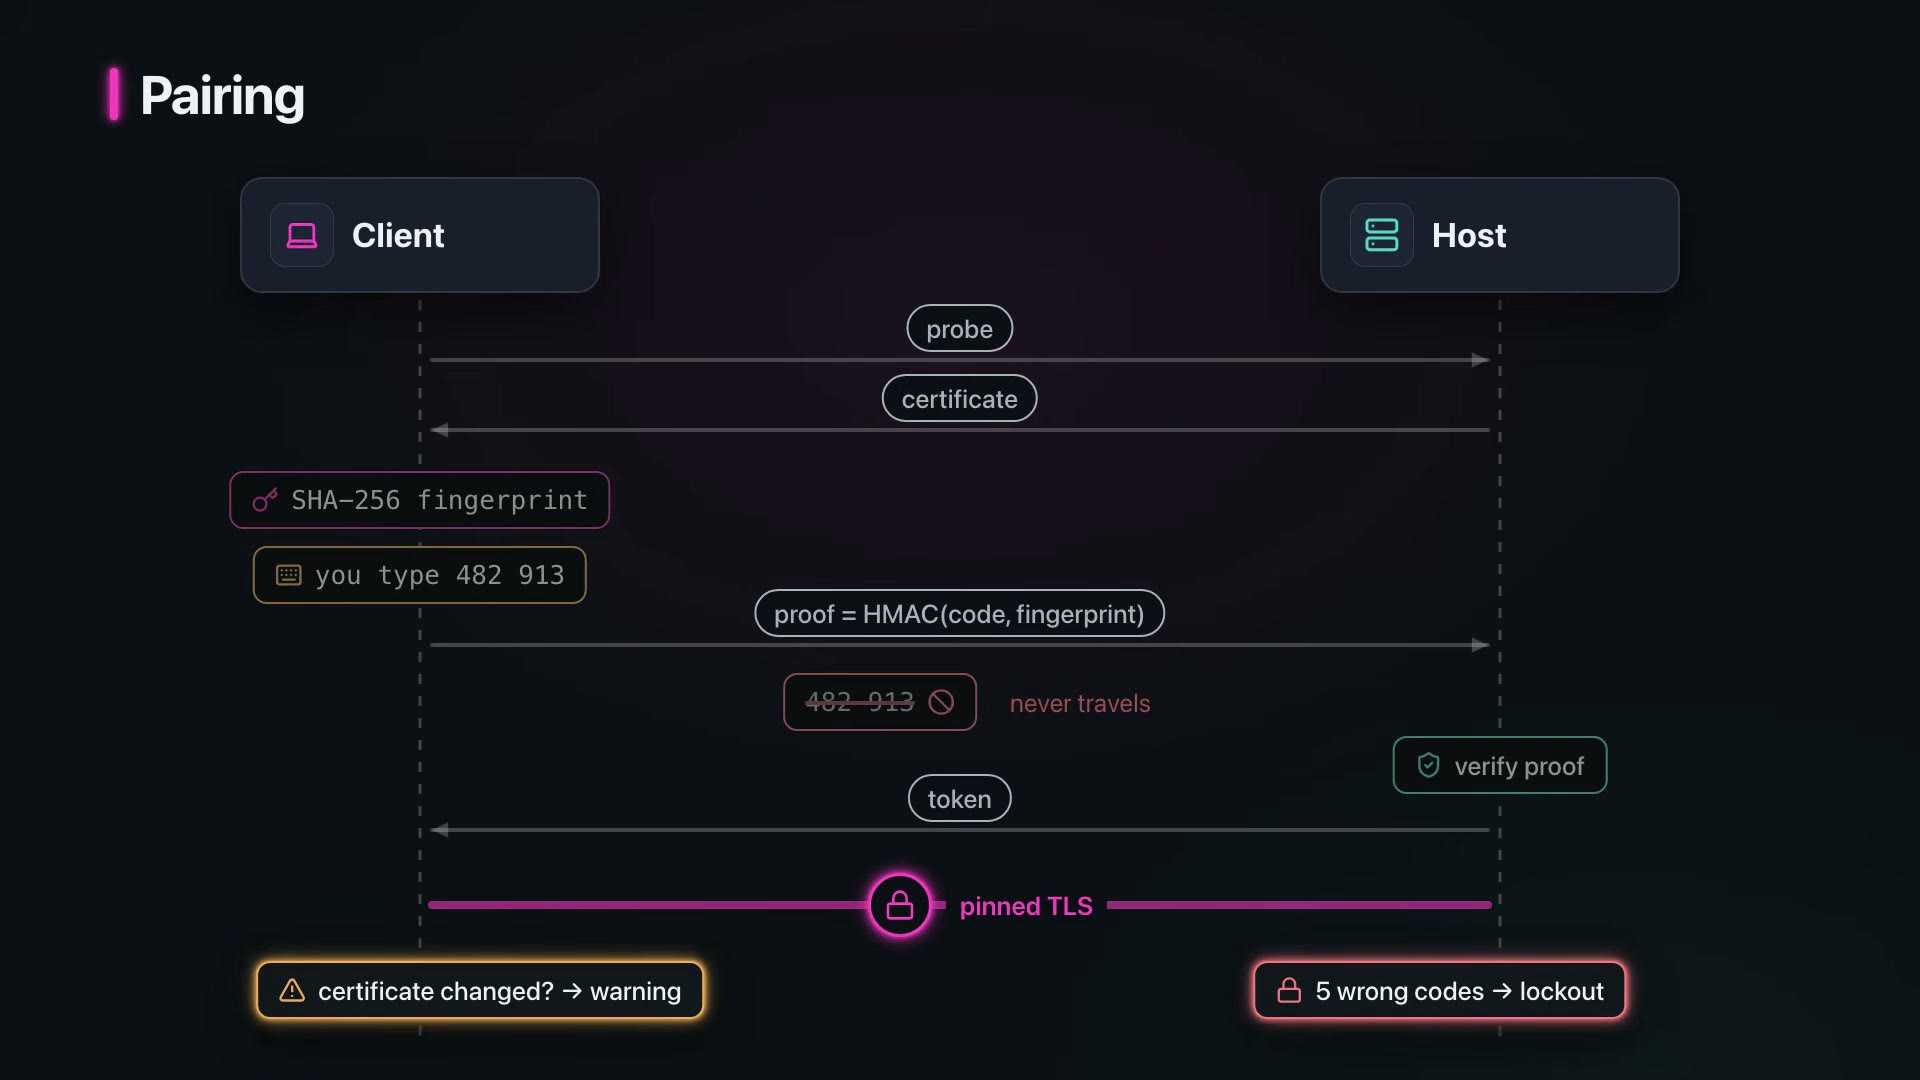
Instead of sending the code, your side sends a proof: the code mixed with that fingerprint, using HMAC. Only someone who knows the code can make it, and it only works for that one certificate.
The host checks the proof and hands back a token. From then on every connection is encrypted, and checked against the pinned certificate.
If the certificate ever changes, Git Gud stops and warns you instead of trusting it. And after five wrong codes, the host locks pairing for a while.
Reaching a machine
On the same network, machines find each other with a small broadcast on port 47832, and talk over HTTPS on port 47831.
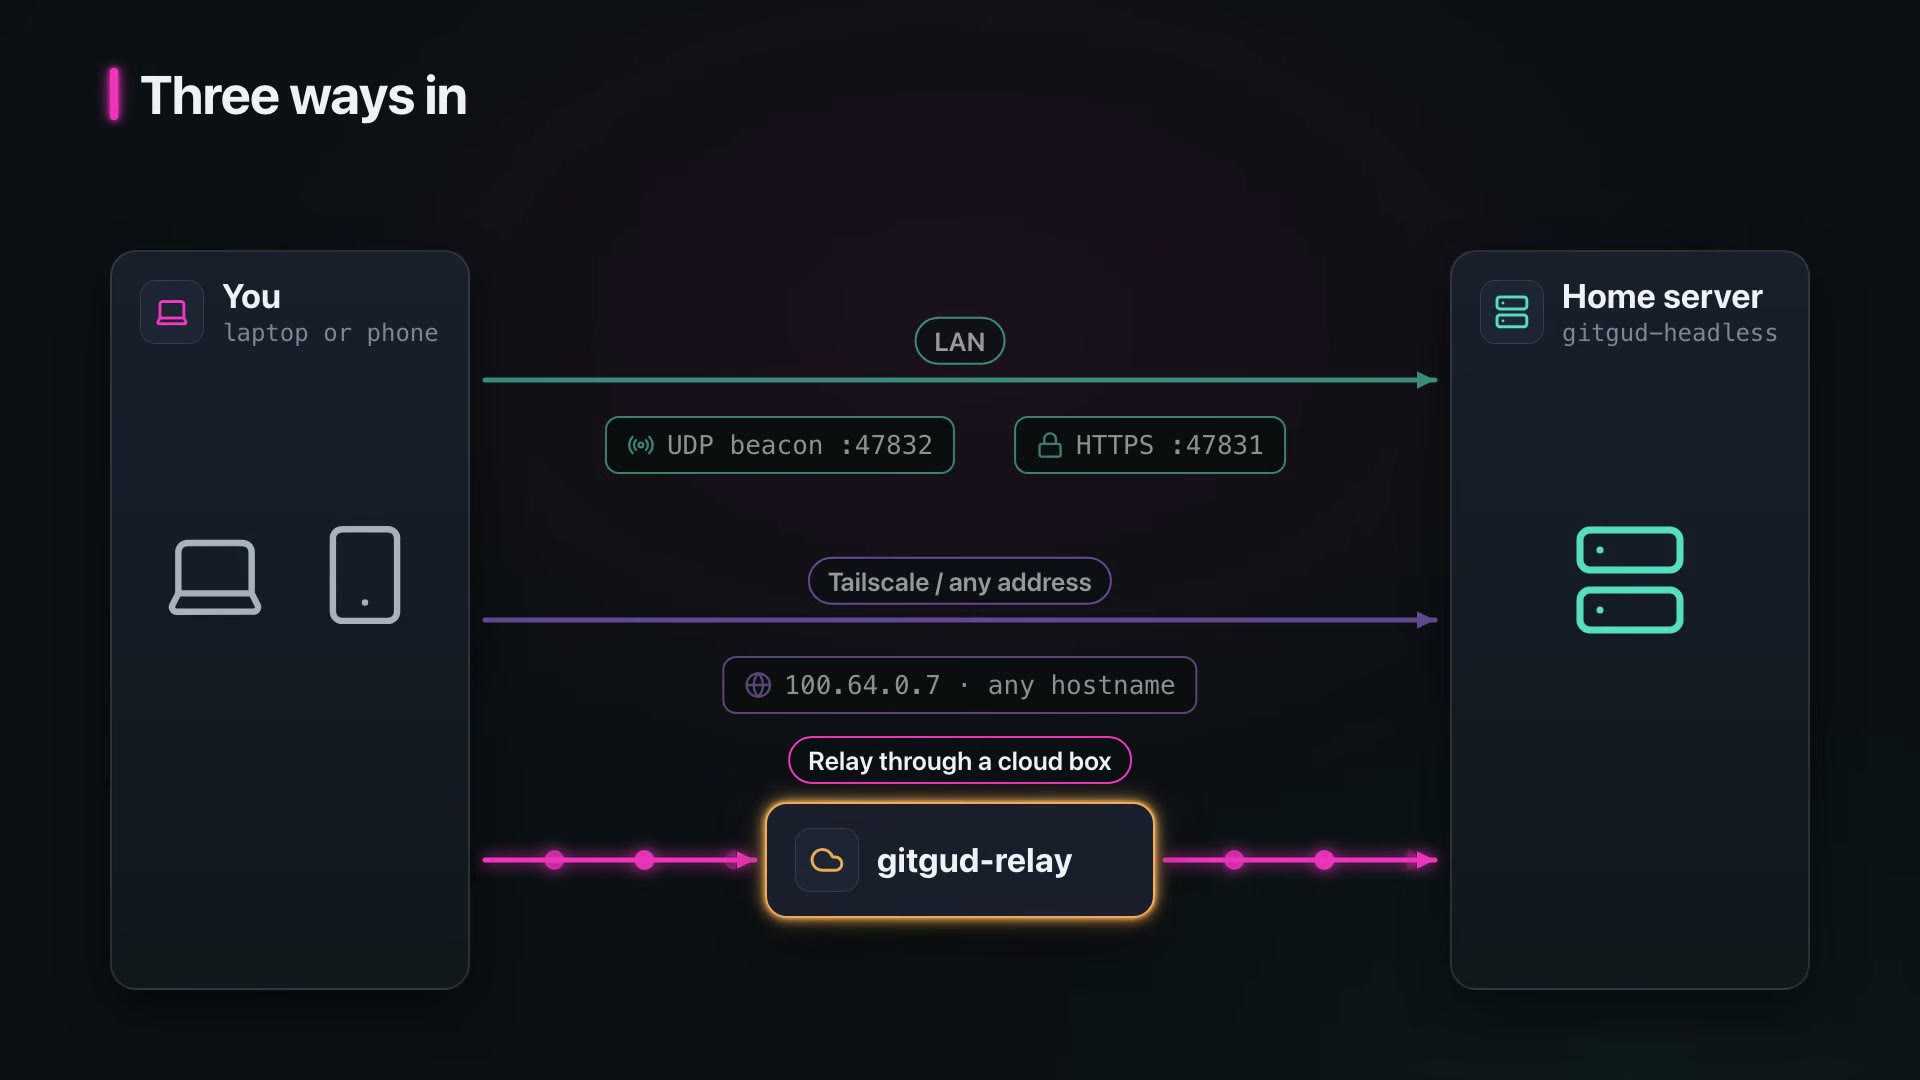
Away from home, connect by Tailscale name, or by any address, with Connect by address.
And with no VPN at all, a relay you host can pass the connection along. That's the next section.
12. The headless daemon and the relay
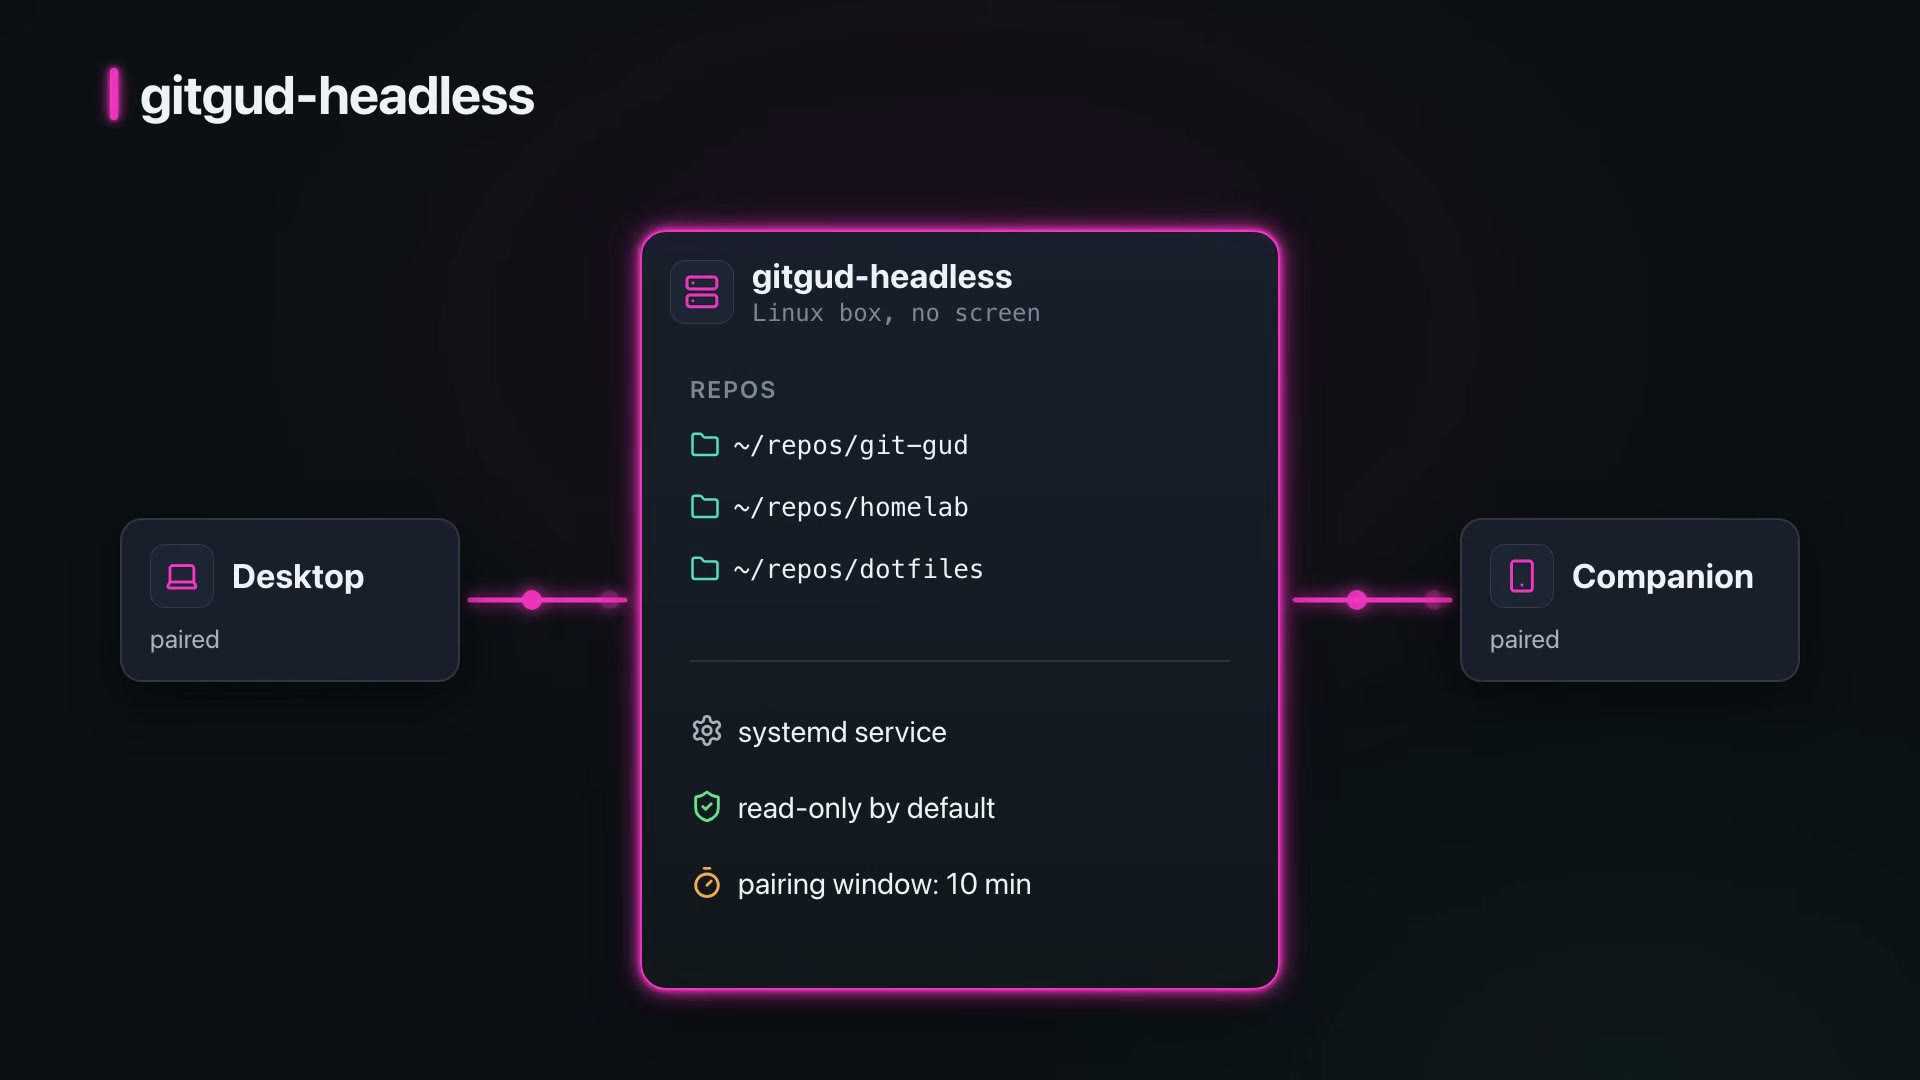
Not every machine has a screen. A NAS, a dev server, a Raspberry Pi. For those, there's gitgud-headless: a single-file daemon that speaks the same protocol as the desktop app.
Setting it up
One install script puts it in your home folder and sets up a systemd service. Then init writes a config with the repositories to share.
It's careful by default. It listens only on this machine, and it's read-only until you say otherwise. Here I pass writable, and the address to listen on.
Serve starts it. It prints its certificate fingerprint, the port, and the repositories it shares.
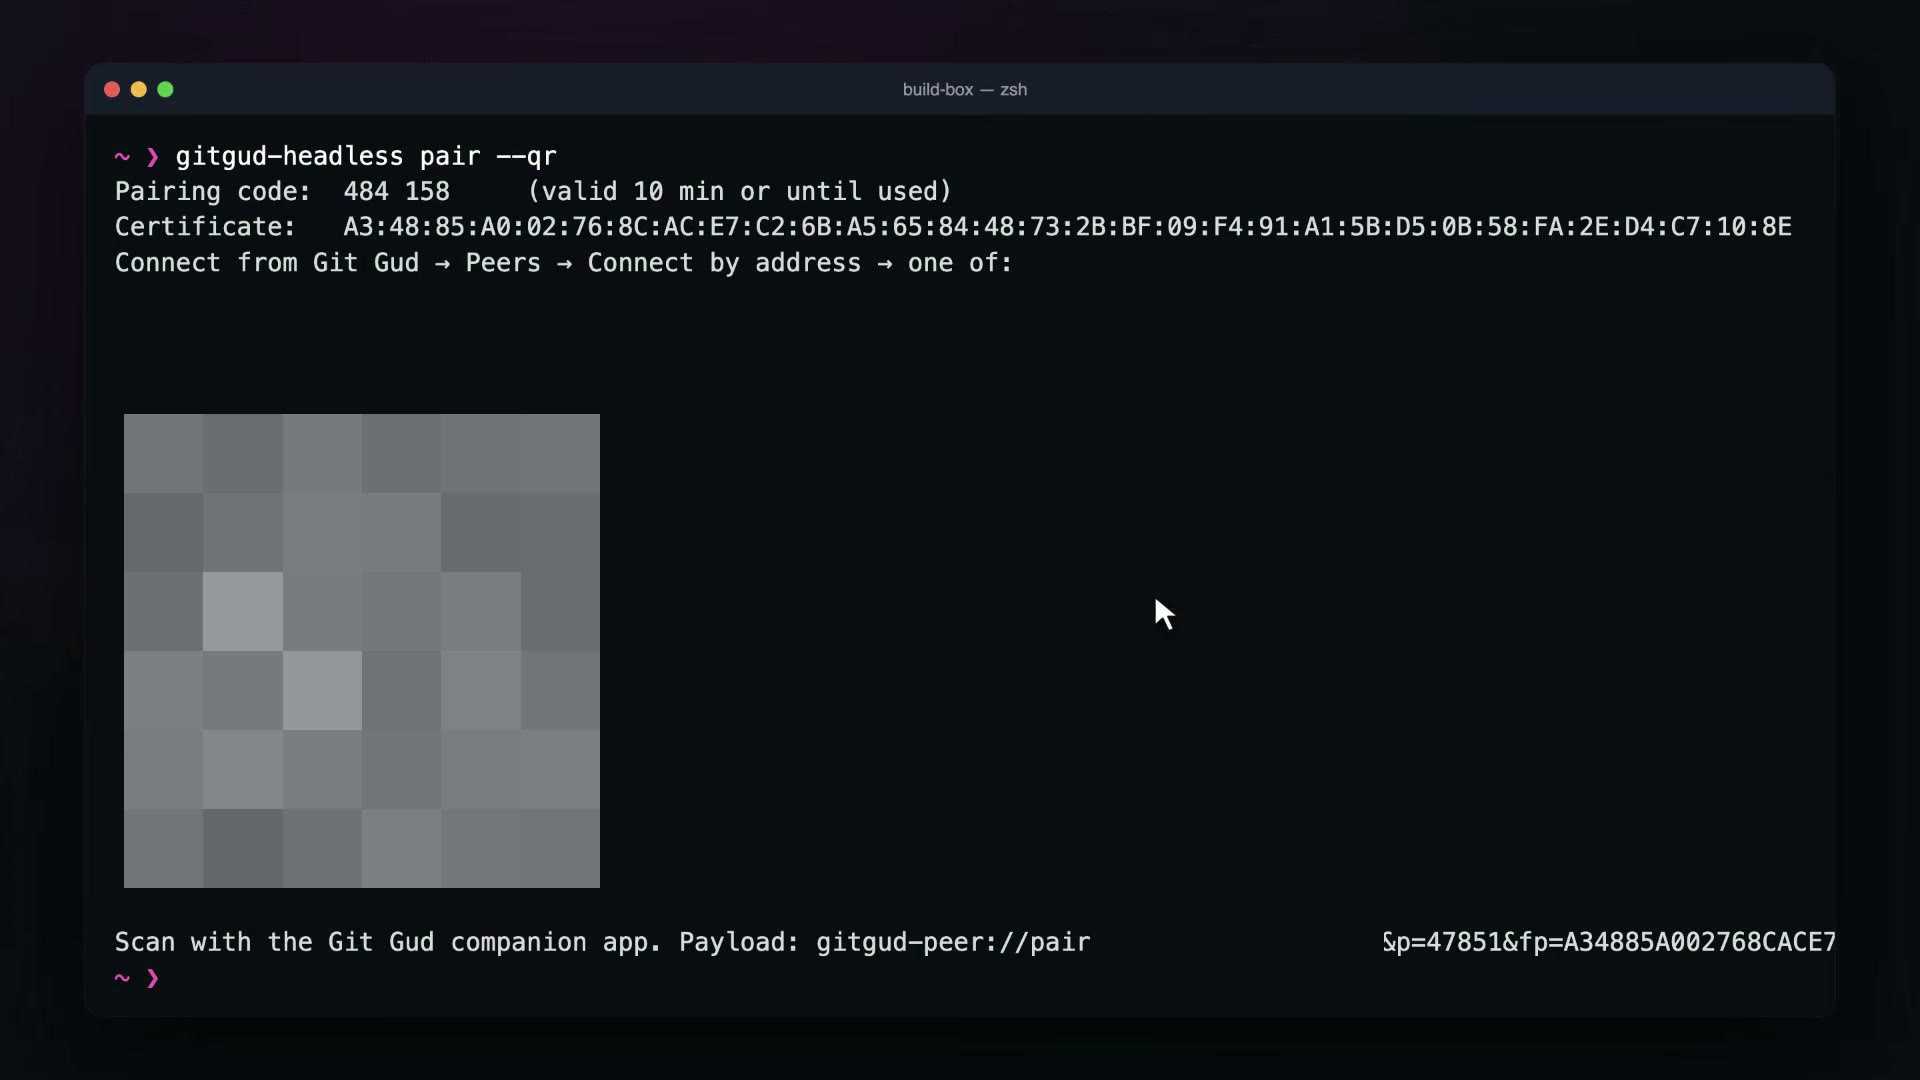
Unlike the desktop, the daemon refuses to pair until you ask. Pair opens a ten-minute window, prints a code, and with the QR flag, draws a QR code right in the terminal.
Connecting from the desktop
On the desktop, Connect to a Peer, Connect by address, and paste the pairing link.
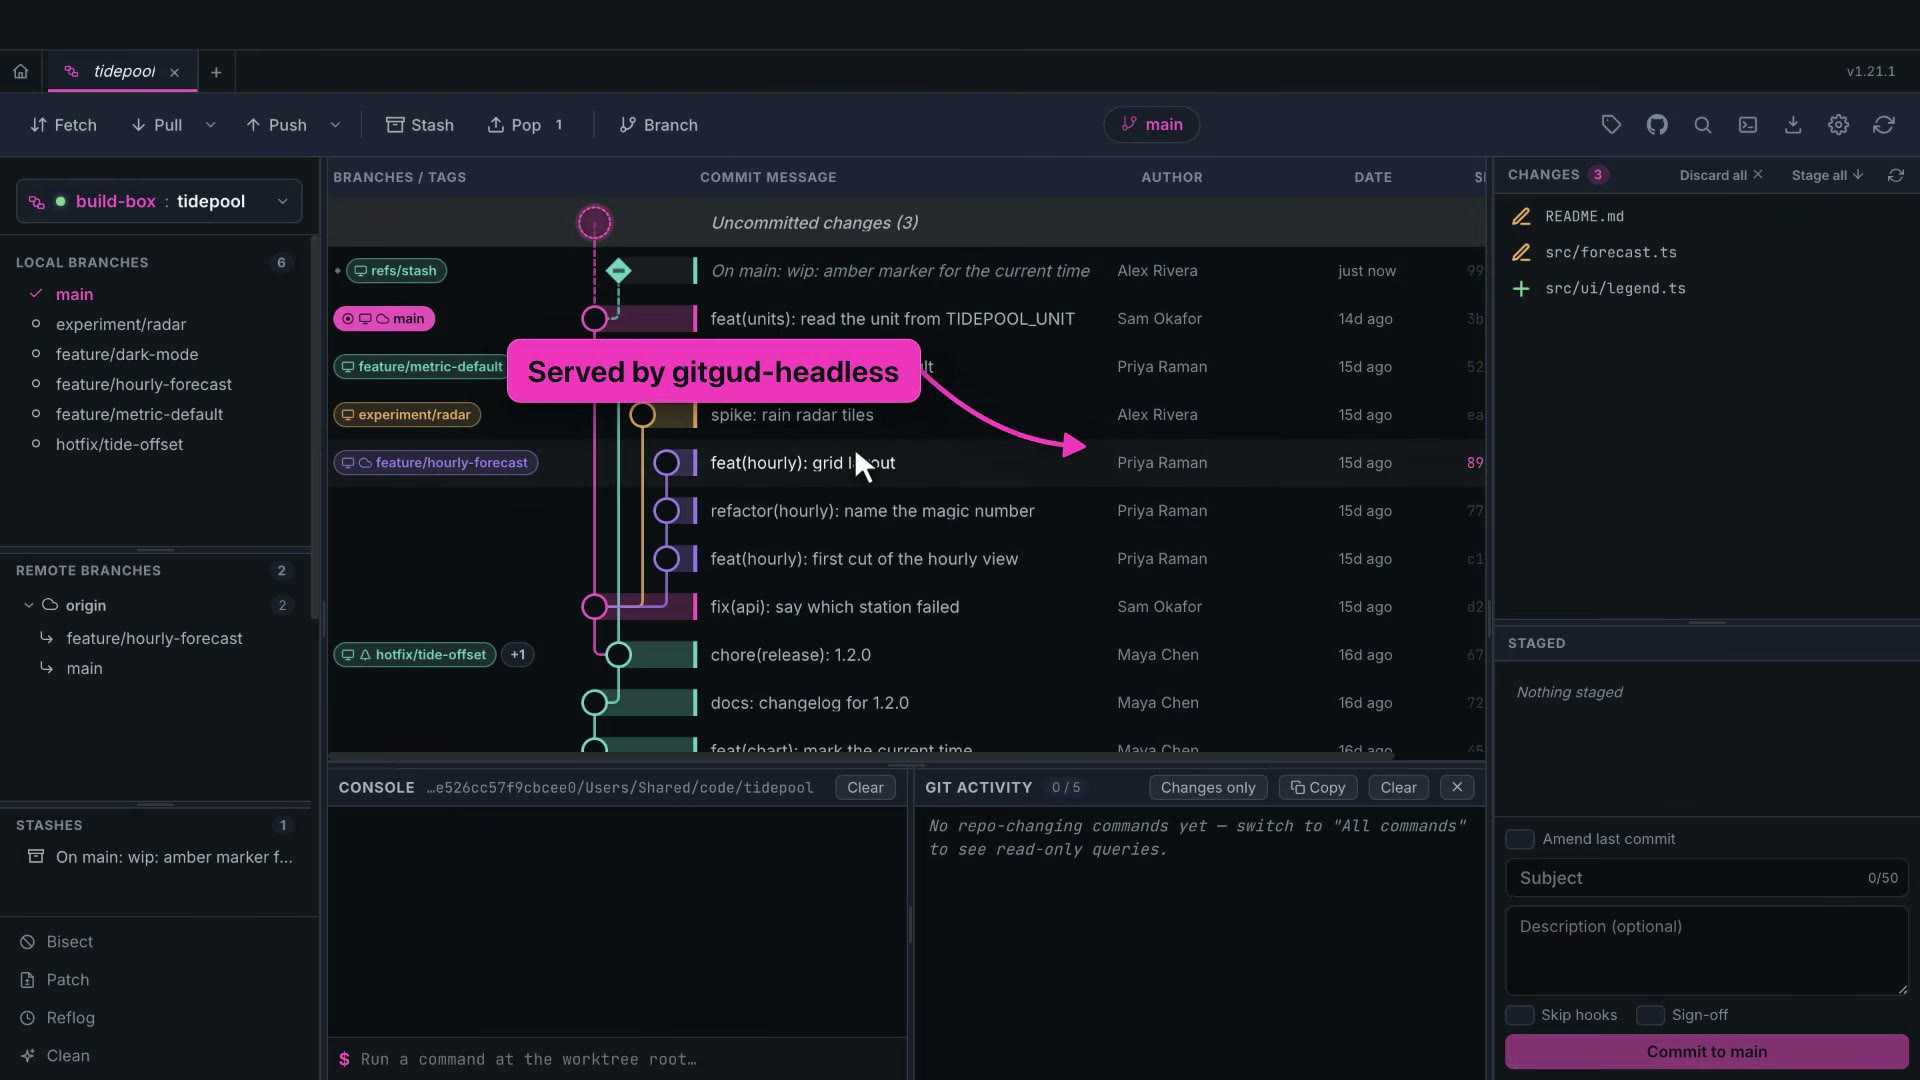
The daemon's repositories appear, and they work like any other peer.
Managing devices
Back on the server, devices lists everything that's paired.
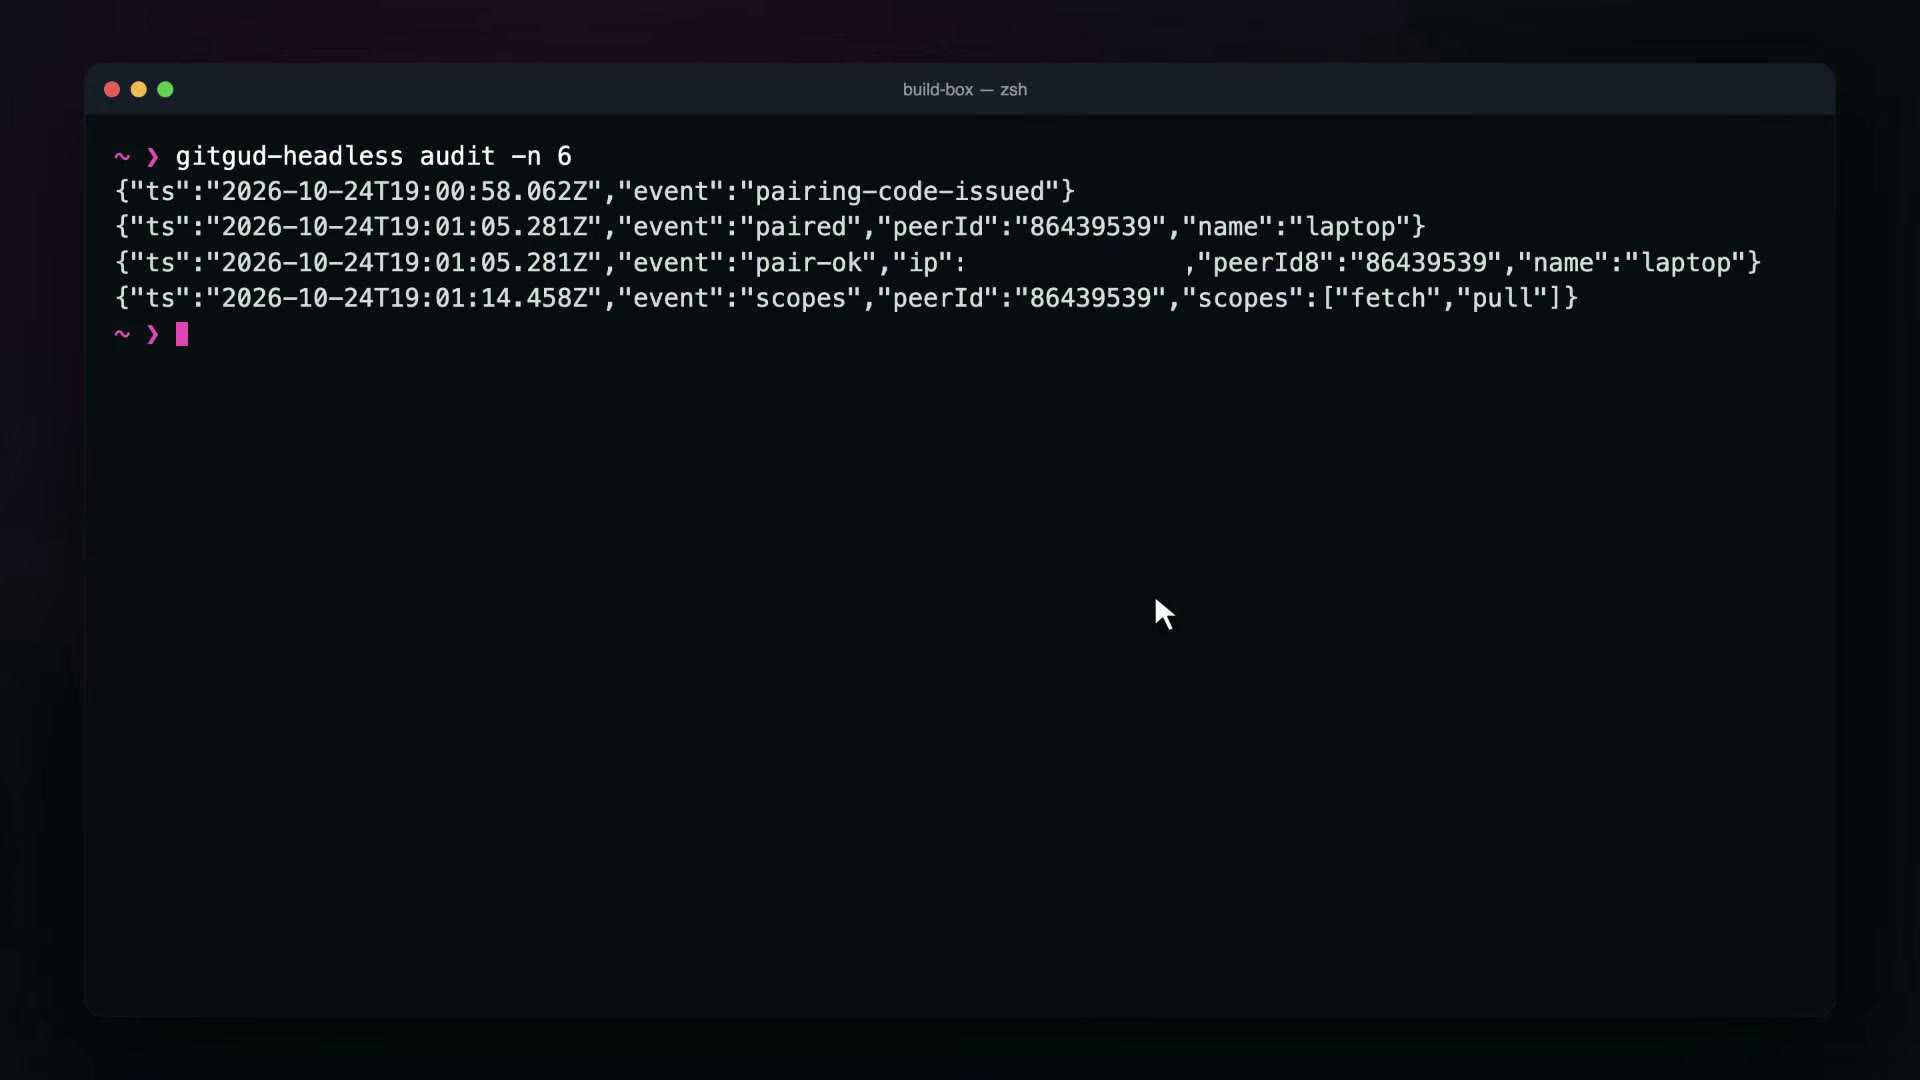
Allow gives one device a narrow set of writes, like fetch and pull, without making it fully writable. Revoke removes a device.
And audit shows a log of every pairing attempt and every git command that changed something. Update fetches a new release and checks its checksum before replacing itself.
The relay
Now the hard case: your server is at home, you're on a train, and there's no VPN. gitgud-relay is a tiny service you host anywhere public. There's a one-command deploy script for Azure.
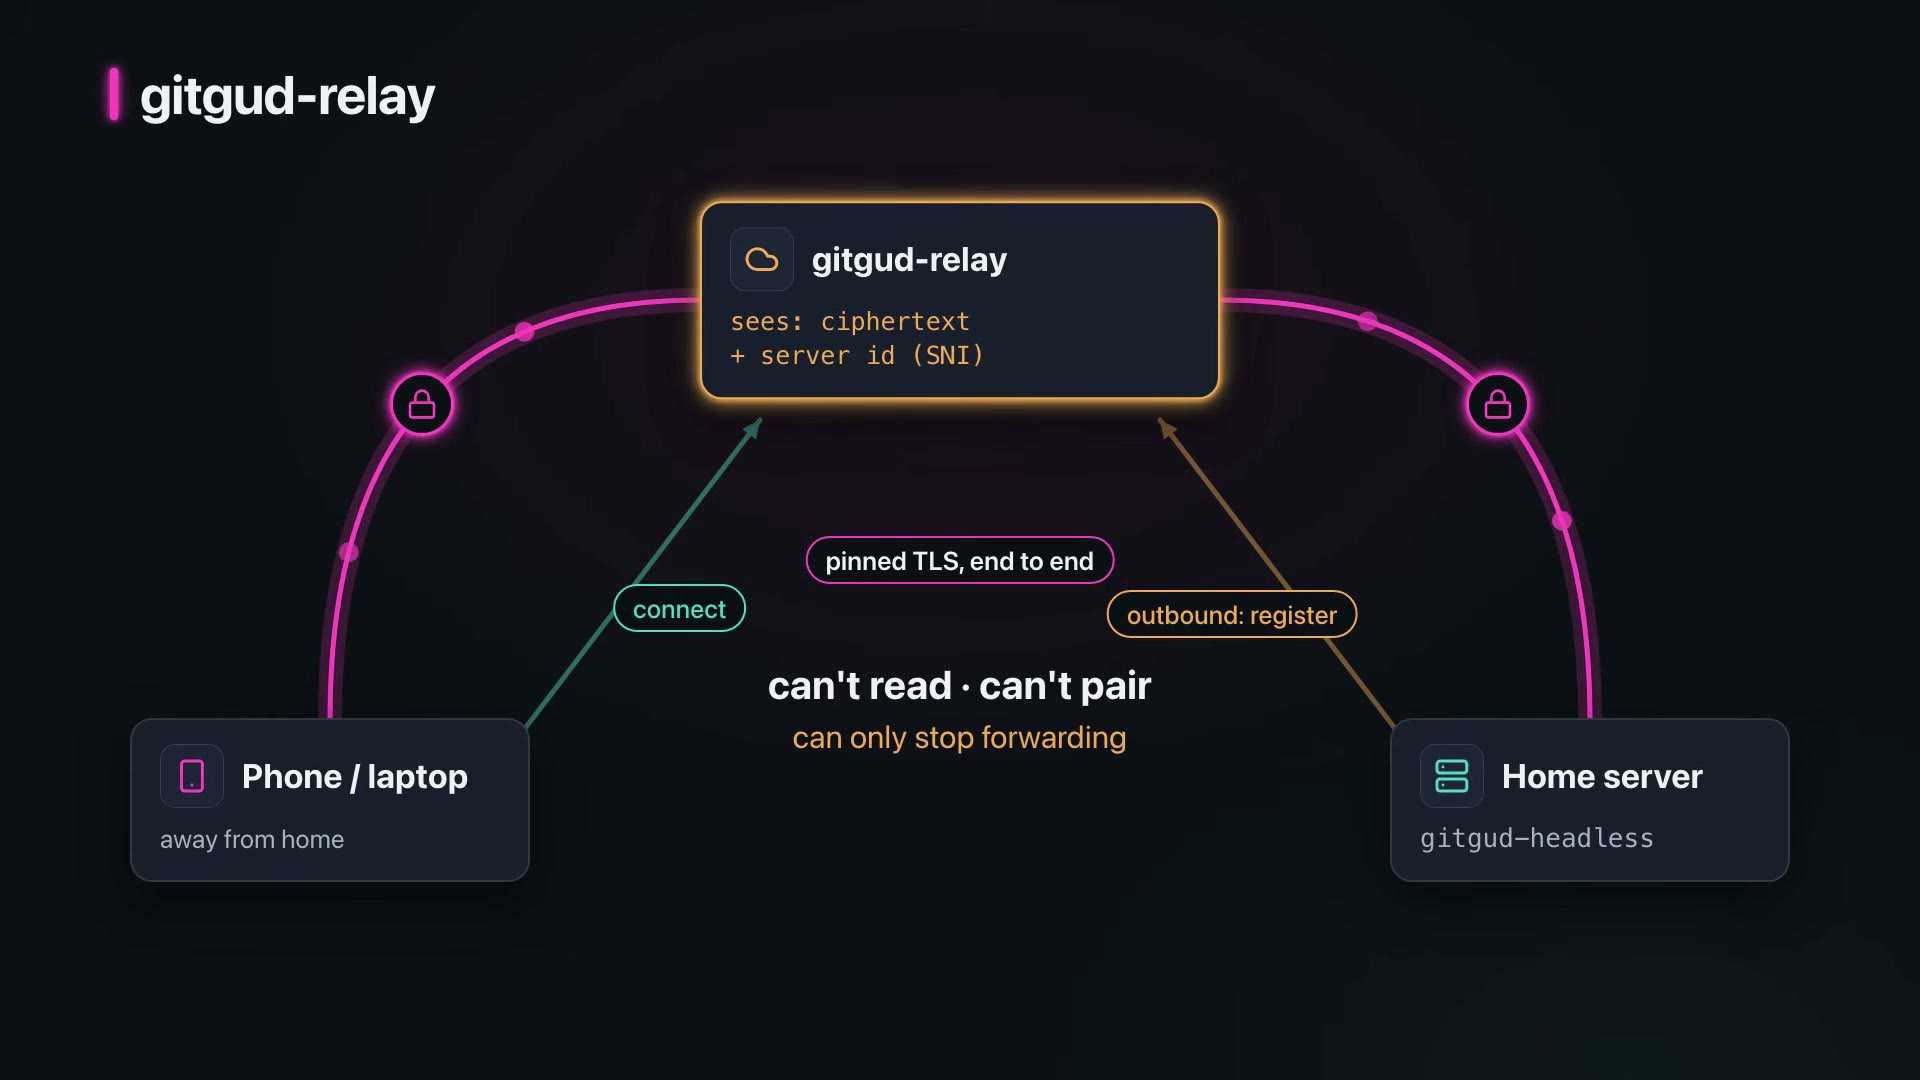
Your server keeps a connection open to the relay. When your laptop or phone wants in, the relay joins the two connections together.
The relay only ever sees encrypted bytes. The encryption runs end to end, from your device to the host, with the same pinned certificate as before. The relay picks the route by reading the server's id from the connection's opening message, and nothing more.
So a relay can't read your code, and it can't pair with your machines. At worst, it can stop passing traffic.
13. The companion app
The companion app is Git Gud for your phone, on Android and iOS. It's for looking: checking what changed, reading a diff, following along while something runs.
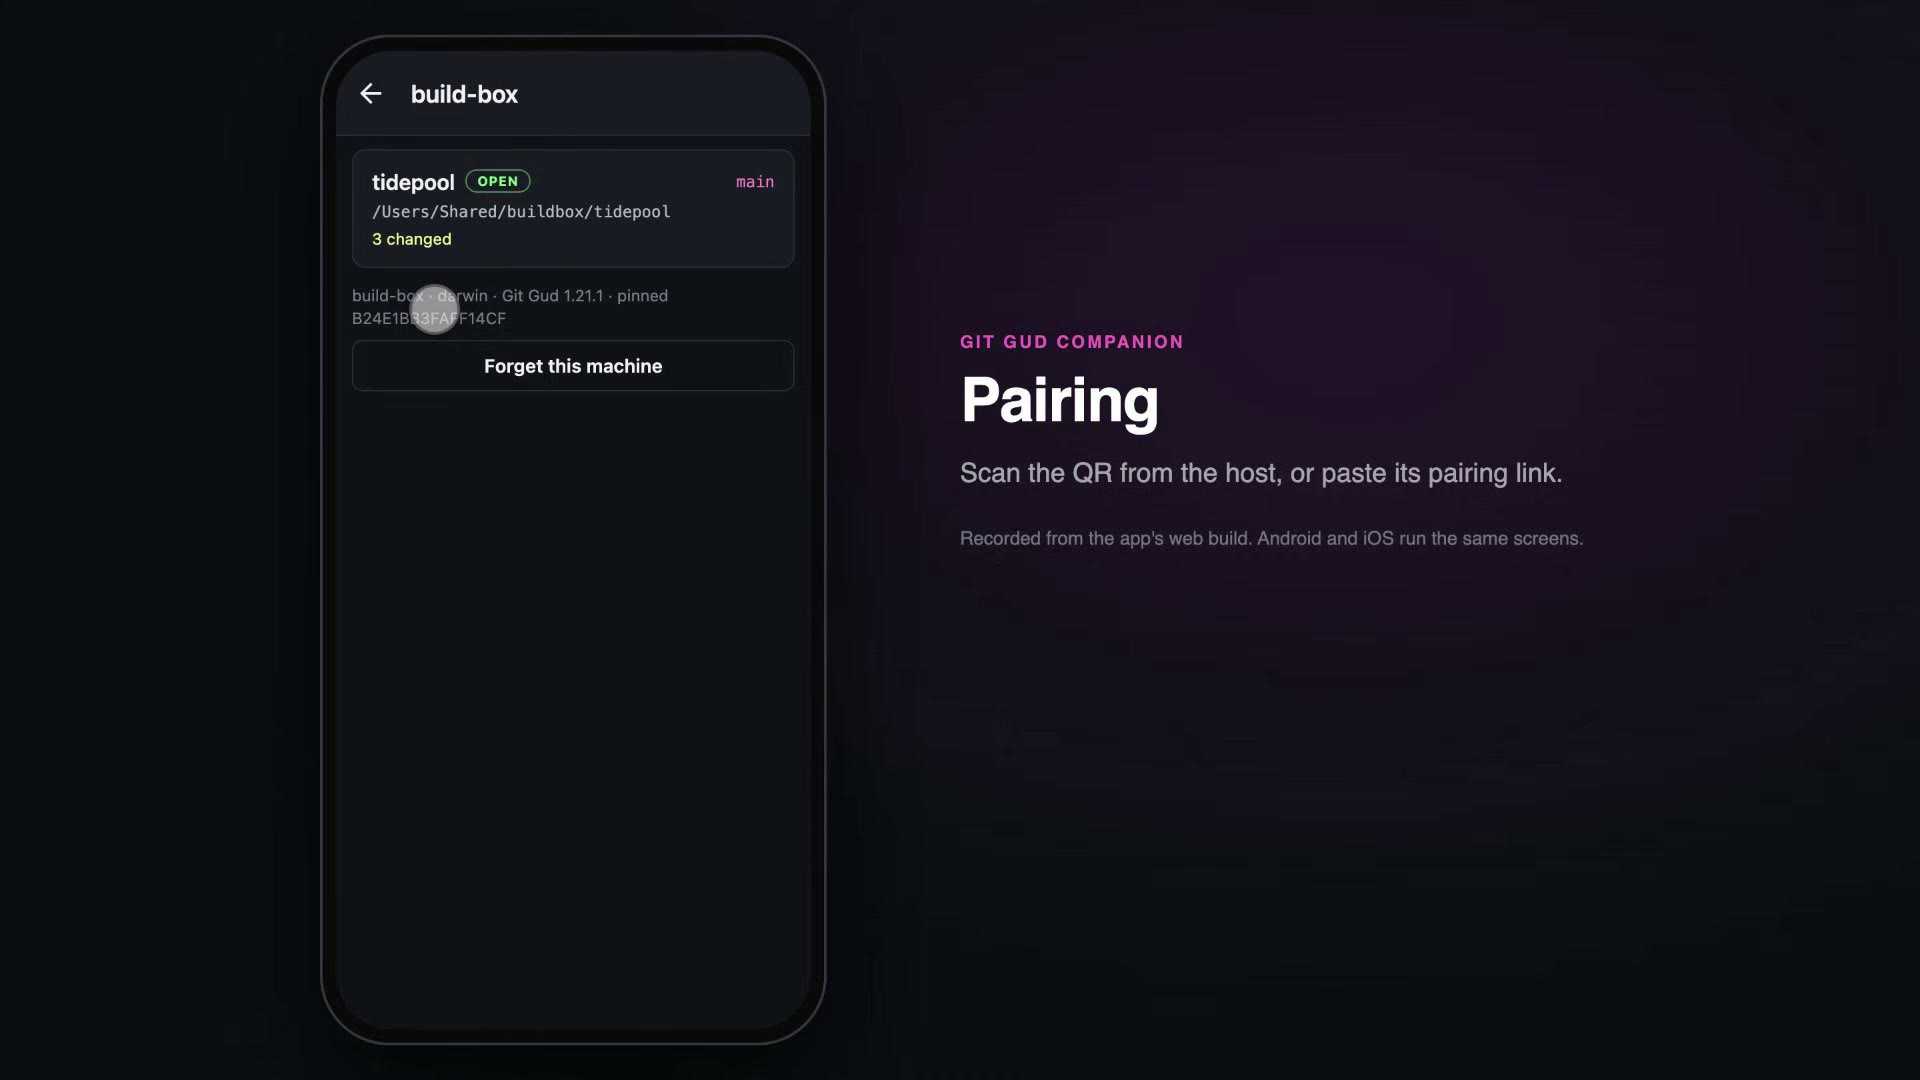
To pair it, show the QR code from the host's sharing settings, or from the daemon's pair command. The phone scans it, or you paste the link.
The QR code carries the host's address and its certificate fingerprint, so the phone pins the certificate before its very first request.
Browsing
Machines lists every paired computer and whether it's reachable right now. Tap one to see its repositories.
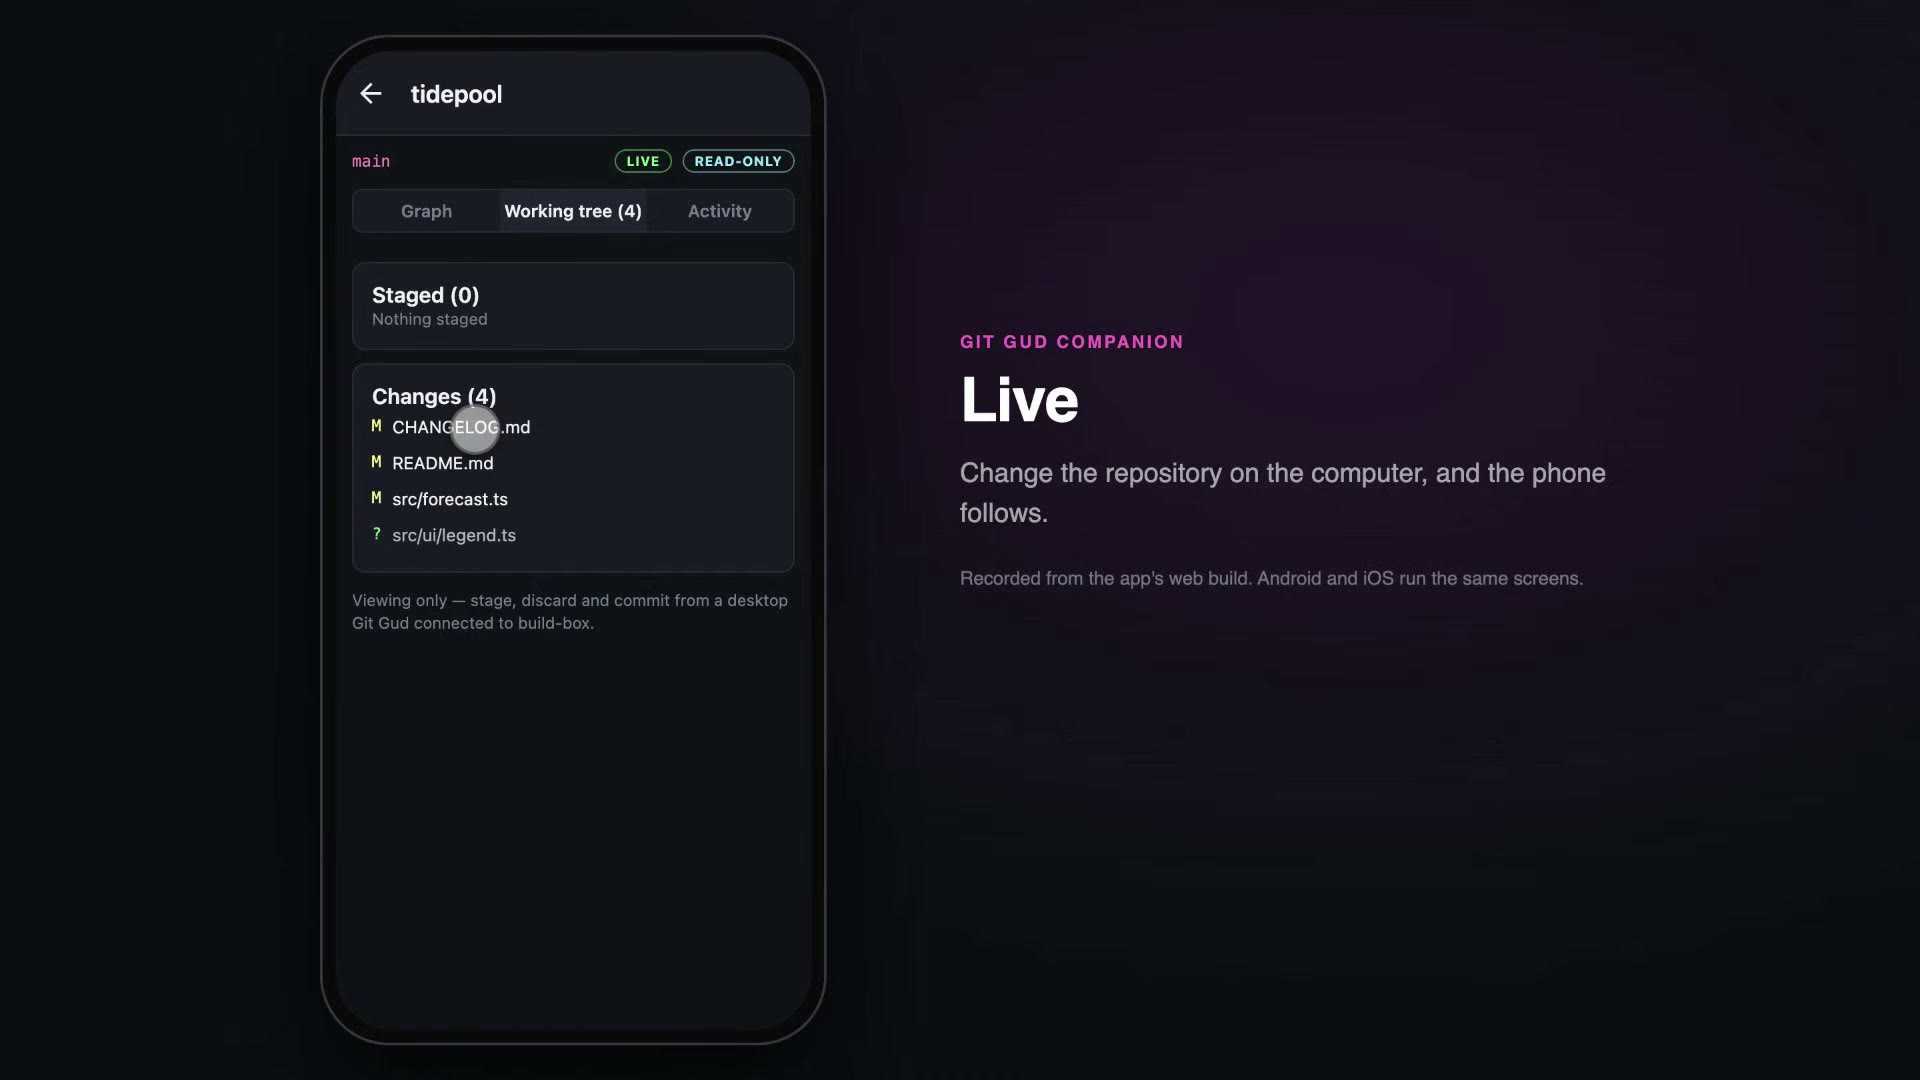
A repository opens on its graph. It's the same lane-colored graph, sized for a phone.
Tap a commit to read its message. The working tree tab shows uncommitted changes on the machine, and tapping a file shows its diff.
The activity tab shows the git commands the host is running.
It's all live. When the repository changes on the computer, the phone updates by itself.
Read-only by design
The phone is read-only. Every pairing from a phone is marked read-only on the host, and the app itself refuses to send a write before it leaves the phone.
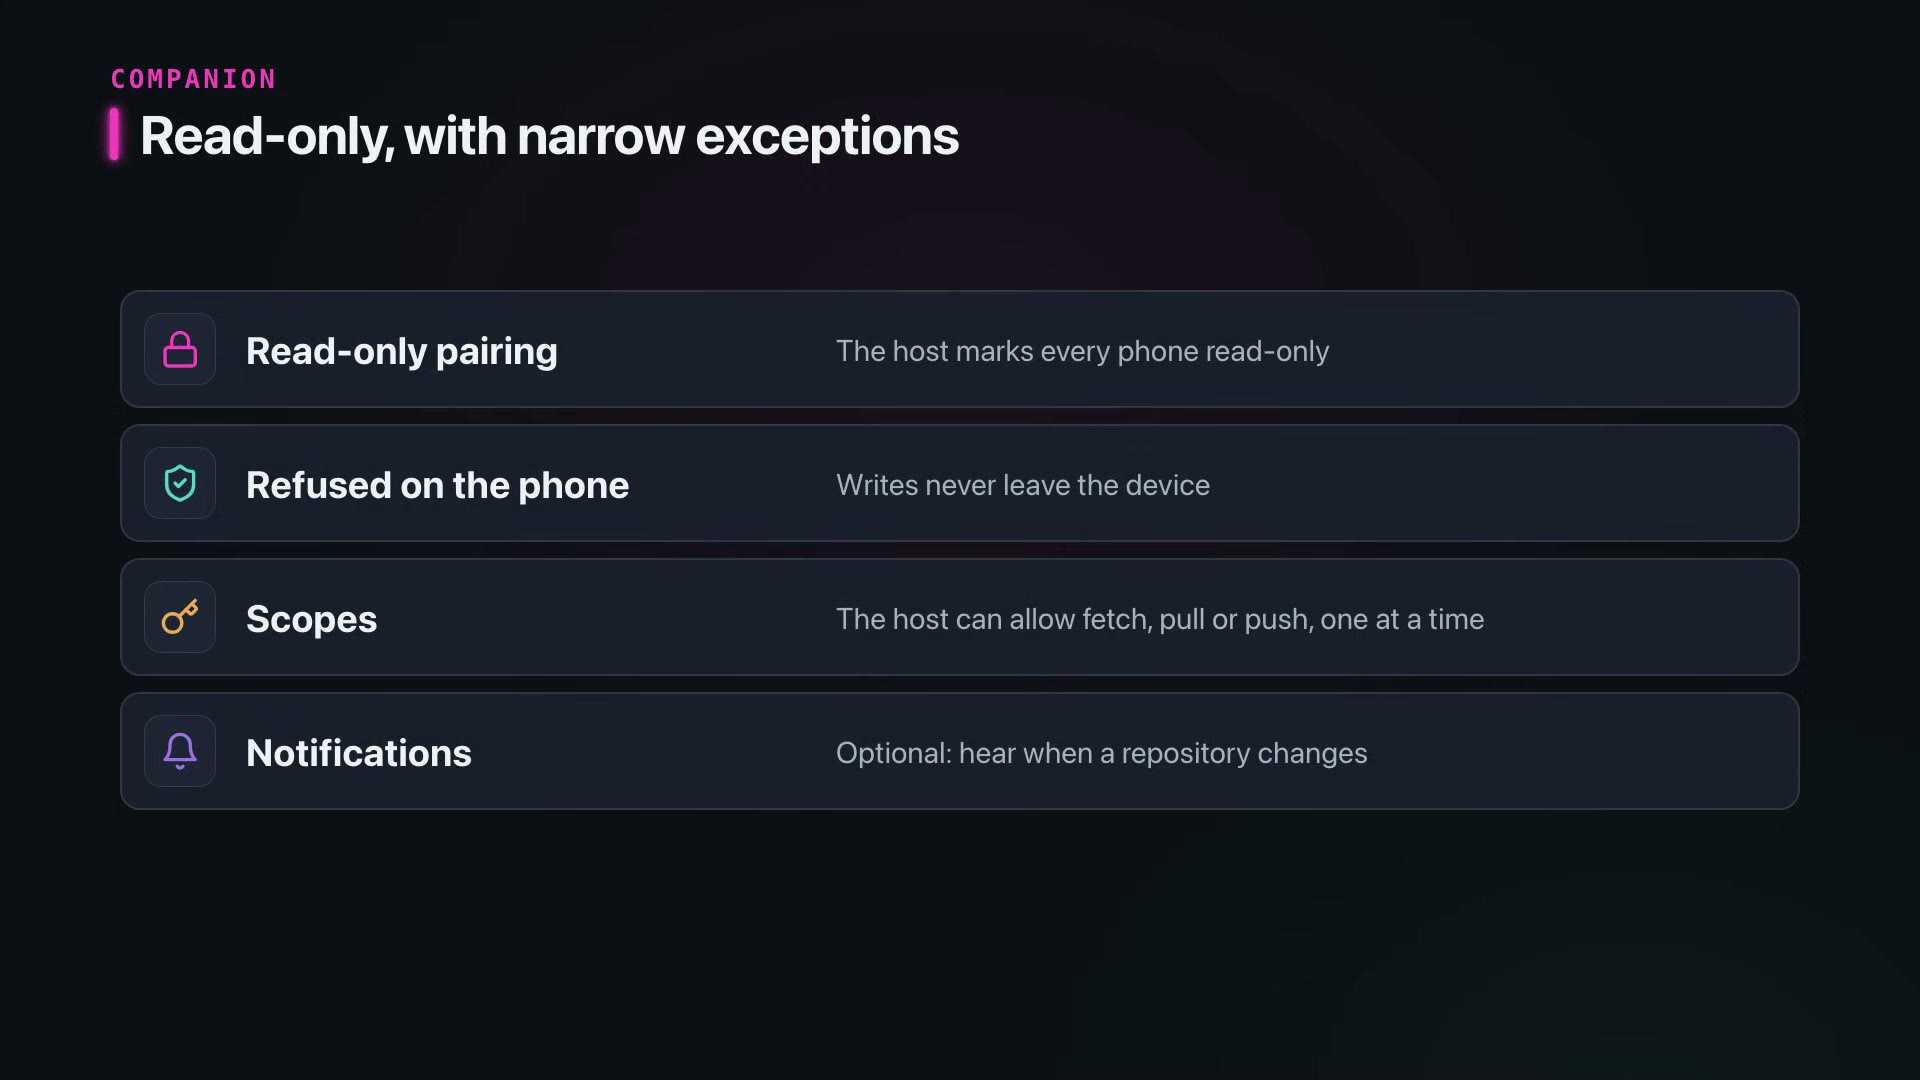
If you want a little more, the host can grant scopes. Allow fetch, and a Fetch button appears on the phone. Pulls are always fast-forward only, and pushes are never forced.
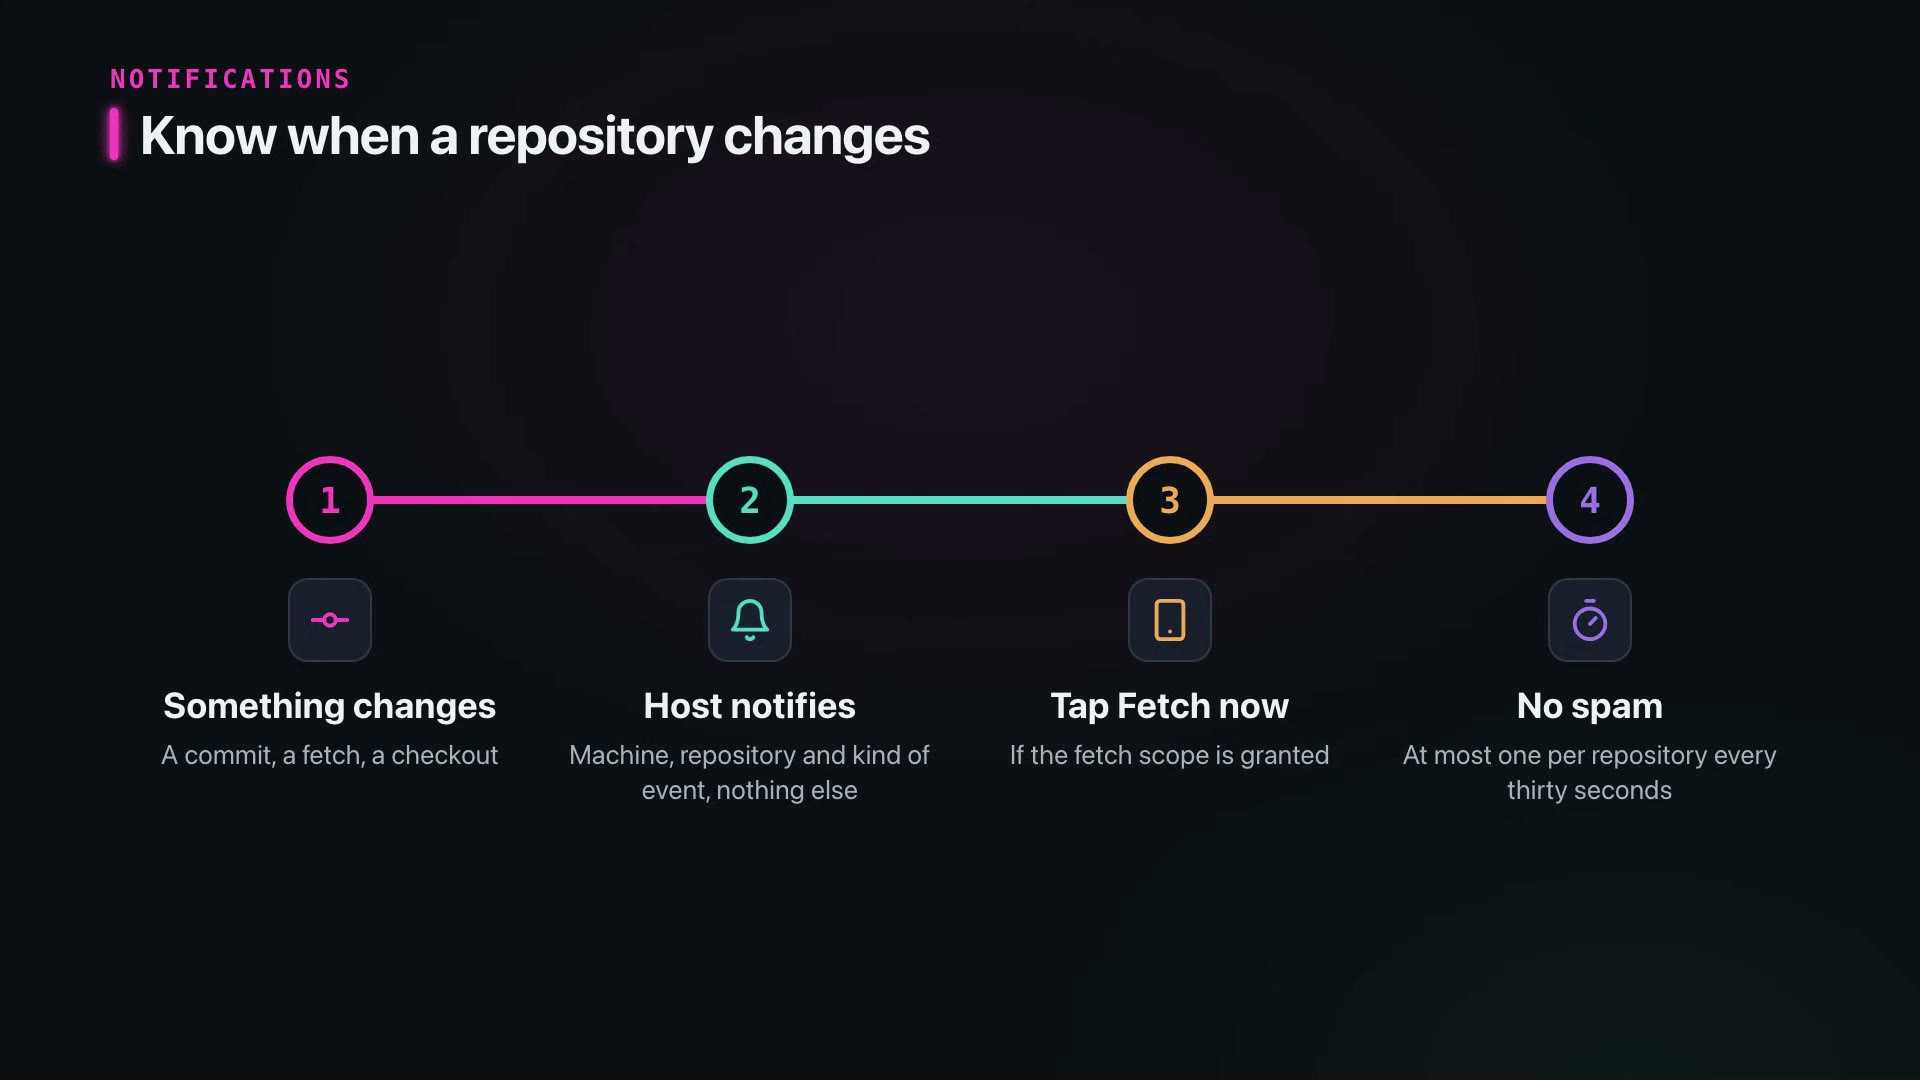
With notifications on, the host tells your phone when a repository changes. The notification has a Fetch now button when that scope is allowed. Only the machine, the repository and the kind of change are sent.
How it all fits
That's the whole family. The desktop app for your work. The daemon for machines with no screen. The relay to reach them from anywhere. And the phone to keep an eye on things.
All four speak one protocol, with certificates pinned at pairing and every git command visible.
Try it
Git Gud is open source. Get the desktop app from the latest release, browse the source, or read every feature in one list.